Creation of Monitoring Packs
A monitoring pack is a small set of configuration files, checks, templates or images grouped into a directory to perform a certain monitoring function, such as for example, checking availability or device services (Linux, Windows, Docker…), temperature of a site, brightness of a sensor, and so on.
They are designed in the form of packs to be able to group common aspects about the monitoring function they perform. This way, files related to configuration or the checks themselves can be found within the same file system. There will also be no need to search for additional information about their operation or the variables that need to be configured.
Note
There are several communities where these types of packs are evaluated and developed:
Basic Structure
It consists of a series of files grouped by directories with a well-defined function. Some of the components of a pack are optional and contribute to some extent to the monitoring functionality for which the pack is designed. This is the list of typical components of a pack:
Discover (optional): stores the scripts used in the Import Tool for discovery tasks (interfaces, SNMP version, QoS…).
Libexec (optional): stores specific checks (scripts) used in the pack. If generic checks are used, its existence is not necessary.
Pack: directory that is copied to the monitoring core for processing. It contains the list of commands, services, and templates (definition of macros). It should also contain the associated .pack file.
Templates (optional): stores the definitions of RRD templates for PnP4Nagios. If the pack does not have this directory, default templates will be used.
etc/resource.d: stores the file named nombre_de_pack.cfg with the resources of the pack. These resources are macros that have the same value for all hosts to be monitored from the same Wocu.
package.json: file containing the generic definition of the pack for use with external tools.
An example of the directory structure discussed:
networkdevice-traffic/
├── discover
│   ├── wocu-discover-community.sh
│   ├── wocu-discover-ifaces.py
│   ├── wocu-discover-snmpversion.py
│   └── wocu-discover-vendor.py
├── libexec
│   ├── wocu_check.py
│   └── wocu-check-traffic.py
├── pack
│   ├── commands.cfg
│   ├── networkdevice-traffic.pack
│   ├── services
│   │   └── traffic.cfg
│   └── templates.cfg
├── package.json
├── templates
│   └── pnp
│          └── wocu-check-traffic.php
└── etc
    └── resource.d
            └── networkdevice-traffic.cfg
Next, the directories and files of the previous structure (specific to the pack networkdevice-traffic) will be discussed in detail. It is worth noting that the scripts for checks and discovery must also follow a set of rules for their operation to be as desired (correct return of execution value and perfdata).
File package.json
JSON file used for pack versioning, providing relevant information such as author, version, and license, as well as known dependencies for its application.
Another point to highlight is that it allows tagging this pack to perform operations with a pack viewer/editor. This file is mandatory for all packs created.
Example of the definition file package.json:
  {
  "name": "dns",
  "types": ["pack"],
  "version": "0.1",
  "homepage": "http://a3sec.com/monitorizacion/",
  "author": "A3Sec",
"description": "Dnslookup search to obtain the IP address for the given host/domain query.",
  "keywords": [
    "pack",
    "linux",
    "dns"
  ],
  "dependencies": {
    "shinken": ">=2.0.3"
  },
  "license": "AGPL"
  }
Directory “discover”
In this directory, different scripts will be stored to perform discovery operations launched from the packs in the Configuration Module.
It is important to note that autodiscovery scripts are used to automatically and properly configure the value of a specific macro for a device (such as type, SNMP version, etc.). Each discovery script will return output in JSON format (an array of dictionaries). The structure of this JSON will vary depending on the type of macro to be completed.
Examples:
For a string-type macro (for example, _DEVICEVENDOR), the JSON that a script must return will have the following format, an array with a dictionary to complete the macro
[
    {
        ‘vendor’: ‘Cisco’
    }
]
Note that the name used in the JSON (vendor) does not match the name of the macro (_DEVICEVENDOR). This is not necessary; the name used in the JSON will be the name displayed in the configuration interface.
For multi-valued macros of type table (for example, _IFACES), the JSON that a script must return will have the following format, an array of dictionaries:
[
{
            "admin status": "up",
        "index": "1",
            "max speed in": 0,
        "max speed out": 0,
        "name": "ATM0",
        "oper status": "up",
            "speed": "1MB",
        "type": "adsl",
        "units": "m"
    },
    {
        "admin status": "down",
        "index": "2",
        "max speed in": 0,
        "max speed out": 0,
        "name": "Ethernet0",
        "oper status": "down",
        "speed": "1MB",
        "type": "ethernetCsmacd",
        "units": "m"
    }
]
The keys of each dictionary represent the columns that will be displayed in the Configuration Module.
Currently, several discovery scripts have been developed with various functions, including:
SNMP version discovery
SNMP community discovery
Vendor discovery on hosts
QoS discovery
Network interface discovery
WiFi Access Point discovery
Process discovery
Partition discovery
High Availability (HA) state discovery in clusters
Directory “libexec”
In this path/directory, the monitoring scripts themselves are stored, files written in a programming language (bash, python, perl…) or compiled and ready to be executed without the need for an interpreter.
These scripts are responsible for performing the different checks launched from the pack’s command file (commands.cfg). There is no numerical limit to the number of scripts that can be stored here; the limitation lies in that when defining a command (in the command.cfg file), it must exist in the paths of the checks or within this directory.
Similarly to what was previously mentioned in the section on discovery scripts, the syntax or language used to construct each script is not a problem, but in their behavior, they must all behave in the same way. That is, handling and returning a defined set of output/state values.
They are as follows:
The return value of the script |
Status |
|---|---|
0 |
OK |
1 |
WARNING |
2 |
CRITICAL |
3 |
UNKNOWN |
In addition to the output value, each of the scripts can optionally return a string of text containing a set of measurable values to be processed later. For example, this could involve their insertion into RRD or InfluxDB databases, which are used for graphing purposes.
In such a string, values such as load, CPU usage, ping response time, device temperature, etc., can be included.
At a minimum, any check should return a text string in a human-readable format that indicates the state of the data we are interested in measuring. For example, the ping check check_ping returns a string like this:
PING ok - Packet loss = 0%, RTA = 0.80 ms
If we want to add additional information (perfdata) for post-processing, it should go after the previous string separated by a pipe “|” character, specifying the names of the performance metrics we wish to measure (percent_packet_loss and rta in the example):
PING ok - Packet loss = 0%, RTA = 0.80 ms | percent_packet_loss=0 rta=0.80
Note
See additional information about perfdata (Nagios) See additional information about plugins (Shinken)
Plugins
There is a manufacturer summary (Shinken) on all aspects of plugin development. They can be found at the following link.
Additionally, a multitude of checks and scripts that could be adapted as packs can be found in official or unofficial locations:
Directory pack
This directory is necessary in all WOCU-Monitoring packs. It contains the definition of the pack itself, as well as templates (for devices and services). Also, the definition of services and the commands associated with them.
Special care must be taken to complete this part correctly, as any syntax error in these files causes an error output from the monitoring engine (when performing WOCU-Check). If the application stops, it cannot be restarted until these syntax issues are corrected.
The components of this directory are described below:
File “commands.cfg”
File in which the command name equivalences are defined for use in the pack, with the actual script being called. Multiple definitions can be included.
Within this file, extensive use is made of the various macros defined for the device or service.
A command is defined with the following structure:
# Wocu CPU load wrapper
define command {
command_line $PLUGINSDIR$/wocu-check-cpu.py -H $HOSTADDRESS$ -C $_HOSTSNMPCOMMUNITY$ -V $_HOSTDEVICEVENDOR$ -s $_HOSTSNMPVERSION$ -w $_HOSTCPU_WARNING_THRESHOLD$ -c $_HOSTCPU_CRITICAL_THRESHOLD$
command_name    wocu-check-cpu
}
As can be seen, on one hand, the name of the command (command_name) must be defined, and on the other hand, the call to the actual script in the file system (command_line). All types of macros are also passed, both standard ones (ADDRESS) and user-defined ones (_SNMPVERSION).
To use any type of macro, it is mandatory to enclose them between dollar symbols ($). To use the macros for “Host”, it is necessary to prefix the macro name with a prefix (HOST):
Standard:
$HOSTADDRESS$User-defined:
$_HOSTSNMPVERSION$
For service macros, the syntax is similar, but prefixing the macro name with SERVICE for whichever type it may be.
File “templates.cfg”
File where devices and services associated with the pack are defined. This will be the name associated with each device when specifying this pack within the Configuration Module.
Within these definitions, the possible user-defined macros are included for the device (remember they start with an underscore), as well as the customized value of the device or service attributes.
You can find a detailed list of attributes for both in these links:
Note
It is very important that in the definition of services and hosts, both include the part register 0, so that this definition is generic and not applied to a specific host. If this option is not added in both definitions, the assignment of the host and services to the configured host in question will not work correctly.
Example:
define host{
name           ssh
_SSHPORT       22
register       0
}
define service{
name                 ssh-service
use                  generic-service
check_interval       10
retry_interval       2
max_check_attempts   2
register             0
}
Recommendation
The service defined here is mainly used to provide default time values for the pack, that is, how often it is performed, how often it is retried, and the number of times it is retried. The specific part can be overwritten within the files in the services directory.
File “discovery.cfg”
File used for autodiscovery operation in Shinken (discovery.cfg). These are rules for completing the information of a device by adding new services based on discovery rules.
These rules can be defined under certain criteria, such as: open ports, devices in the UP state, etc.
A possible example for the HTTP pack:
define discoveryrule {
    discoveryrule_name   Http
    creation_type        host
    openports            ^80$
    +use                 http
}
Mire information at: simple discovery or advanced.
Important
This part will become optional in the new version and will have to be activated as a module.
File “services.cfg”
Files for the definition of the most specific services of the pack, which will be directly associated with the device we are configuring in the Configuration Module.
They can all be defined within a single file, but by convention, a file is created for each of the services to be assigned. This way, applying a single pack can add multiple checks to the device. For example, applying the linux-ssh pack will add CPU, Memory, Load, Disks, Files checks within its services directory. Each of these will have a service definition in this directory with the corresponding name: cpu.cfg, memory.cfg…
Below are two examples of the previously mentioned pack:
define service{
service_description  CPU Stats
use                  linux-ssh-service
host_name            linux-ssh
check_command        check_ssh_linux_cpu_stats
register             0
}
define service{
service_description Memory
use                 linux-ssh-service
host_name           linux-ssh
check_command       check_ssh_linux_memory
register            0
}
As mentioned previously, it is necessary to include the register 0 option in the definition of the services.
In the service_description option, the name of the service displayed in various monitoring consoles will be set. It is important that the value of service_description is unique for each service and pack, as this will prevent errors of duplicate services and RRD graphs (since this field is used for the construction of both elements).
In the use option, you must specify the generic service created within the templates.cfg file, and in the host_name option, the generic device from the same file.
The value of check_command will be that of a command defined within the commands.cfg file to which we will refer, being able to pass parameters (in the format of VALUE_N) as shown below.
A particular case of services is when it comes to iterating over a list type macro. In these cases, it is desirable to create a service for each value we have in that list. For example, monitoring the traffic of all interfaces in this list or monitoring the service classes of network devices. For this, a special construction is used in which iteration is performed over a macro of this type: duplicate foreach.
Let’s recall the default value of the macro:
_QOS_CLASSES dummy$(Example_Class)$
And an example already configured:
_QOS_CLASSES B_IN$(ClaseBronce_i)$,B_OUT$(Clase_Bronce_o)$

define service {
    service_description     QOS_$KEY$
    use                     generic-service
    host_name               qos-cisco
    check_command           check_qos_cisco!$VALUE1$
    duplicate_foreach       _QOS_CLASSES
    register                0
}
This way, a new service will be created for each value of the list-type macro. The primary key ($KEY) of the macro (e.g., B_IN and B_OUT) is used, and the first value of the list of values that the macro has is passed as a parameter to the command (previously defined in the commands.cfg file), in this case: Clase_Bronce_i and Clase_Bronce_o.
As it is a generic service, it must also have the register 0 option.
File .pack
This is one of the most important files in the entire pack. It is also a JSON file that describes the entire pack. It provides us with the pack’s name, as well as its installation path.
It allows the definition of custom hashes so they can be used in the Import Tool configuration management tool. A clear example of this is the definition of a “cost” associated with each pack, whose use must be captured and managed in the Configuration Module.
Additionally, all macros that will be used in the pack need to be configured, indicating their type and providing a brief description of their usage. To do this, a hash must be defined in which the macro name is related to 2 values:
Description: A text string explaining its function.
Type: Defined type of the macro. Allowed values:
string
integer
percent
table
3 comma-separated integer
6 comma-separated integer
doublepercent
float
floatpercent
ip_address_v4
Additionally, for each macro, these optional fields can be defined:
Protected: to mask passwords, etc., in the Configuration Module.
It can take the values true or false.”
Choices: to display a dropdown with options. They are indicated following this format:
"choices": ["ip", "hostname"]Required: to indicate that it is a mandatory macro. The Configuration Module will not allow saving changes if this macro is not filled in.
Unique: to check that there are no multiple macros with the same value as this one. It can take the values “1” or “0”.
Example of a .pack file:
{
"name":"qos-cisco",
"description":"This plugin checks for the QOS status configured on Cisco routers",
"path":"qos-cisco/",
"cost":"5",
"macros":{
        "_SNMPCOMMUNITY": {
        "description": "SNMP community to use in the check",
        "type": "string"
        },
        "_QOS_WARNING_THRESHOLD": {
        "description": "QOS warning limits",
        "type": "string"
        },
        "_QOS_CRITICAL_THRESHOLD": {
        "description": "QOS critical limits",
        "type": "string"
        },

"_QOS_CLASSES": {
            "description": "QOS classes(cisco)",
            "type": "table",
            "table_fields": [{
                "Display Name": {
                    "help": "Name appearing in the service: QOS_<Display Name>",
                    "type": "str"
                }},
                {"QOS Name": {
                    "help": "QOS snmp class name (configured on remote device)",
                    "type": "str"
                }}
            ],
        "discover_script": "wocu-discover-qos.py -H $HOSTADDRESS$ -C $_SNMPCOMMUNITY$"
        }
        }
}
Macros defined with simple values such as integer, string or percent accept a single value that will later be properly presented in the Configuration Module.
However, macros of type table, represented as table, can contain an indefinite number of fields, which will later be represented as columns. To handle these fields, an array with their values is defined, maintaining the same JSON-like structure. In it, each field will be defined with its type and an additional field to show help to the user through a blue icon.
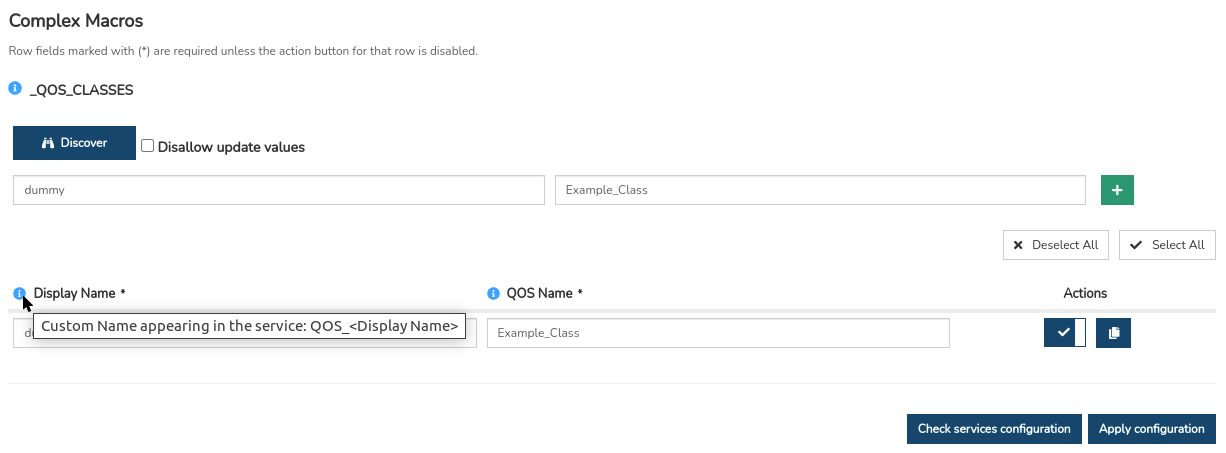
To define a discovery script associated with a macro (of any type, table or value), it must be done within the definition section of that macro, using the key discover-script and as the value the full path of the script with the required parameters.
{
    "name": "networkdevice-cpu",
    "description": "Network device cpu checks",
    "path": "networkdevice-cpu",
    "cost": "4",
    "macros": {
        [...]
        "_SNMPVERSION": {
            "type": "string",
            "description": "Device SNMP versions supported are: 1 and 2c",
    "discover_script": "wocu-discover-snmpversion.py -H $HOSTADDRESS$ -C $_SNMPCOMMUNITY$"
        },
        "_DEVICEVENDOR": {
            "type": "string",
            "description": "Device vendor",
    "discover_script": "wocu-discover-vendor.py -H $HOSTADDRESS$ -C $_SNMPCOMMUNITY$"
        },
        [...]
List of macros in the definition file (templates.cfg):
define host {
    name                     qos-cisco
    use                      generic-host
    _SNMPCOMMUNITY           $SNMPCOMMUNITYREAD$
    _QOS_CLASSES             dummy$(Example_Class)$
    _QOS_WARNING_THRESHOLD   10
    _QOS_CRITICAL_THRESHOLD  20
    register                 0
}
As you can see in the example .pack file, it is necessary to define the following entries:
Name: nombre del pack.
Description: Brief description of the pack’s functionality.
Path: Relative path where it will be installed (by default, same as name).
Macros: List of macros defined in the templates file (templates.cfg).
Additionally, custom fields can be created in keys, for example, the cost:
[...]
"cost": "3",
Directory “templates”
In this directory, templates associated with the script files hosted within the path <packname>/libexec/ (see the previous chapter on this topic) are stored (within the pnp/ path).
Template files (.php)
They are used to modify the visualization of the values stored within the RRD graph databases on the monitoring consoles.
This functionality is provided by PnP4Nagios. It comes with a multitude of default templates for most common checks (e.g., nagiosplugins).
All service checks that do not have a corresponding template will not be able to correctly display the values stored in the RRD databases.
The syntax chosen by PnP4Nagios for representing the data is through PHP-written files.
You can find examples of templates associated with checks and the syntax used at the following links:
Directory “etc/resource.d”
In this directory, the configuration file with the resources to be used in the pack is saved.
To avoid having to configure the same macros and values on all devices of the same WOCU-Monitoring that use the same pack, you can define these macros as resources in the file /etc/resource.d/nombre_del_pack.cfg.
When deploying the pack on different WOCU-Monitoring instances, the .cfg file will be copied to the appropriate Shinken path so that the macros are available.
Example:
In the log-occurrences pack, the file etc/resource.d/log-occurrences.cfg has been defined with the following content:
$ELASTICSEARCH_CLUSTER_IP$="127.0.0.1"
$ELASTICSEARCH_CLUSTER_PORT$=9200
Once the pack is deployed, you should edit the log-occurrences.cfg file to configure the correct IP and port for ElasticSearch for the specific case.
Changing the check interval in packs
In packs, a generic service is defined, usually with the pack name followed by the suffix -service, where the default values of the check intervals are specified. However, more specifically, you can change the behavior of any of the services defined within the services directory.
Example of defining a device and service in the templates.cf file of the SSH pack:
define host{
name           ssh
_SSHPORT       22
register       0
}
define service{
name                 ssh-service
use                  generic-service
check_interval       10
retry_interval       2
max_check_attempts   2
register             0
}
Example with the SSH pack, defining the timings of a service in the services/custom_ssh.cfg file:
define custom_ssh_service{
host_name            ssh
use                  ssh-service
check_interval       5
retry_interval       1
max_check_attempts   2
register             0
}
Installation and distribution
For installation, you would need to place the root directory of the pack within the monitoring core’s structure, specifically within the directory intended for packs: packs_wocu.
To verify if the syntax used in the pack is correct, you can perform a check through the command line.
wocu-check
However, to verify the functionality, you need to enable the pack and test its operation against a real device.
In the WOCU-Monitoring logs, you can observe if there are syntax errors or inconsistencies between the templates.cfg file and the .pack file.
The distribution part is handled through the configuration distribution tool Salt, which is responsible for keeping the most updated version of the plugins.
networkdevice-traffic/
├── discover
│   ├── wocu-discover-community.sh
│   ├── wocu-discover-ifaces.py
│   ├── wocu-discover-snmpversion.py
│   └── wocu-discover-vendor.py
├── libexec
│   ├── wocu_check.py
│   └── wocu-check-traffic.py
├── pack
│   ├── commands.cfg
│   ├── networkdevice-traffic.pack
│   ├── services
│   │   └── traffic.cfg
│   └── templates.cfg
├── package.json
├── templates
│   └── pnp
│          └── wocu-check-traffic.php
└── etc
    └── resource.d
            └── networkdevice-traffic.cfg
This is one of the most important files. It’s also a JSON file that describes the entire pack. It specifies the pack’s name as well as the installation path.
linux-nrpe/
├── commands.cfg
├── linux-nrpe.pack
├── linux.png
├── services
│   ├── disks.cfg
│   ├── load.cfg
│   ├── procs.cfg
│   ├── swap.cfg
│   └── users.cfg
└── templates.cfg