First steps
In this section, the steps to be followed by the Administrator once WOCU-Monitoring is installed are explained. This documentation follows a practical approach to facilitate the understanding and monitoring of the operation.
Access to WOCU-Monitoring
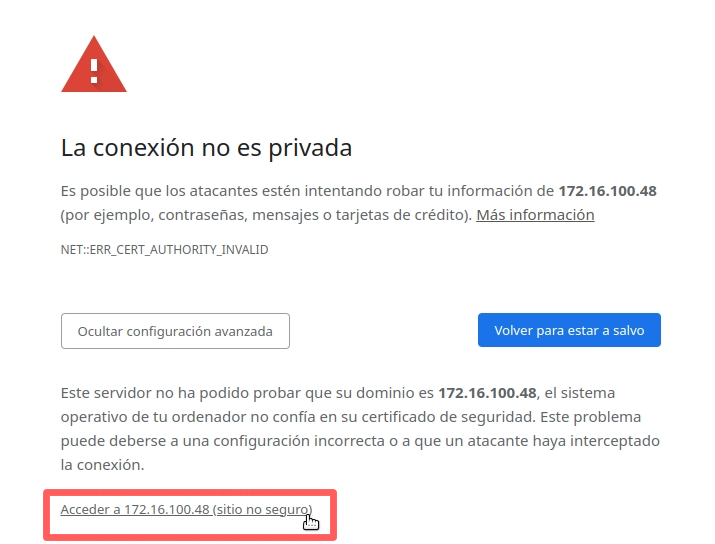
1. Access the WOCU-Monitoring interface by entering the following address in your browser:
https://<yourserverip>/aggregator2. When logging in using a self-signed certificate, the browser will return a warning by default. You need to accept this certificate in order to continue with the process. Learn more about managed certificates in the section: HTTPS administration.
3. Ingrese sus credenciales en la página de login. El usuario y contraseña establecido por defecto son
admin/admin, siempre y cuando no se hayan modificado previamente en el fichero de Initial configuration. Por motivos de seguridad la contraseña es enmascarada. Durante el primer acceso a WOCU-Monitoring, se mostrará un aviso sobre el uso de cookies. Para continuar navegando con normalidad, acepte el mensaje informativo.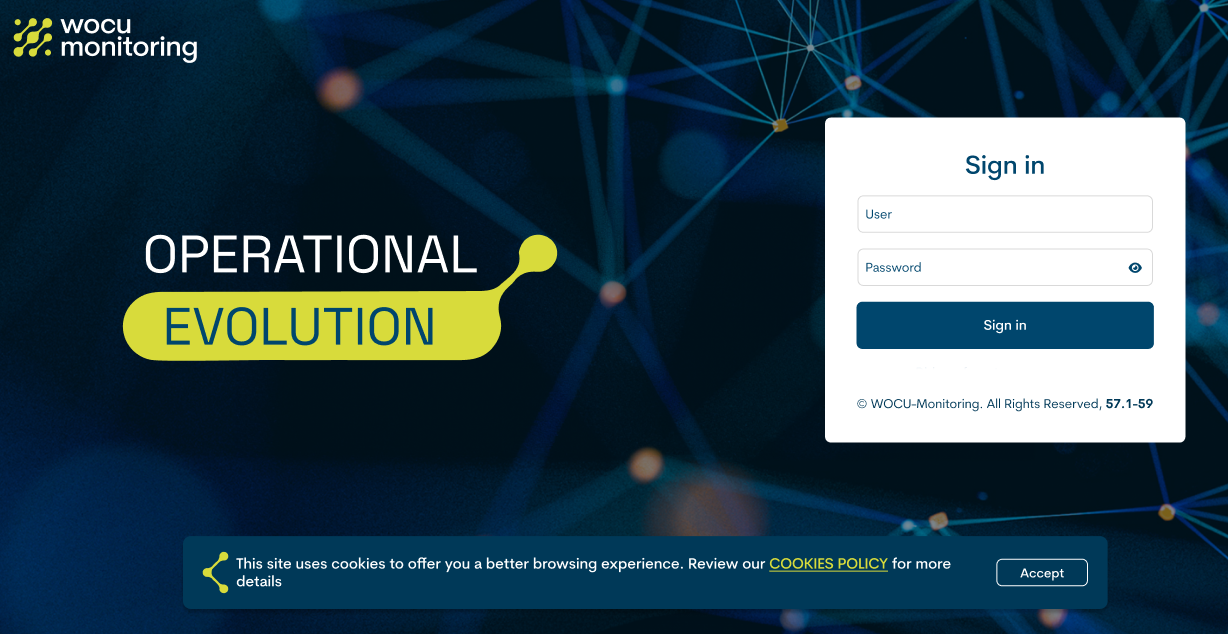
Incorrect credentials
If the username or password entered is incorrect, WOCU-Monitoring will display an error message. Check your credentials and try again. If the maximum number of failed attempts is exceeded, the configured account may be temporarily locked. In that case, wait before logging in again or contact your administrator.
4. Once you have entered your credentials, click on the Log in button to access WOCU-Monitoring.
Creation of Realms
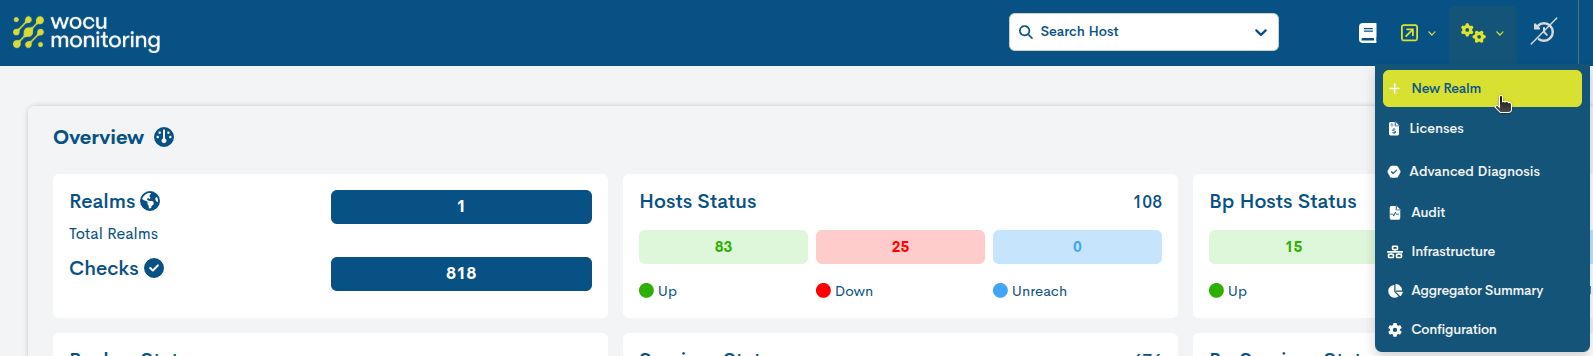
Once inside the application, the next step is to register a first Realm.
Attention
This guide will only focus on setting up the fields necessary to set up a Realm. More complete and detailed information can be found in here.
Click on the blue button + New Realm to start the creation process through the following form.
The creation of a Realm can be done in two ways, depending on the backend technology that will be used to query and store the information associated with the monitored hosts.
The option selected in the Backend Technology field (Livestatus & Influx or Elasticsearch) determines the configuration model of the Realm and conditions the fields to be displayed below in the form.
Realm with Livestatus & Influx backend
Attention
This guide will only focus on setting up the fields necessary to set up a Realm. More complete and detailed information can be found in here.
Complete the following fields to set up the first Realm:
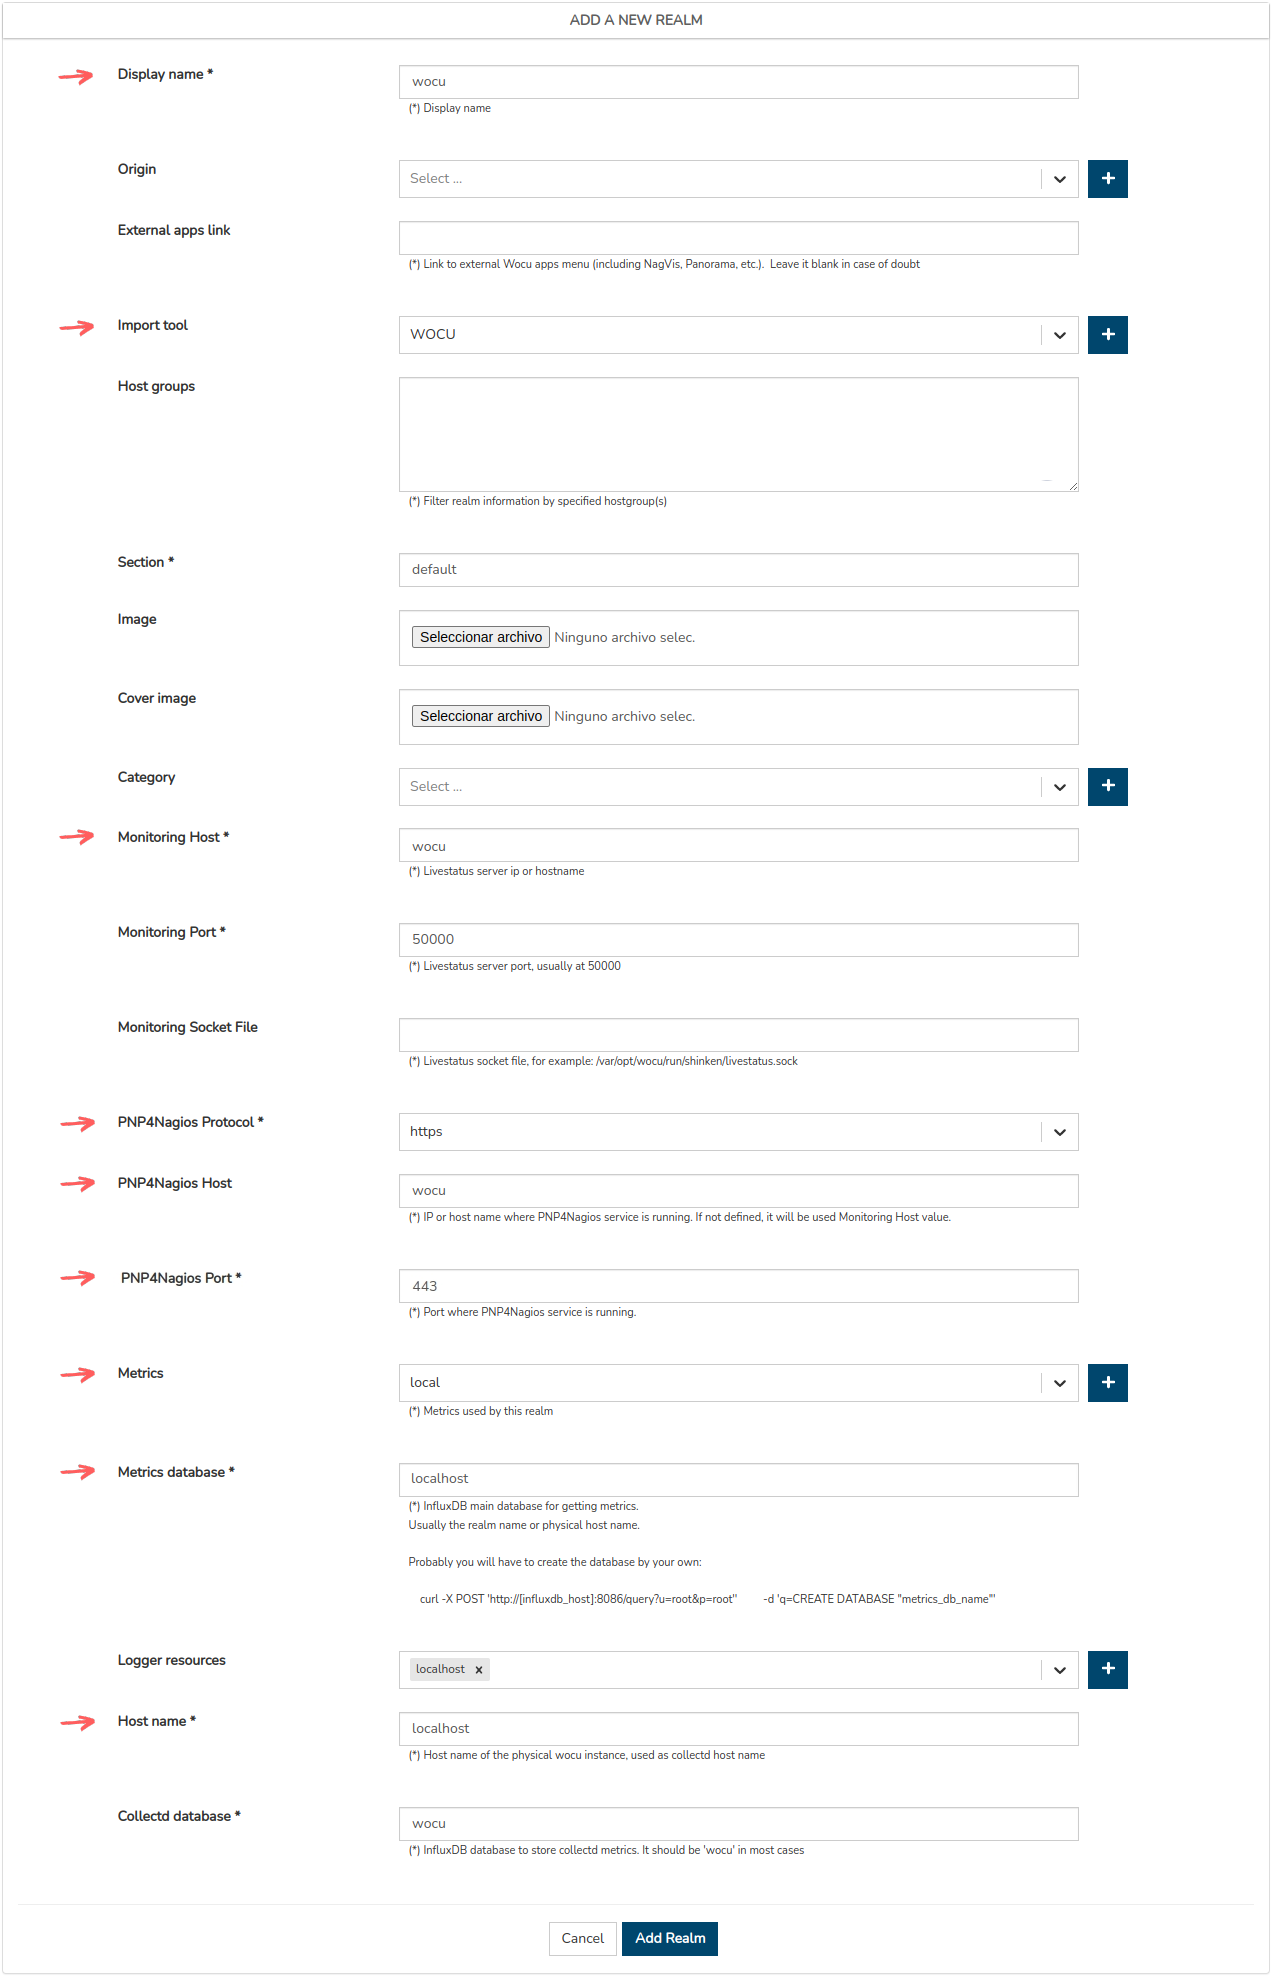
1.1 Display Name: añada
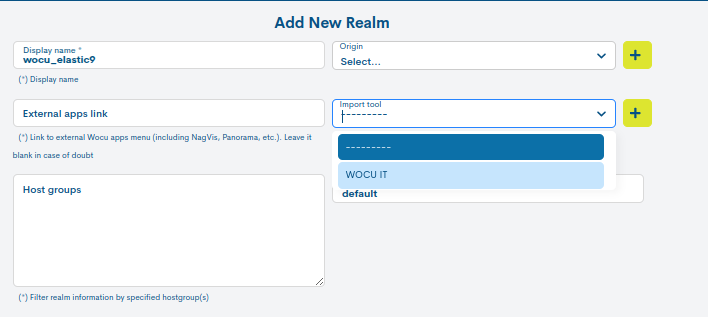
wocu_LI.1.2 Import Tool: to add a first Import-Tool trigger the + function.
Se destacan los campos a modificar.
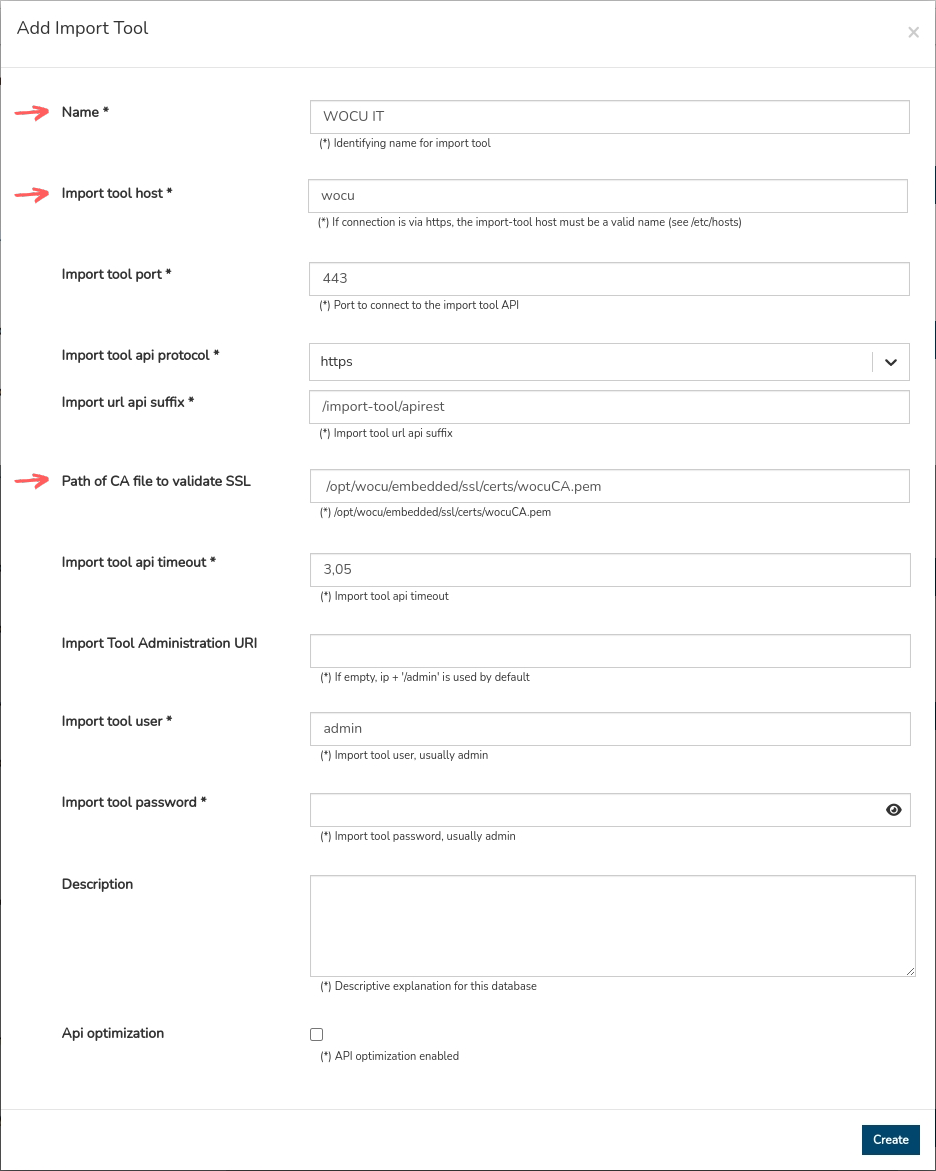
The fields to be modified for the registration of a new Import-Tool are:
1.2.1 Name: add
WOCU IT.1.2.2 Import tool host: añada
wocu.1.2.3 Path of CA file to validate SSL: copy the text indicated in the help information:
/opt/wocu/embedded/ssl/certs/wocuCA.pem
Next:
Confirm the changes made via the Create button.
Select the new Import-Tool in the selector to continue.

1.3 Monitoring Host: add
wocu.1.4 Backend technology: select
Livestatus & Influx.1.5 Metrics para añadir un primer servidor de bases de datos accione la función +.
Se destacan los campos a modificar.
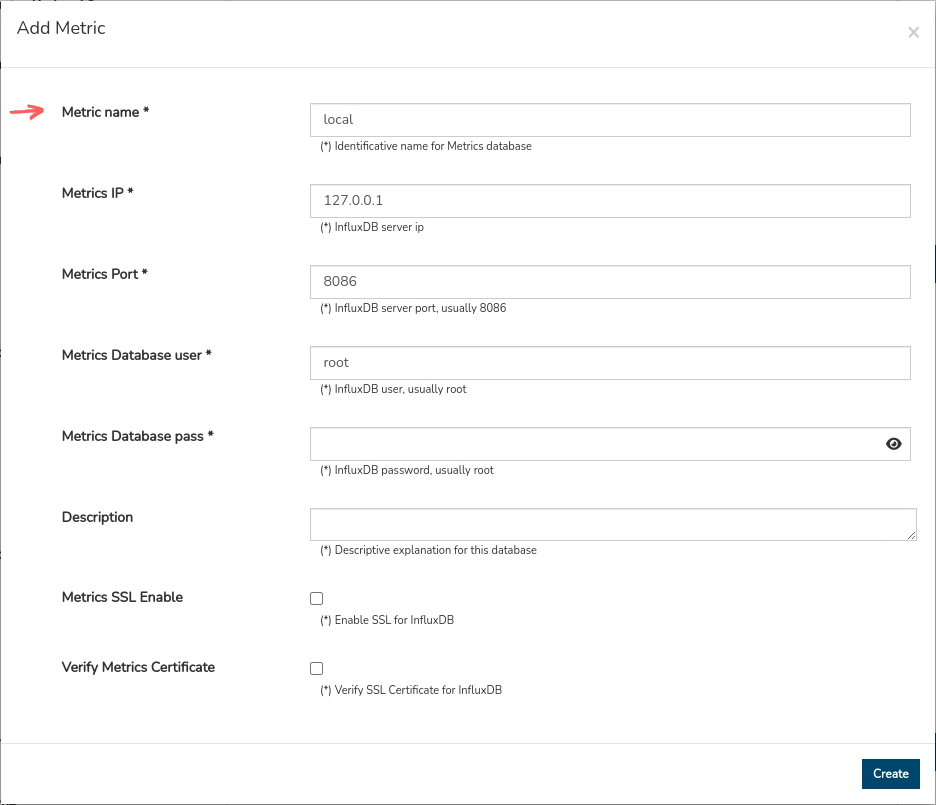
The field to be modified for the registration of a new server is:
Metric name: add
local.Next:
Confirm the changes made via the Create button.
Select the new Metrics in the selector to continue.

1.6 Metric Database: to create the database that will store metrics perform the following steps:
Run the following command in a new terminal:
apt install -y curl && curl -X POST 'http://localhost:8086/query?u=root&p=root' -d 'q=CREATE DATABASE "localhost"'
The database has been created. The answer should be as follows:
{"results":[{"statement_id":0}]}
Back to the form, in the Metric Database field, add the same value used in the previous command:
localhost.
1.7 Host Name: add
localhost.
Realm with Elasticsearch backend
Attention
This guide will only focus on setting up the fields necessary to set up a Realm. More complete and detailed information can be found in here.
Complete the following fields to set up the first Realm:
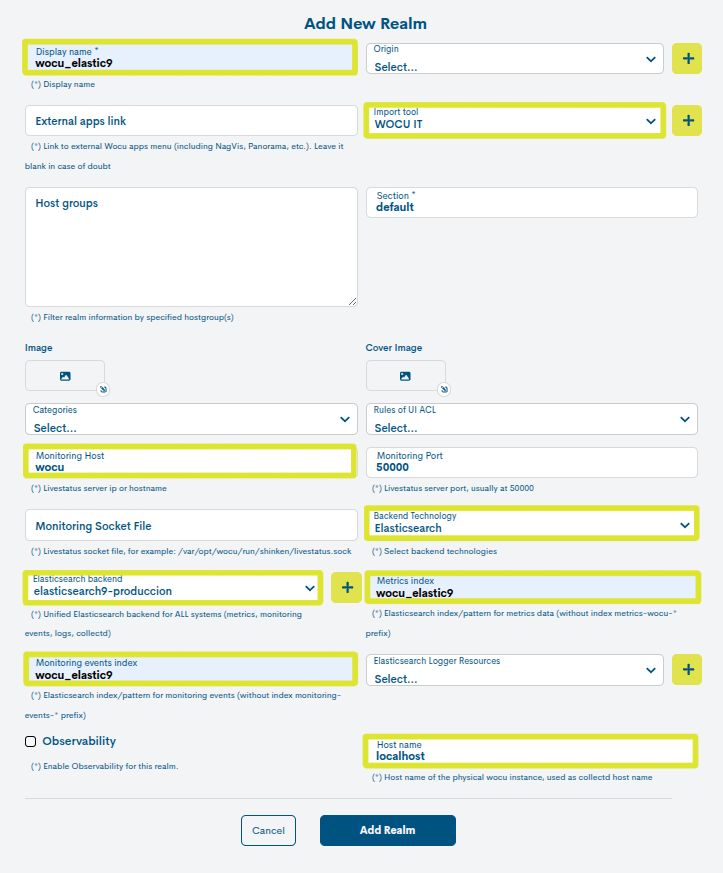
1.1 Display Name: añada el nombre del reino. Para este caso de uso:
wocu_elastic9.1.2 Import Tool: to add a first Import-Tool trigger the + function.
Se destacan los campos a modificar.
The fields to be modified for the registration of a new Import-Tool are:
1.2.1 Name: add
WOCU IT.1.2.2 Import tool host: añada
wocu.1.2.3 Path of CA file to validate SSL: copy the text indicated in the help information:
/opt/wocu/embedded/ssl/certs/wocuCA.pem
Next:
Confirm the changes made via the Create button.
Select the new Import-Tool in the selector to continue.
1.3 Monitoring Host: add
wocu.1.4 Backend technology: select
Elasticsearch.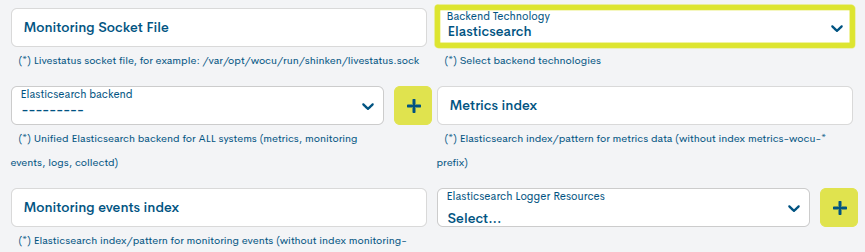
1.5 Backend technology selector: To add a first backend previously configured, activate the function +.
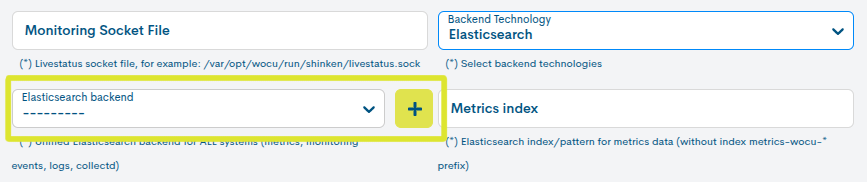
The minimum fields to configure for registering a new backend are:
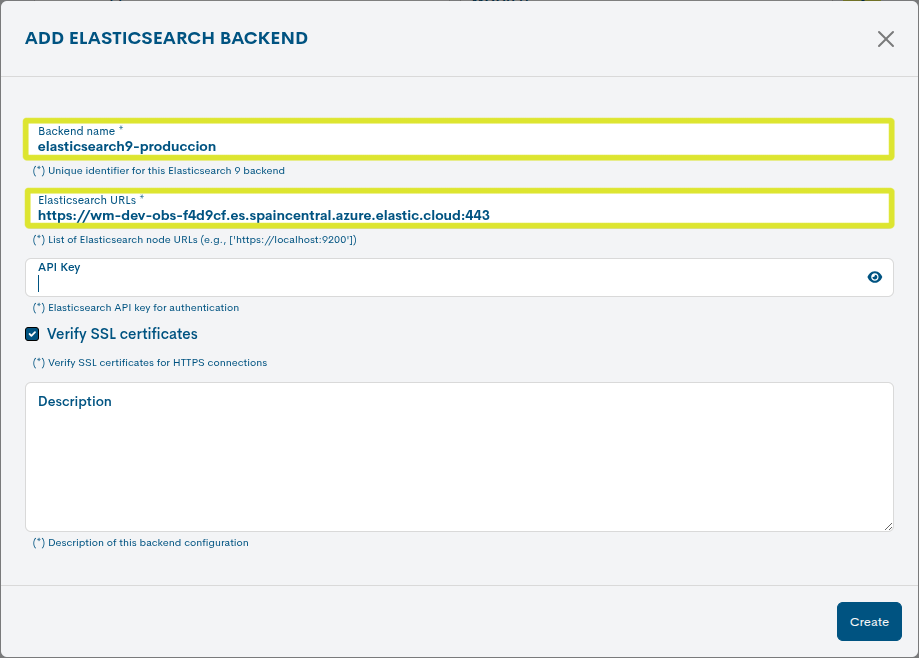
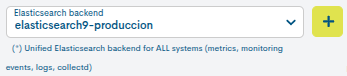
1.5.1 Backend name: add
elasticsearch9-production.1.5.2 Elastic URL: field intended to indicate the URL of the Elasticsearch 9 nodes to which WOCU-Monitoring will connect. This value can be configured based on two scenarios:
Project managed from Elastic
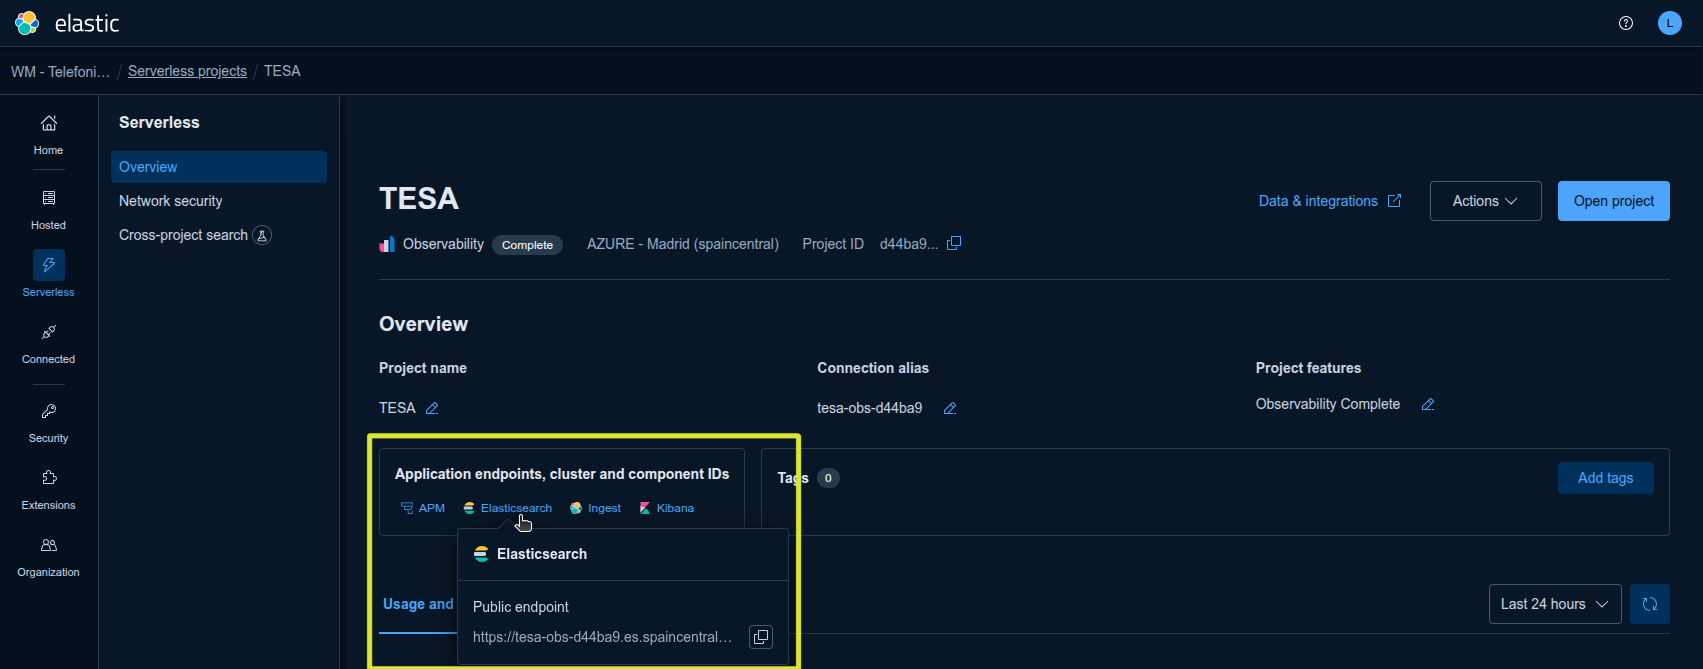
In deployments managed from the Elastic console, the value must be obtained by accessing the corresponding Serverless Observability project.
The path is as follows: Serverless projects > [project_name] > Overview.
Next, locate the Application endpoints, cluster and component IDs block, select the Elasticsearch option, and copy the value shown in Public endpoint.
This endpoint will be the value that must be configured in the Elastic URL field.
Own or local Elasticsearch installation
In environments managed using a custom Elasticsearch server, the URL must be provided by the Elastic administrator. In on-premises Elasticsearch 9 installations, it is sufficient to specify the host URL and the port on which Elasticsearch is listening.
For example: ::
https://localhost:9200
Note
If Elasticsearch is configured with authentication, it will also be necessary to complete the API Key field. This value will be required for TD-Agent configuration.
To do this, you will need access to the Elastic interface with administrative permissions.
See the process for creating an API Key in the following section (Steps 4 and 5): Manual configuration.
The URL was obtained:
Confirm the changes made via the Create button.
Select the new backend in the selector to continue.
1.6 Metrics Index: Add the kingdom name (
wocu_elastic9). The system will internally add the prefix corresponding to the metric index.1.7 Monitoring events index: Add the realm name (
wocu_elastic9). The system will internally add the prefix corresponding to the metrics index.1.8 Host Name: add
localhost.
2. Once you have entered all the required data, save the form configuration using the Add Realm button.
Congratulations! The first Realm has been successfully created. The default WOCU-Monitoring main page is the Status view, where only the Global will be operational with a single operational Host.
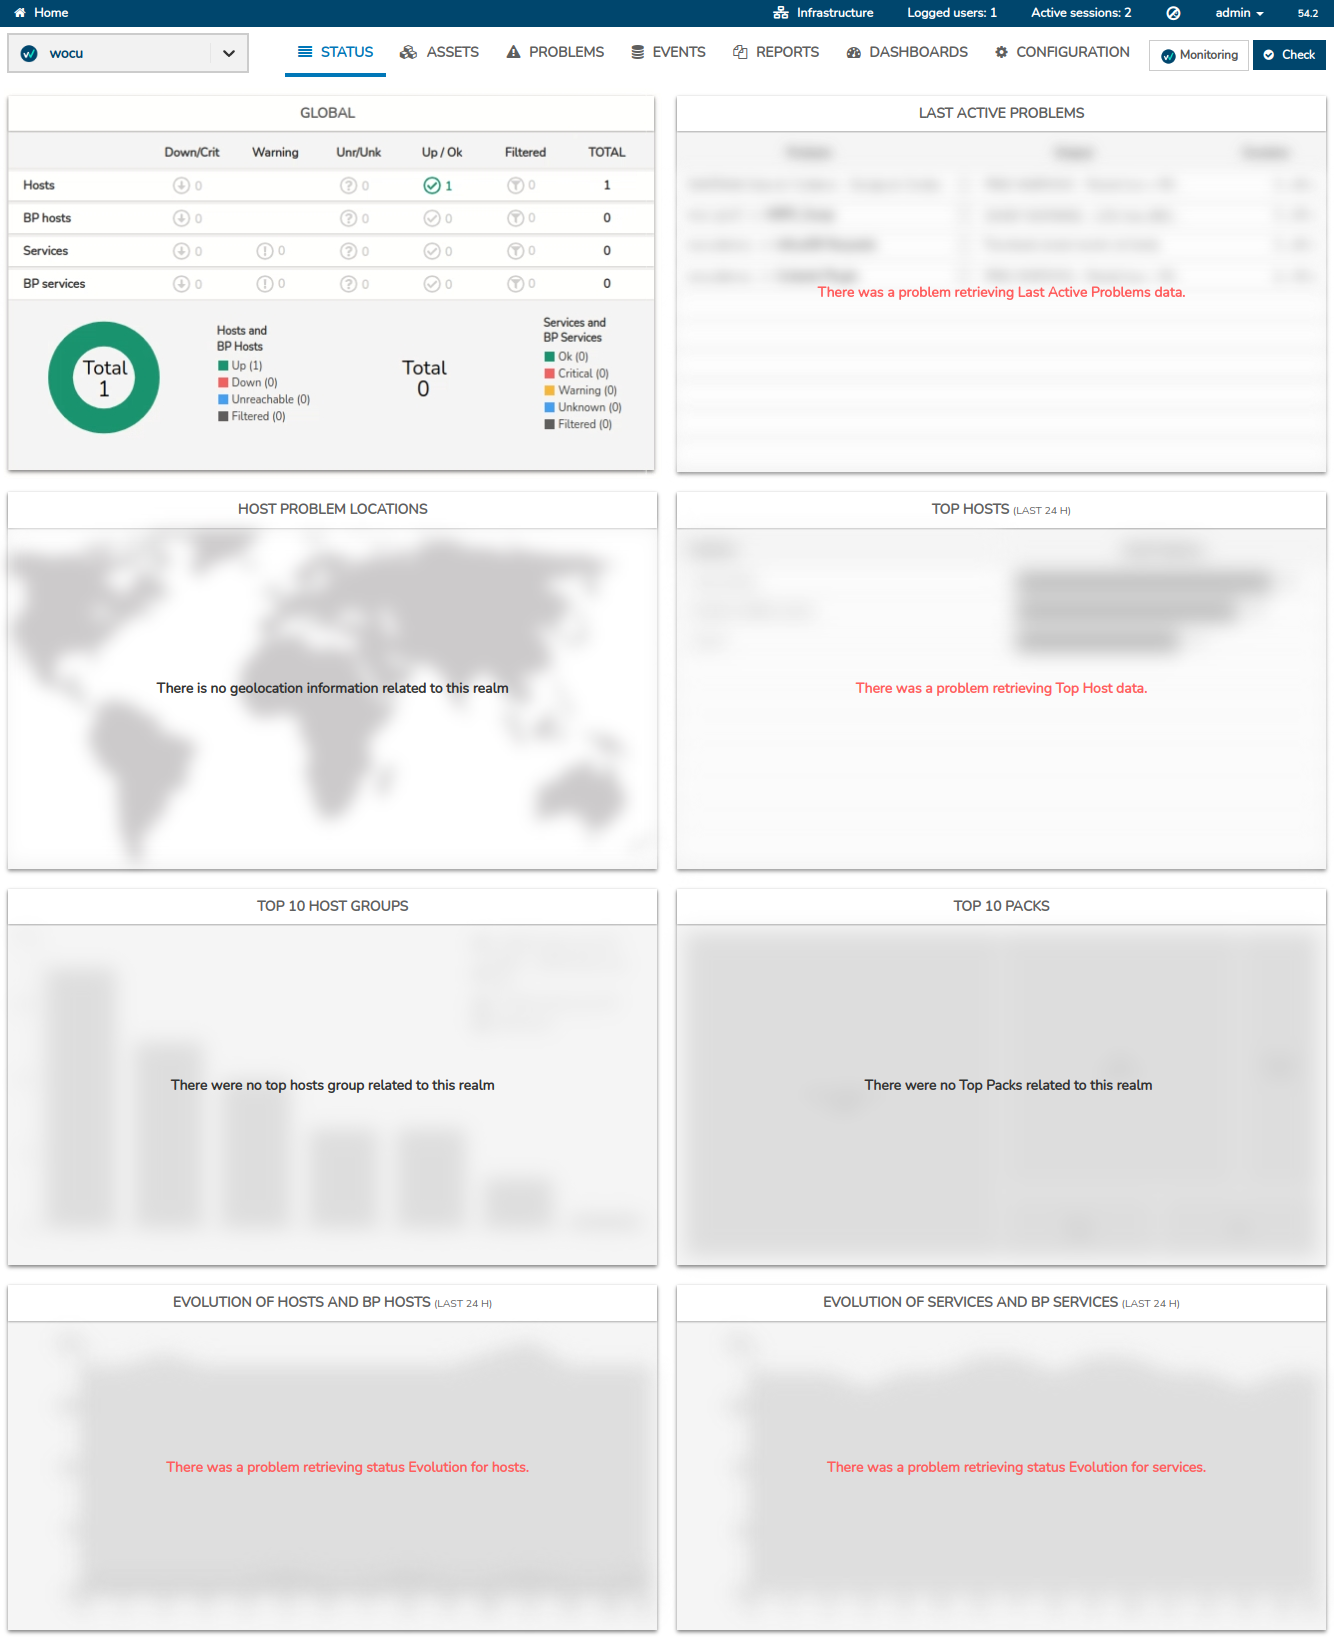
At this point there is only one team in the Realm. The next step will be to expand the infrastructure by adding new hosts.
Manual registration of a Host
Follow these steps to add new hosts to the created Realm and expand the monitored network.
Attention
This guide will focus solely on configuring the necessary attributes to add a new Host. More complete and detailed information here.
1. Acceda al Módulo de Configuración del Realm creado y diríjase a la sección Active Assets > Hosts.

2. Click on the + Add Host button to start the process.

Please complete the following form fields:
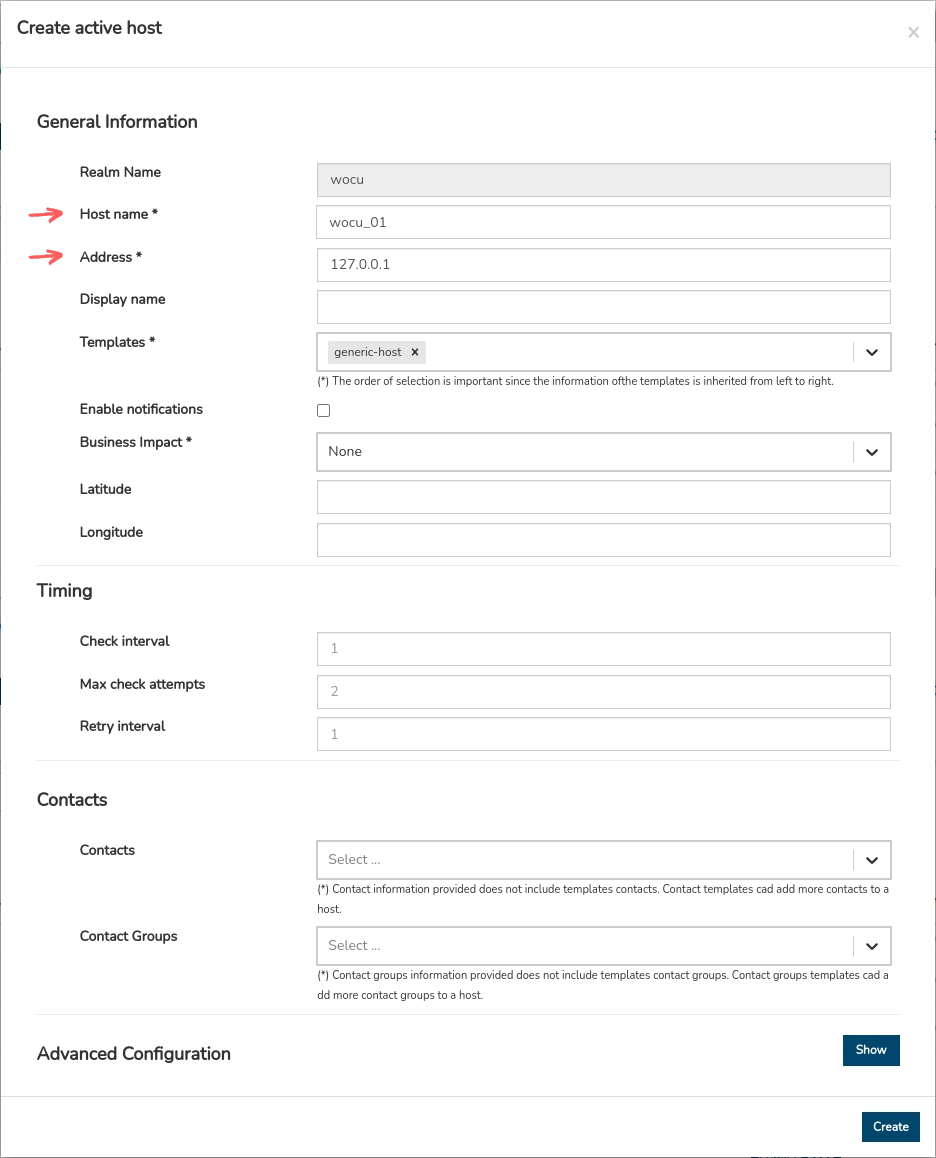
Se destacan los campos a modificar.
3.1 Host Name: add
wocu_01.3.2 Address: register
127.0.0.1.4. Once you have entered the data, save the configuration using the blue Create button.
5. You now have the first
wocu_01unit registered from the Configuration Module.
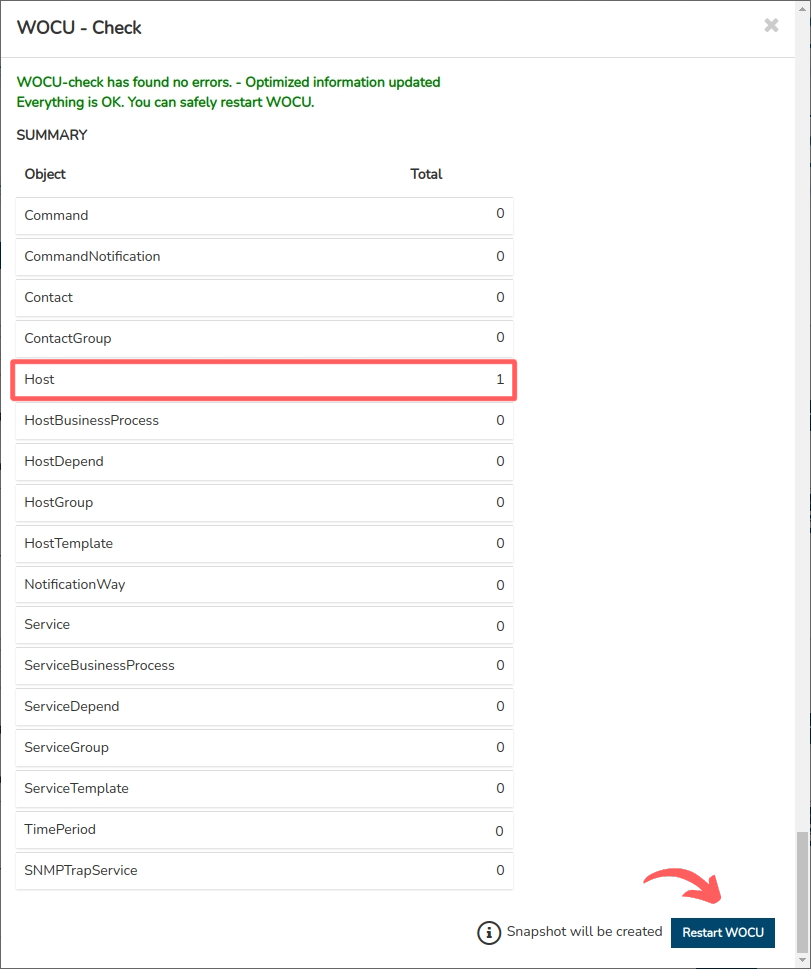
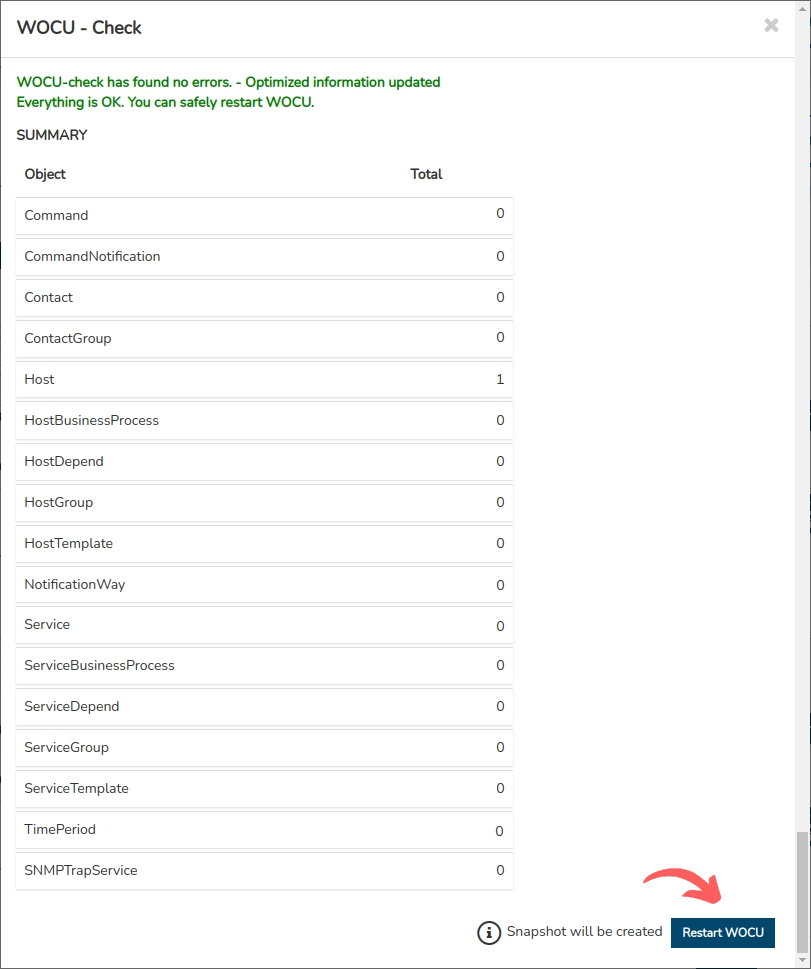
6. To enforce monitoring of the new Host on the system, run Check.

7. Confirm the action by clicking on the Restart WOCU button, located in the dialogue box reporting the status of the DB. The verification message confirms the optimal status of the system to proceed with the restart.
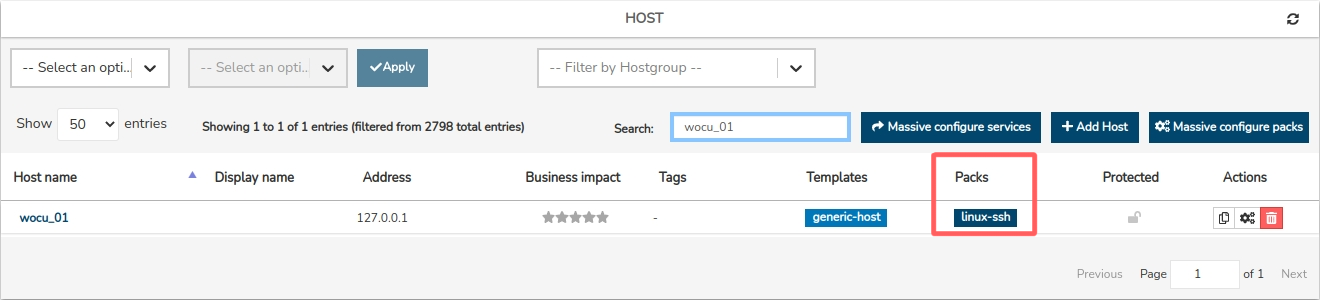
8. Finally, access the Assets > Hosts section where all the monitored Realm teams are listed and locate
wocu_01via the search bar.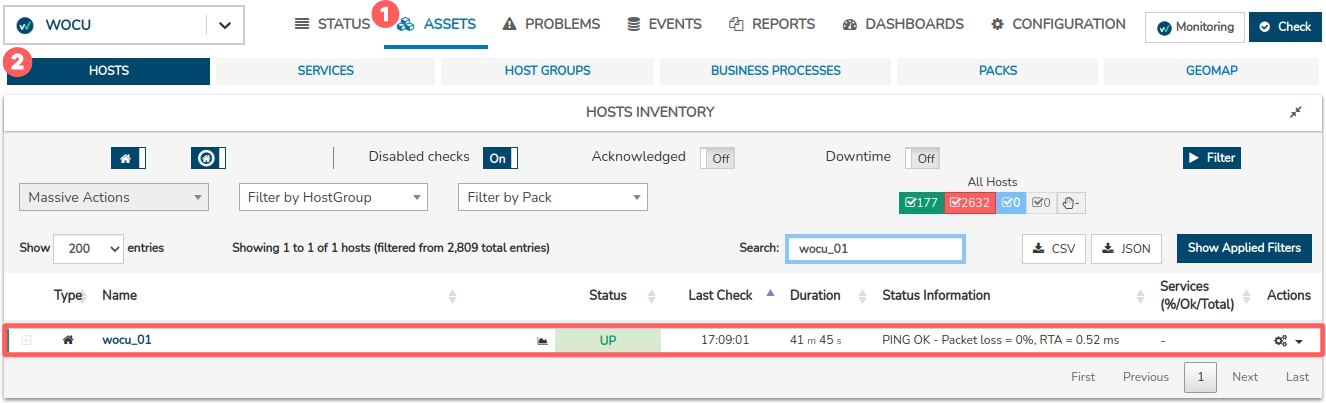
Although the new equipment is already registered, it has no data collected during its monitoring activity. Therefore, the next step will be to associate services to it.
Configuration of monitoring services
Follow the steps below to configure new monitoring services to the wocu_01 equipment.
1. Access the Configuration Module of the
WOCURealm and go to the Active Assets > Hosts section.2. Locate the
wocu_01host in the list and click on the action Packs.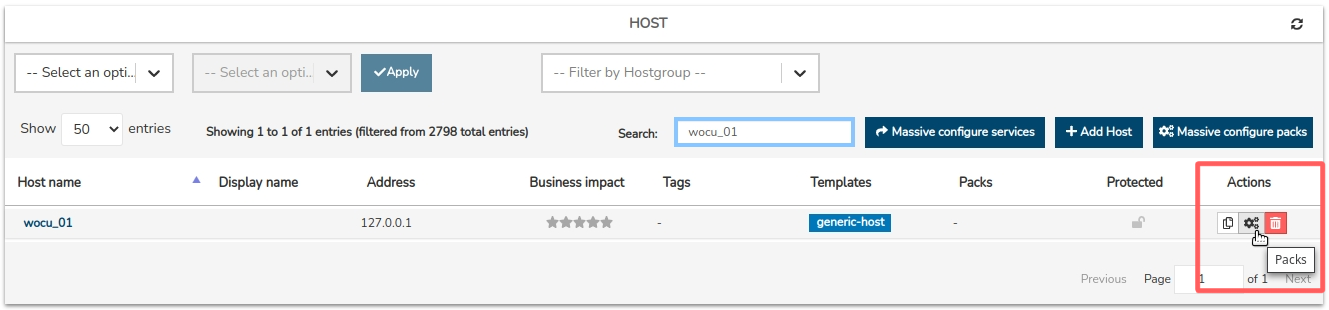
Find out more…
The configuration of services will be carried out through the application of Monitoring Packs. Further information can be found in our Pack Catalogue.
3. Search and select from the list: LINUX-SSH. The entry corresponding to the pack will turn a green background colour, indicating that it has been selected for linking.
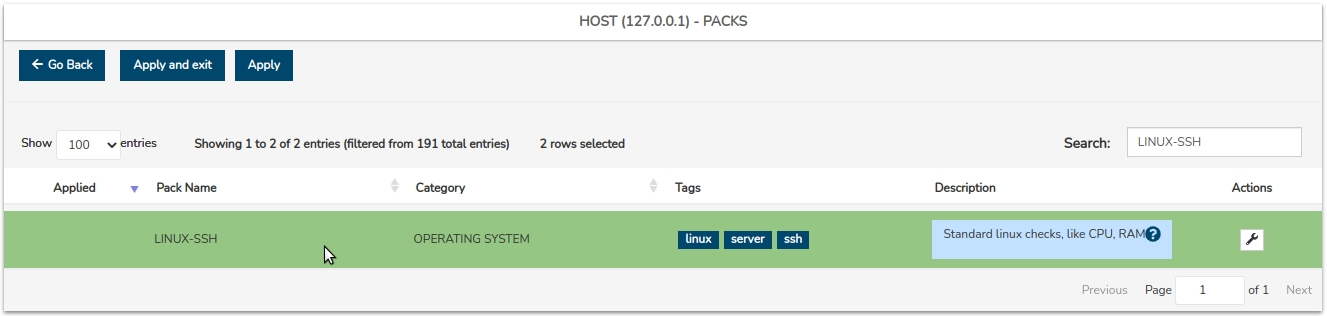
4. Confirm the selection using the Apply and exit button, and return to the global view Hosts.
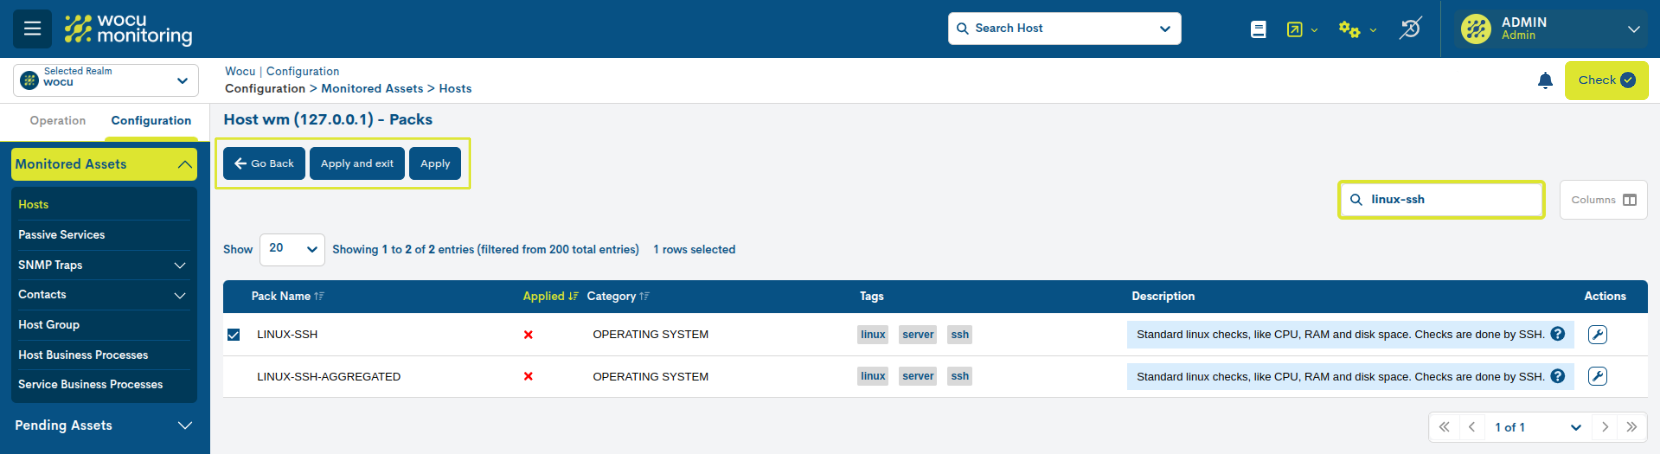
5. You can see how in the Packs column there is a tag referring to the LINUX-SSH (newly configured) pack.
6. To make the new Host configuration effective on the system, re-run Check.
7. Confirm the action by clicking on the Restart WOCU button, located in the dialogue box reporting the status of the DB. The verification message confirms the optimal status of the system to proceed with the restart.
8. Go back to section Assets > Services to verify that the
wocu_01machine already has operational monitoring services (relative to the associated LINUX-SSH pack).As can be seen, there are services already operational (
OKandWARNING) and others inPENDINGstatus, indicating that they are waiting to be executed after the next check.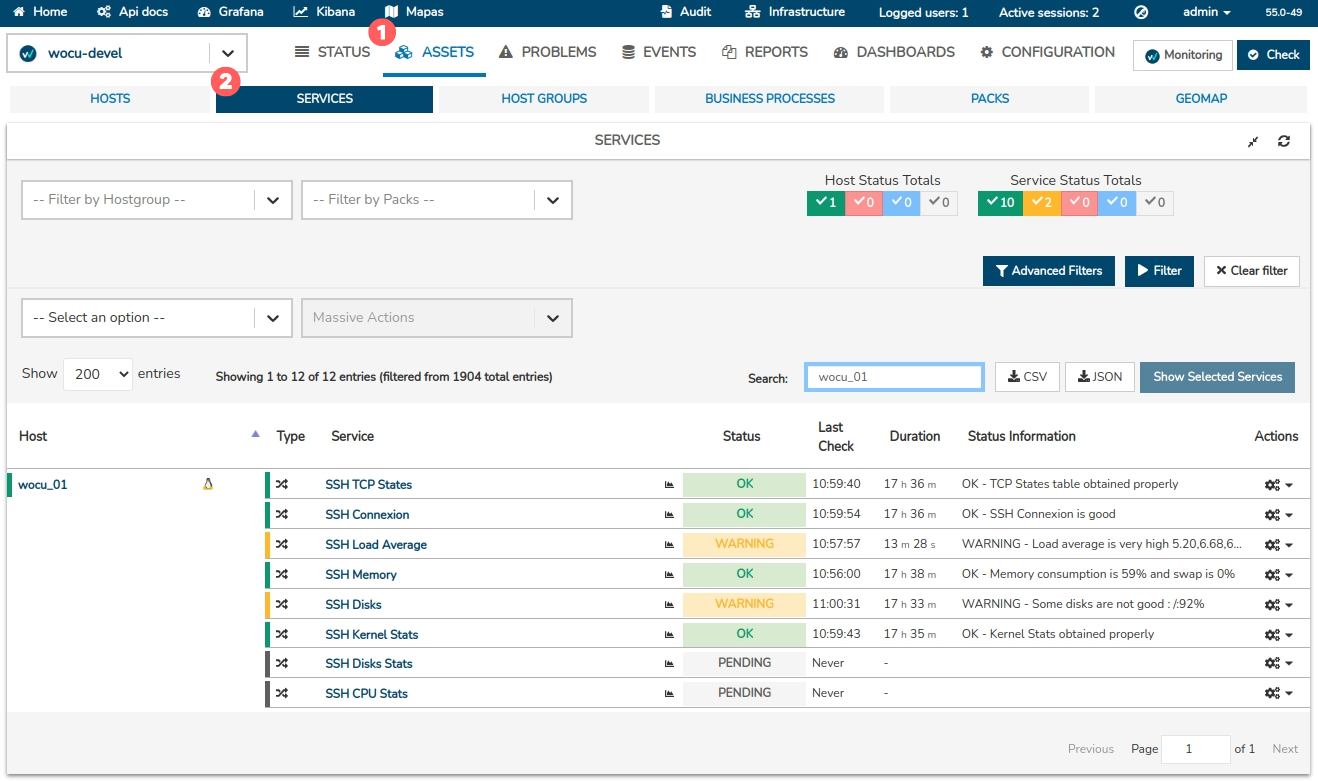
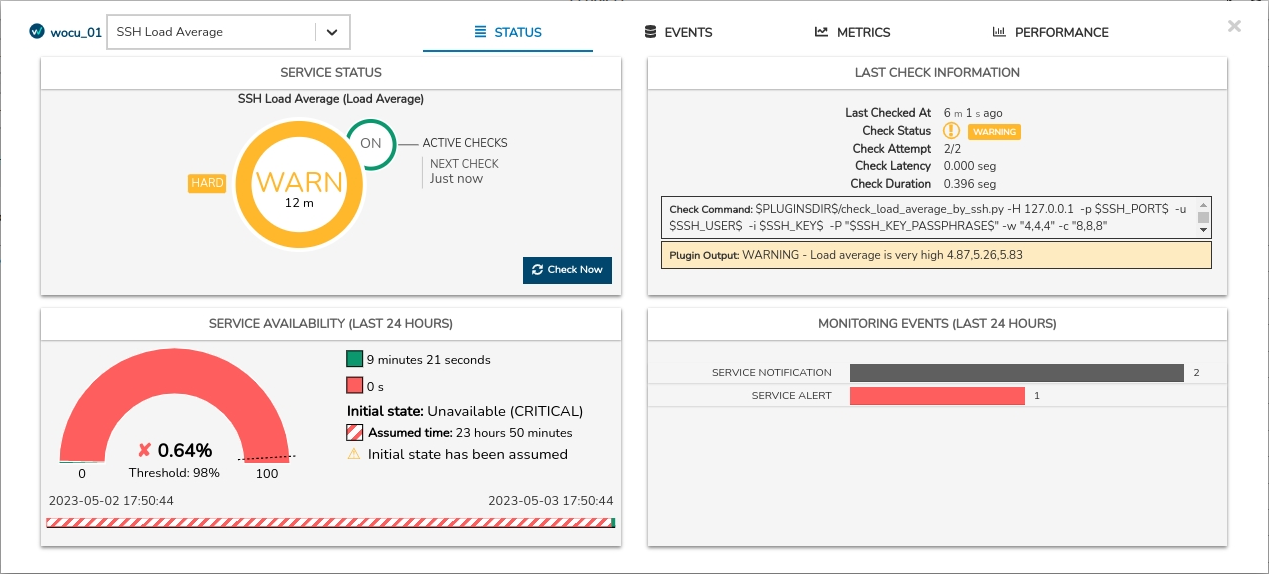
From this interface, it is possible to obtain up-to-date information on each monitoring service. By clicking on the name of a specific service (Service column), a new Detail view of Services and Business Processes will pop up with specific information on the current status, last executed checks, as well as other metric graphs provided during the checking tasks.
What now?
Note
If you have any comments you would like to share, please contact us at <info@wocu-monitoring.com>. We would be happy to receive your suggestions and consider them for future updates.
Below are various sections that may be of interest to you, once you have the first hosts configured.
How to…: detailed information on specific functions is provided, as well as step-by-step descriptions of the operation to be followed.
Monitoring Packs: catalogue of packs classified by most common technologies, functions or manufacturers in the market.
API: serves the complete and detailed documentation of the WOCU-Monitoring
API.Release Notes: list of releases of new features, bug fixes and other significant changes, which accompany each version of WOCU-Monitoring.
User Manual: divided into three sections according to the most common tasks:
A chapter dedicated to the Operation tasks of monitored assets.
A chapter detailing the management of Report Generation and their types.
A chapter describing the Basic Configuration for adding, importing, and managing assets.
Now you can start taking full advantage of all the functionalities that WOCU-Monitoring has to offer.