Report management
Reports created in the application shall be stacked sequentially in a global panel within the subsection Reports. A then each report is presented in its entirety across panels and graphics within the Visualize subsection.
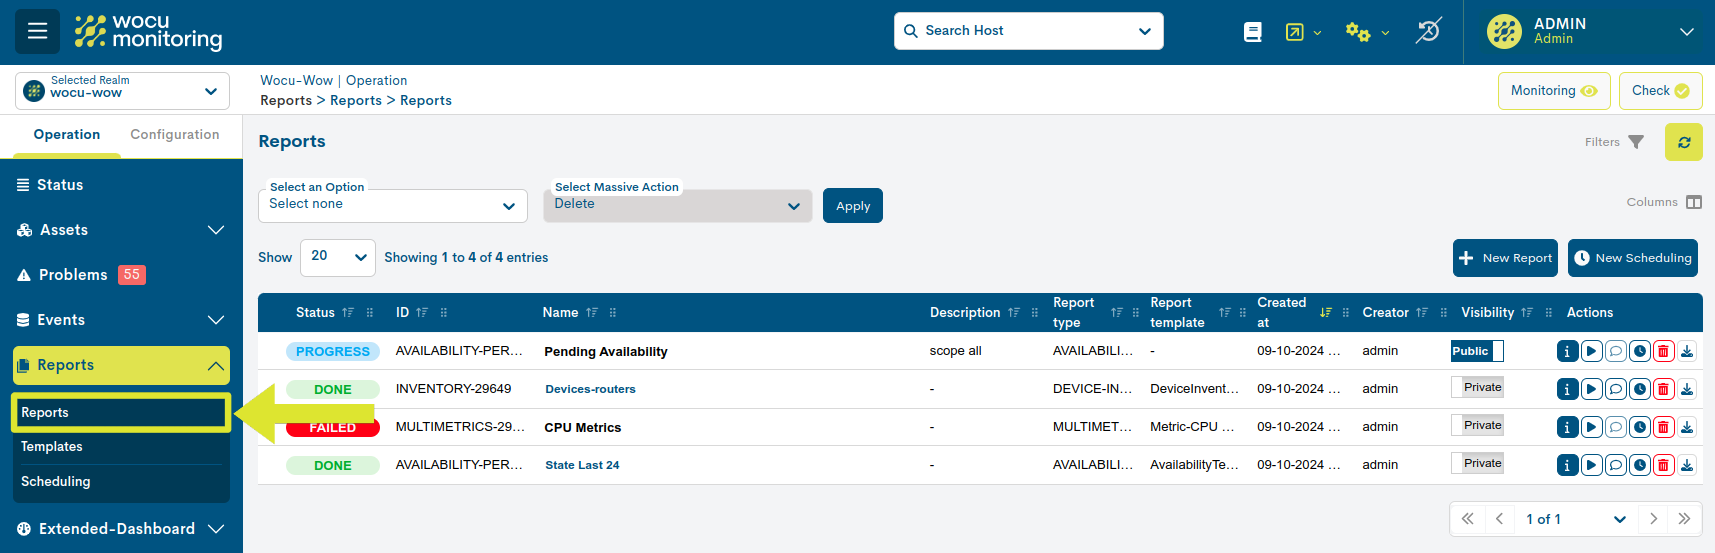
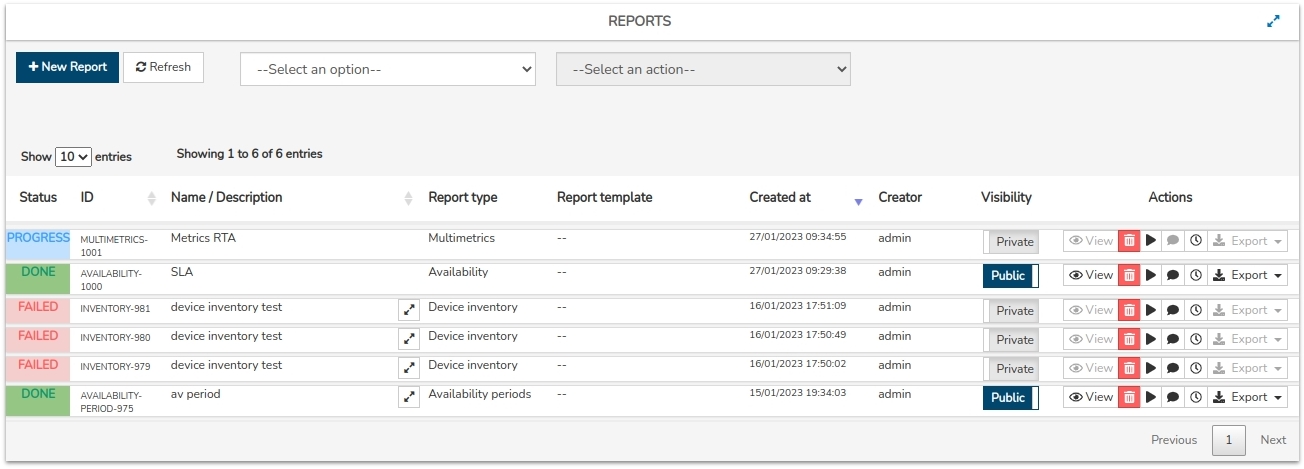
Reports
This global panel contains all available reports together with a number of user-defined fields and other automatically generated by the system.
The fields are described below:
- Status
Indicates the status of the reports. These can be:
Pending: the report is pending execution.
Progress: the execution of the report is in progress.
Done: the report is already created and available to the user.
Failed: the report has suffered a failed execution, i.e. it has not been executed correctly.
Unknown: this status is assigned when none of the above has been detected and indicates that the status of the report is unknown.
- ID
Indicates a unique numeric identifier assigned by WOCU to each report.
- Name
Displays the report identification term previously assigned by the report originator.
Clicking on the name tag will redirect the user to the section Visualize, where the report is presented in its entirety through panels and graphs.
Attention
This action will not be available when the status of the report is Failed and when it is considered obsolete (report generated in a version prior to the current one).
- Description
Displays the report identification term previously assigned by the report originator.
- Report Type
Indicates the typology of the report.
- Report Template
Indicates the Templates that has been applied to the report.
- Created at.
Indicates date and time of report creation.
- Creator
Reports the user who created/owns the report.
- Visibility
Indicates the type of visibility of the report (Public or Private), previously defined by the user.
Attention
The modification of the visibility of the report shall be freely configurable if the user has the appropriate permissions.
Actions
Column containing the buttons for the actions allowed on each of the reports.
Attention
Please note that there are different types of users who have access to WOCU-Monitoring. This means that the modification and configuration of actions mentioned above will be allowed as long as the the mentioned actions will be allowed as long as the user has the special permissions for each of them.

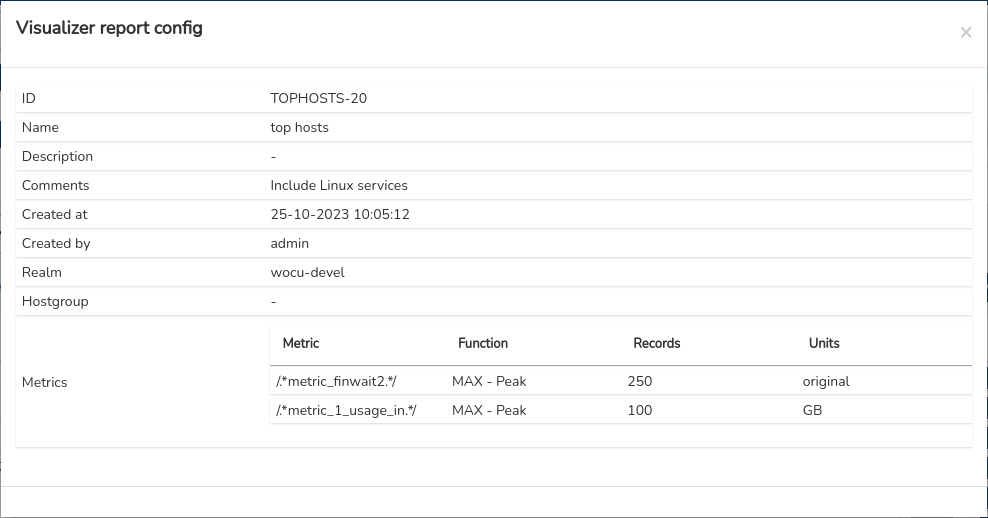
Visualizer report config
Via this button a detail view will pop up with the settings of the corresponding report.
Launch
Allows you to relaunch the selected report by changing the fields: Name, Description and the Date intervals.
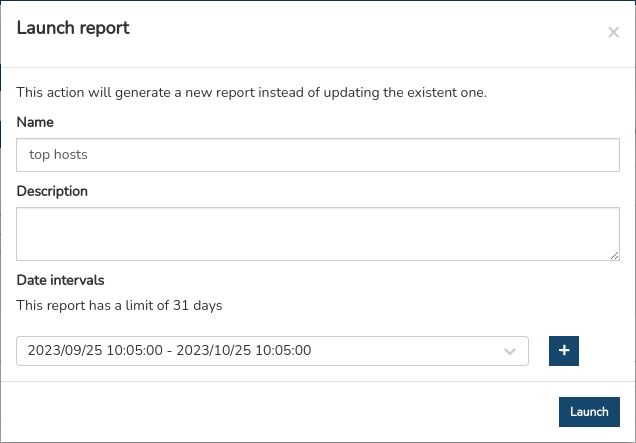
Clicking the “Launch“ button will automatically generate the new report.
Attention
For the relaunch of the report the user must have the appropriate permissions.
Note
This action will not be available when the report is considered obsolete (report generated on a version older than the current one).
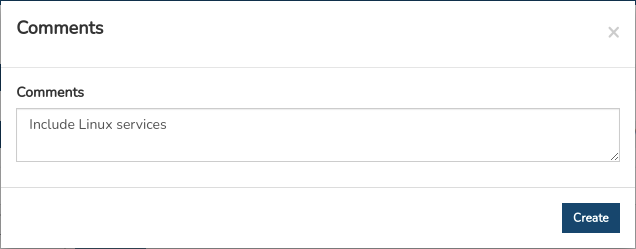
Comment
Allows the user to enter a note or comment associated with a report. Normally this space will be used to note any relevant information about the report that the user considers important to share with the other users of the tool.
By clicking on the comment icon a window will appear where the user can register the note he/she wants to add to the report. By clicking on the Save button the comment will be registered.
Comments are visible in the report’s configuration panel (within the Visualize section), and in the exported report in PDF, if the corresponding checkbox has been selected.
Important
To add comments to the report, the user must have the appropriate permissions.
Attention
This action will not be available when the report is considered obsolete (report generated on a version older than the current one).
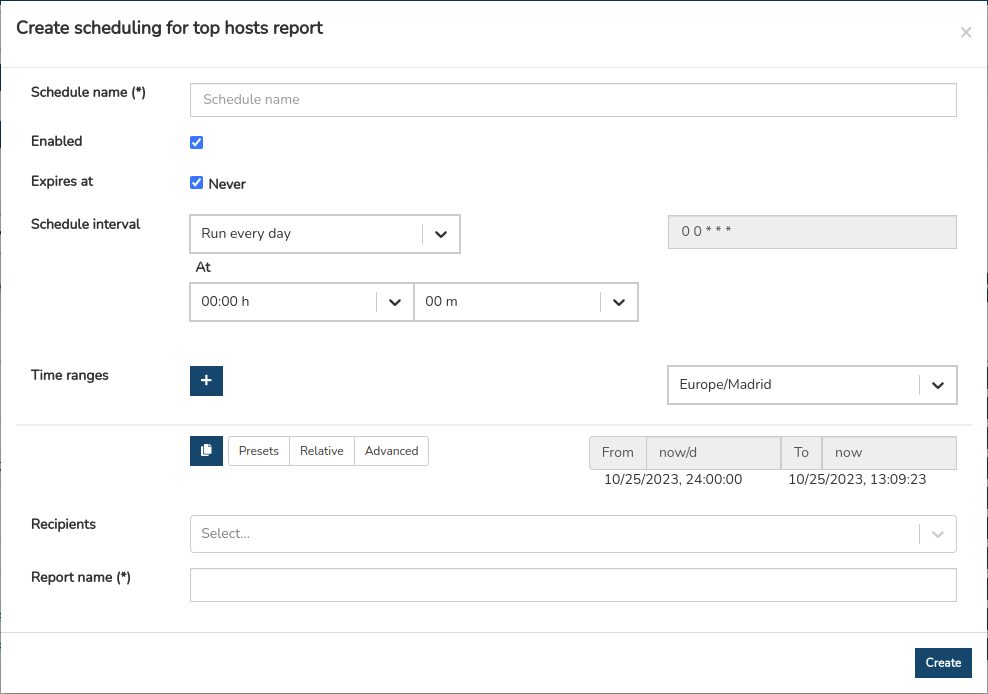
Schedule this report
WOCU-Monitoring enables the automation of the reporting operation,thanks to the possibility of scheduling their generation and launch at the user’s discretion
By clicking on the button (🕒), a new form will be opened to carry out the programming of the report in question.
Note
More information can be found at: Form for creating a Report schedule.
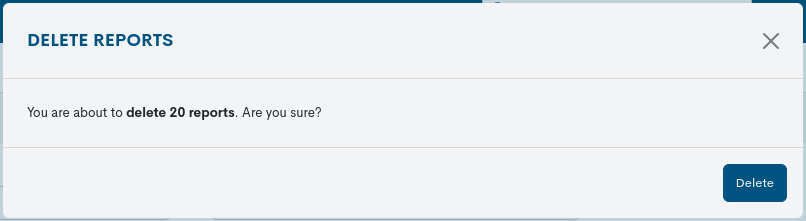
Remove
This option deletes the corresponding report permanently. When button is pressed, a message shall be displayed to confirm the action.
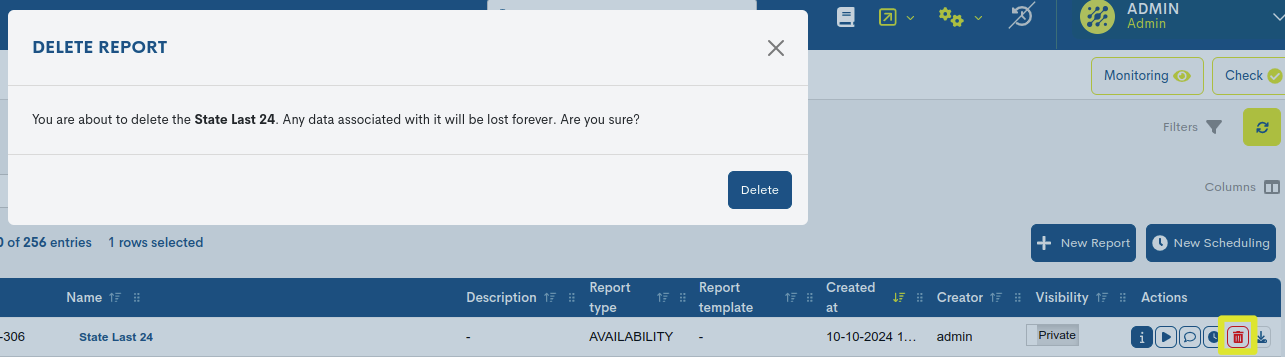
To proceed with the deletion, press the red Delete button. To permanently delete the report, the user must have the appropriate permissions.
Export
The system allows for the export and download of reports in various formats, at the user’s discretion. Possible options are:
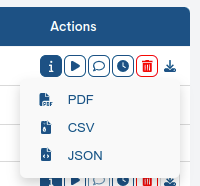
PDF (Portable Document Format): fixed, non-modifiable format. Exporting to PDF makes it easier to share, store or print.
CSV (Comma Separated Value): simple format that separates columns by a separator (semicolon “;“) and rows by a line break. It is easy to export data from a multitude of sources (other monitoring tools, DB, CMDB tools, inventories in a table or spreadsheet format) to this type of format. Thus, it is very easy to make any pre-existing system compatible as an Import Source for the application.
JSON (JavaScript Object Notation): a lightweight data exchange format capable of being read by any programming language, and which, being modifiable, allows a new one to be generated and processed from the exported file, using different tools. In short, a JSON file can be post-processed, unlike a PDF file, which is fixed and immutable.
These export options facilitate the immediate sending of information.
This action will not be available when the status of the report is Failed and when it is considered obsolete (report generated in a version prior to the current one).
Important
The different navigation, search and sorting options available on this screen are explained in detail in the section: Common navigation, filtering and sorting options in WOCU.
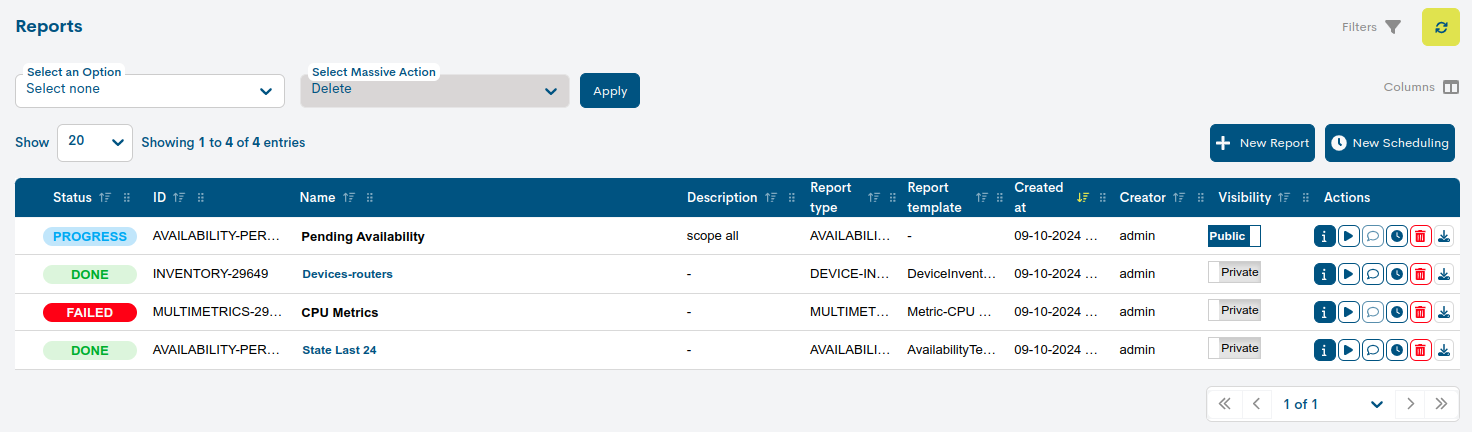
Mass deletion of reports
With both selectors it is possible to delete multiple reports at the same time. The action is executed as follows:

1. Selection of reports to be removed from the list
Prior to the deletion action, the reports to be deleted from the instance must be selected. The view allows several options:
Manual marking of reports in the list itself by clicking on each of them.

Using the Select Current Page option of the first selector, to select all reports on the current page of the list or the Select all option to select all items. Applying the Select None option will deselect the previous selection.


2. Selection of the deletion action (Delete)
Once you have selected the set of reports you are interested in, use the drop-down menu next to it to select the Delete action.

The system will prompt the operator for confirmation before permanently deleting any item. Once the action is approved using the Delete button, the deletion process will commence. Subsequently, the list willbe updated with the remaining reports.
Attention
As long as there are no marked reports, the deletion selector is disabled.
The user may only delete reports created by the user. With the exception of the Administrator who is not restricted in this respect.
New Reports (+ New Report)
The creation of new reports shall be carried out via the button + New Report.
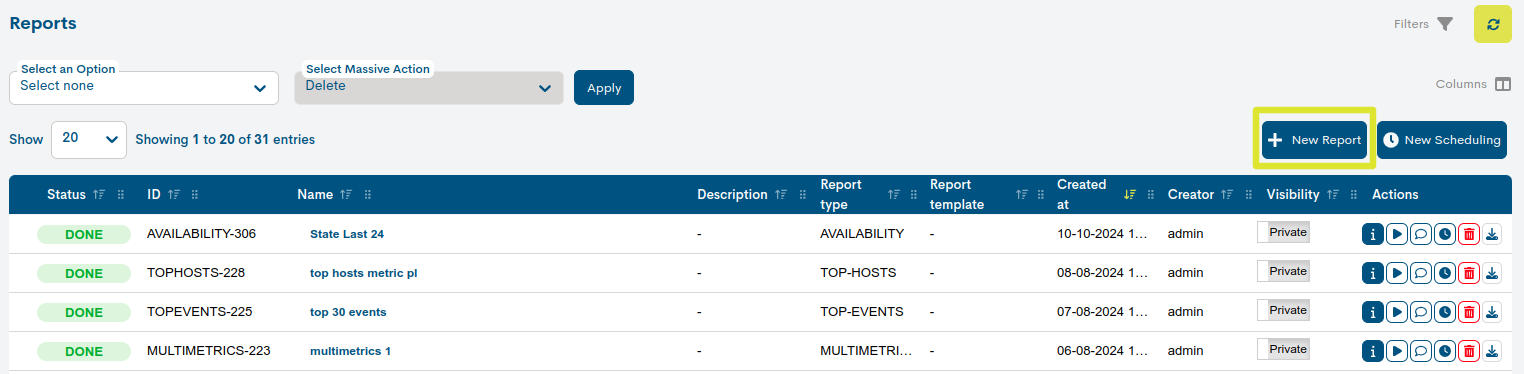
A registration form will then appear, which will reveal configurations according to the type of report chosen. The possible options are:
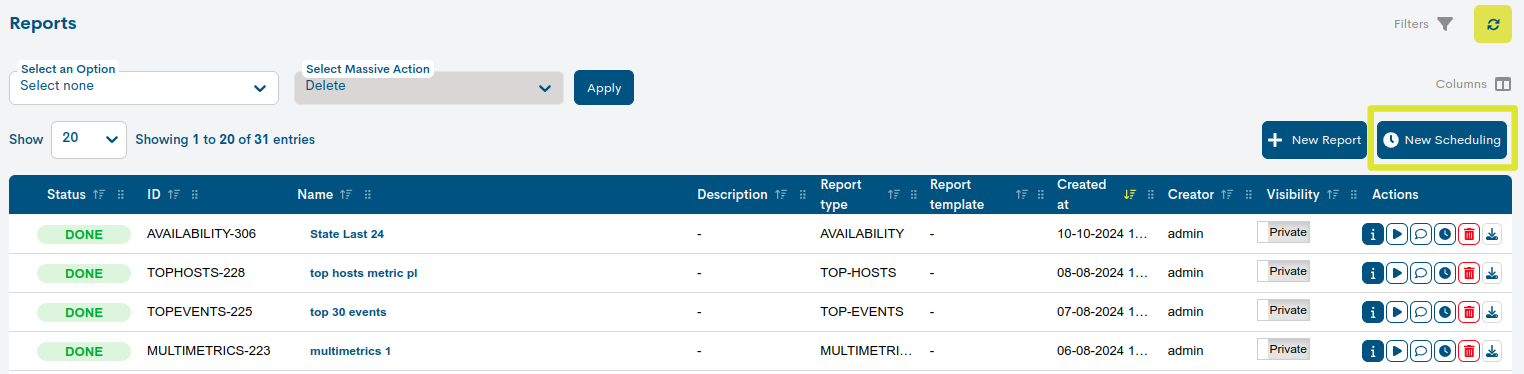
New Scheduling
Through this option it is possible to generate new scheduled reports. More information: Scheduling.
Filtering and search options for reports
Since the inventory of reports can be very large, the tool has options for filtering and searching the displayed items.
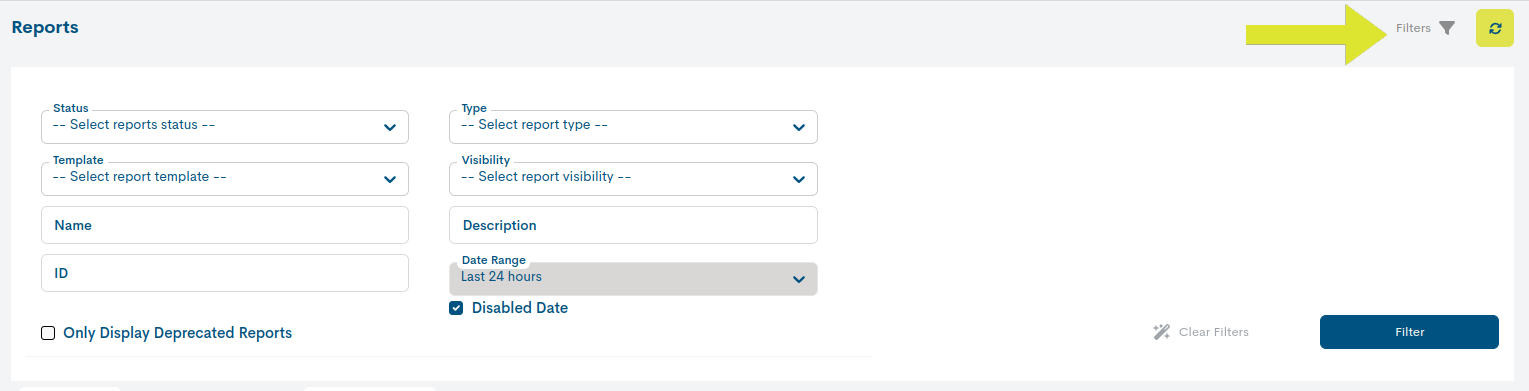
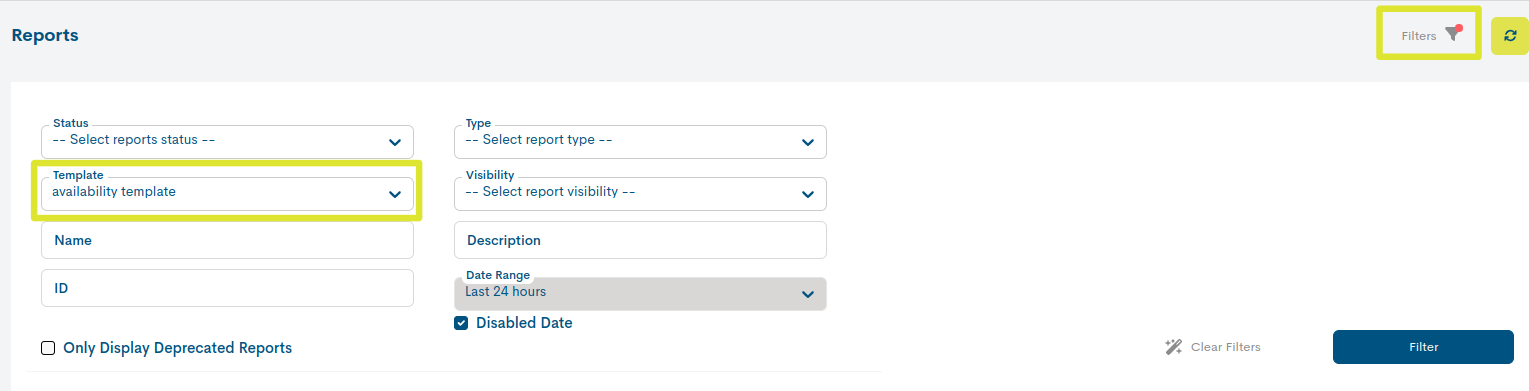
When filters are applied, WOCU-Monitoring displays the message There are filters applied” at the top of the screen.Clicking on this button resets the search, i.e. all applied filters will be the applied filters will be removed.
Filter by status
It allows filtering according to the different states in which the reports can be found. These are:
Pending: the report is pending execution.
Progress: the execution of the report is in progress.
Done: the report is already created and available to the user.
Failed: the report has suffered a failed execution, i.e. it has not been executed correctly.
Unknown: this status is assigned when none of the above has been detected and indicates that the status of the report is unknown.
Filtered by type of report (Filter by type)
It allows you to filter reports according to their typology.
The possible options are:
Filter by template type
Allows filtering according to the template that has been applied to the report.
Filtered according to display
Allows filtering based on the public or private visibility of the report. By default, it is set to All, meaning that when applying this filter, both public and private reports will be shown. If, on the other hand, only private or public reports are desired, the Private or Public options should be selected accordingly.
Name
Allows a search to be made on the basis of the name assigned to the reports. The search works with the first characters of the name, even with several intermediate or final characters.
Description
Allows a search by the complementary description of the report”This filter will be effective when the reports include some kind of information recorded in the Description field, otherwise, no items will be retrieved.
Created at
Through this filter it is possible to retrieve reports according to the date they were created.
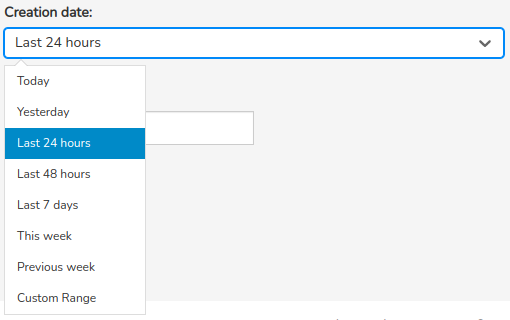
There are a number of time criteria already in place:
Today: filters and displays only the events generated during the time period elapsed in today’s day.
Yesterday: generated yesterday.
Last 24 hours: generated in the last 24 hours.
Last 48 hours: generated in the last 48 hours.
Last 7 Days: generated in the last seven days.
Last 30 Days: generated in the last 30 days.
This Week: generated during the period of time elapsed in the current week (from the start day of the week to the current day).
This Month: generated during the period of time elapsed in the current month (from day 1 to the current day of the month).
Previous Week: generated in the previous full week (Monday to Sunday).
Previous Month: generated in the previous full month (from day 1 to days 28/30/31).
In case you want to set a specific period of time there is the option Custom Range. To configure the time frame it is necessary to set a start date and an end date. By clicking on one of the days, this date will be set as a selection, being marked with a blue background. In addition to the day, a specific time can be set for that day, using the drop-down menus in the hour, minute and second boxes, until the desired time is set. The selected date and time can be seen both in the upper boxes and in the lower part of the view.
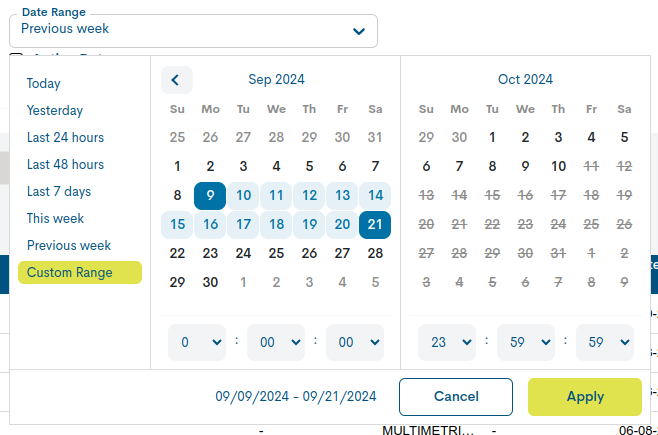
Once the programming has been carried out, click on the Apply button to apply the programming.
Attention
It is of course not possible to choose start and end dates after the current date, nor to set an end date before the start date.
ID
Allows a search to be performed on the basis of the report ID. IDs are unique so it is an easy and efficient way to search for items.
Finally, in order to execute the proposed search, it is necessary to click on the blue button Filter. If, on the other hand, the user wants to reset the query, the user must click on the option Clear filters.
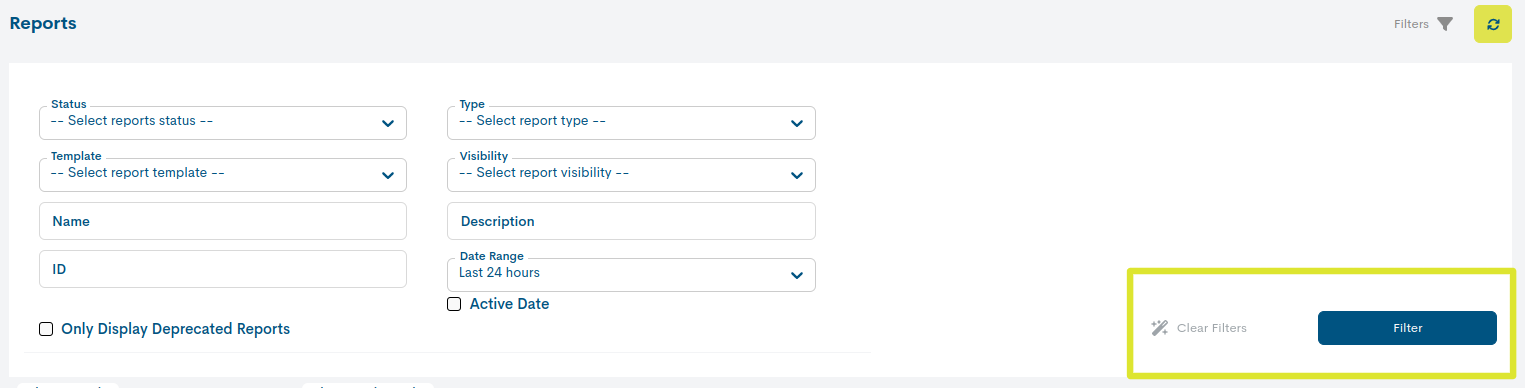
Only display deprecated reports
It allows filtering reports generated in previous versions of WOCU, i.e. in an older version than the current one. By default, the filter is deactivated, so that the panel shows reports launched in this version as well as in previous versions. If, on the other hand, you want to retrieve only obsolete reports, just apply the filter.

For easy identification, when a report reaches this state of obsolescence, it will be greyed out in the global listing. This status also implies the disabling of all actions on the report.
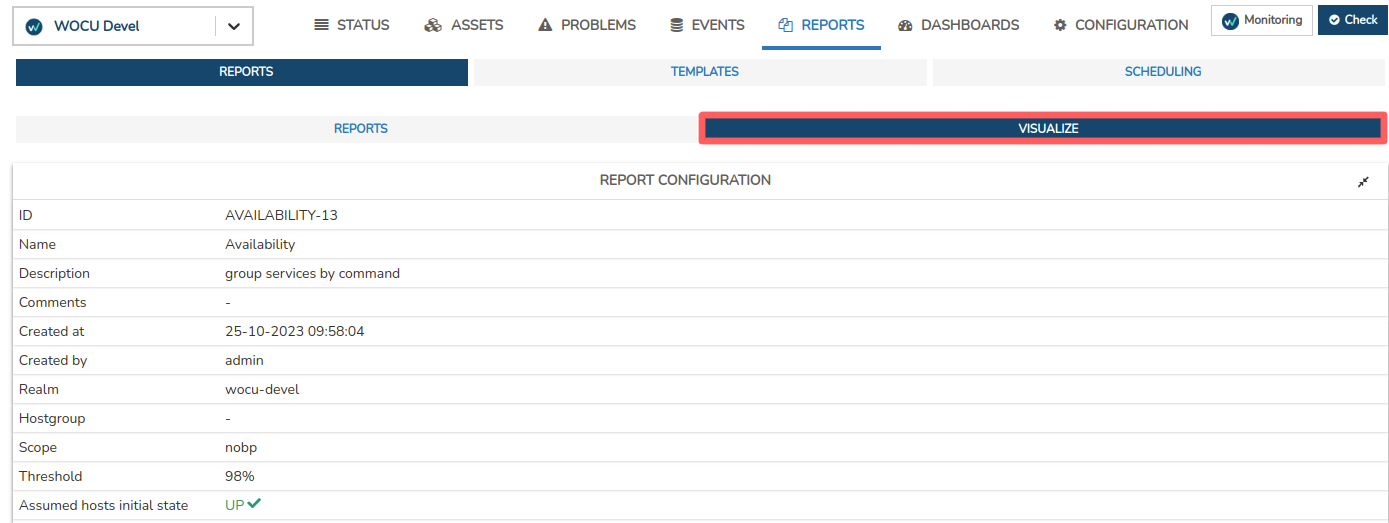
Visualize
This section is directly linked to the Reports section, as clicking on the label of the name of a particular report, the user will be redirected to the present section Visualize.

Important
This tab will not be available until the user accesses it.

In this space, the report is presented in its entirety through panelsand graphics, for reading and interaction by the user”
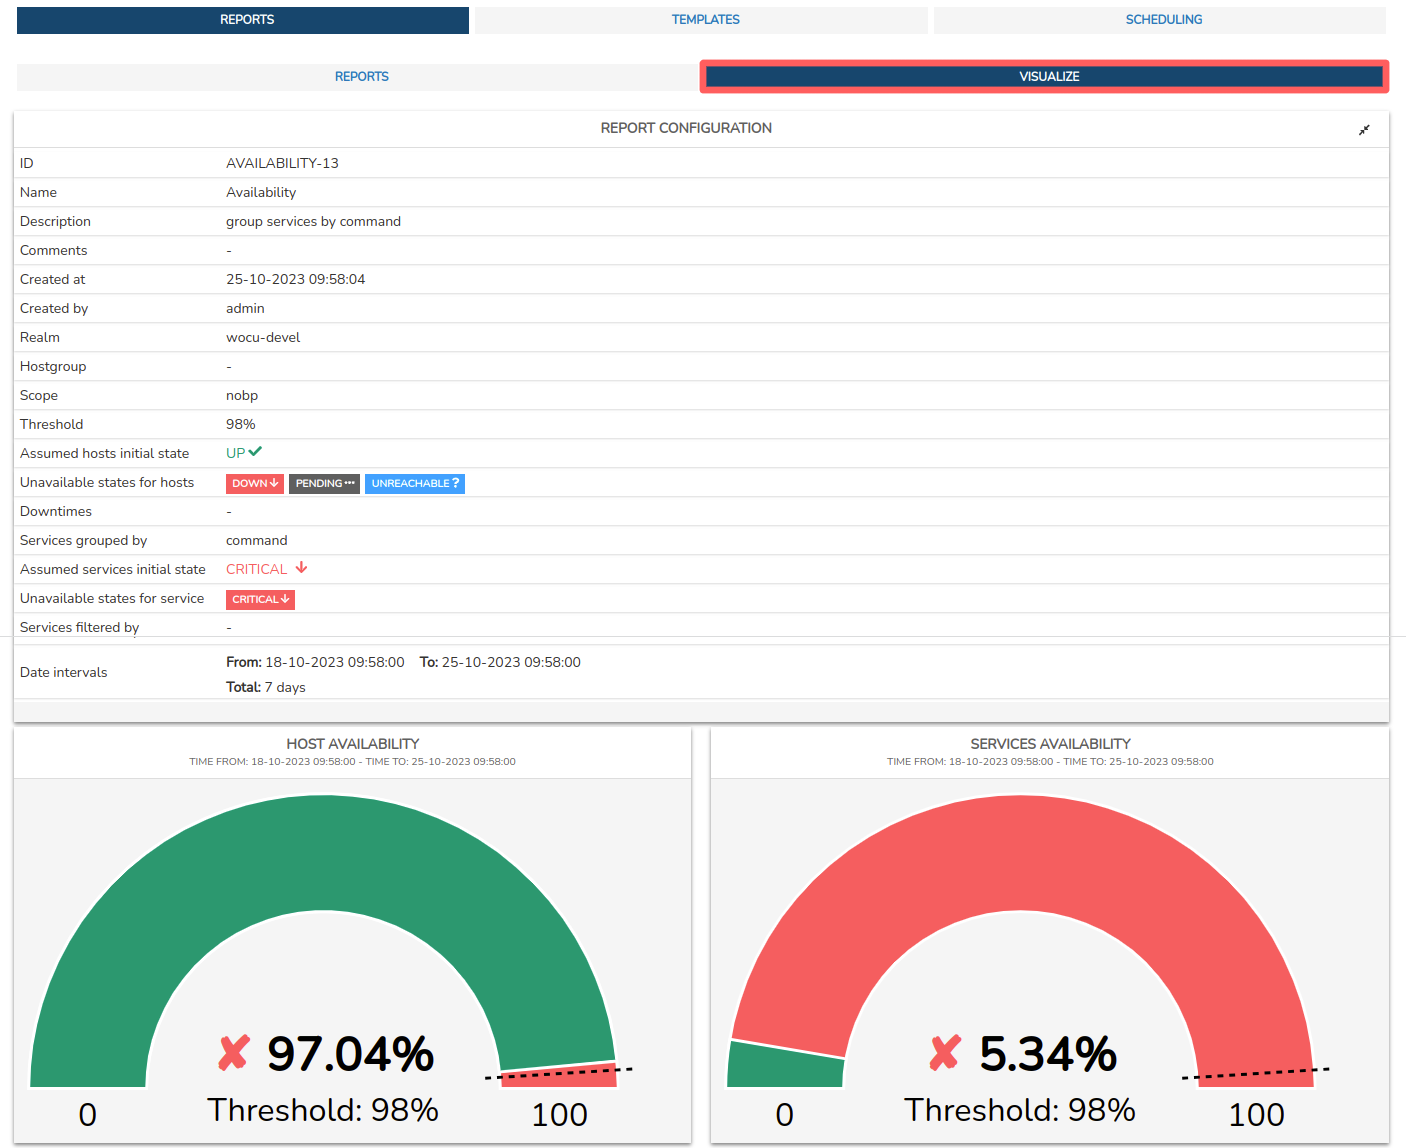
The reports displayed in this section are explained in detail in the the sections “Analysis and Report Options” corresponding to each typology. See in the following shortcuts: