Reports
From this section the user can create, schedule and manage different types of Reports.

Centralized Report Management
This centralized dashboard will display the reports generated in the application, organized sequentially (by default).
Here you will find all the available reports, accompanied by a series of fields previously defined by the user, as well as others that are automatically generated by the system.

The display of inventory fields (columns) is configurable using the Columns option. This feature allows the user to dynamically select which columns to display in the table view and which ones to hide. More information at: Customizing table display: Columns.

Additionally, the application includes support for dynamic table column resizing, allowing the user to manually adjust the width of each column according to their viewing needs. For more information, see here.

The possible options are:
Status
Indicates the status of the reports. These can be:
Pending: the report is pending execution.
Progress: execution of the report is in progress.
Done: the report is now created and available to the user.
Failed: the report has suffered a failed execution, that is, it has not been executed correctly.
Unknown: This status is assigned when none of the above have been detected and indicates that the status of the report is unknown.
- ID
Unique, numerical identifier assigned by the system to each report.
- Name
Displays the report identification term previously assigned by the report creator.
By clicking on the name tag, the report is accessed. In this space, the report is presented entirely through panels and graphs, for reading and interaction by the user.

The reports displayed in this section are explained in detail in the sections Analysis and Report Options corresponding to each typology. See the following shortcuts:
Attention
Access will not be available when the report status is Failed and when it is considered obsolete (report generated in a version previous to the current one).
- Description
Displays descriptive text relating to the report previously assigned by its creator.
- Report Type
Indicates the type of report, which may be:
- Report Template
Indicates the Templates that has been applied to the report.
- Create at
Indicates the date and time the report was created.
- Creator
Reports the user who created/owned the report.
- Visibility
Indicates the type of visibility of the report (Public or Private), defined previously by the user.
Attention
Modifying the visibility of the report will be freely configurable if the user has the appropriate permissions.
- Cover
Field visible through the Column function. Indicates the Covers template that has been implemented in the report.
Actions on inventoried reports
Column containing the buttons for the actions allowedon each of the reports.
Attention
Please note that there are different types of users with access to WOCU-Monitoring. This means that the modification and configuration of the mentioned actions will be allowed as long as the user has the special permissions for each of them.

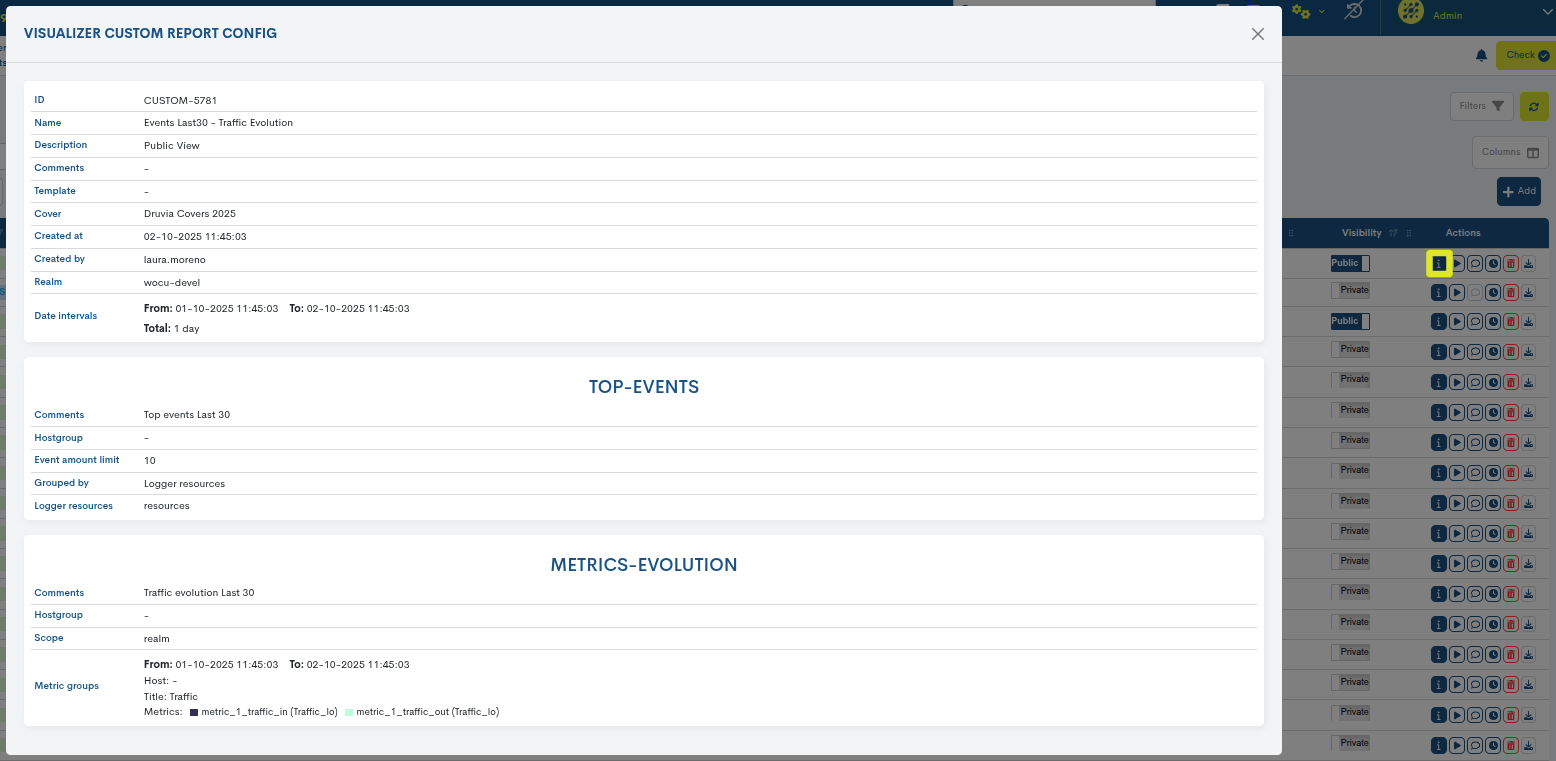
Visualizer custom report config
Through this button a detailed view will appear with the configuration values of the corresponding report.
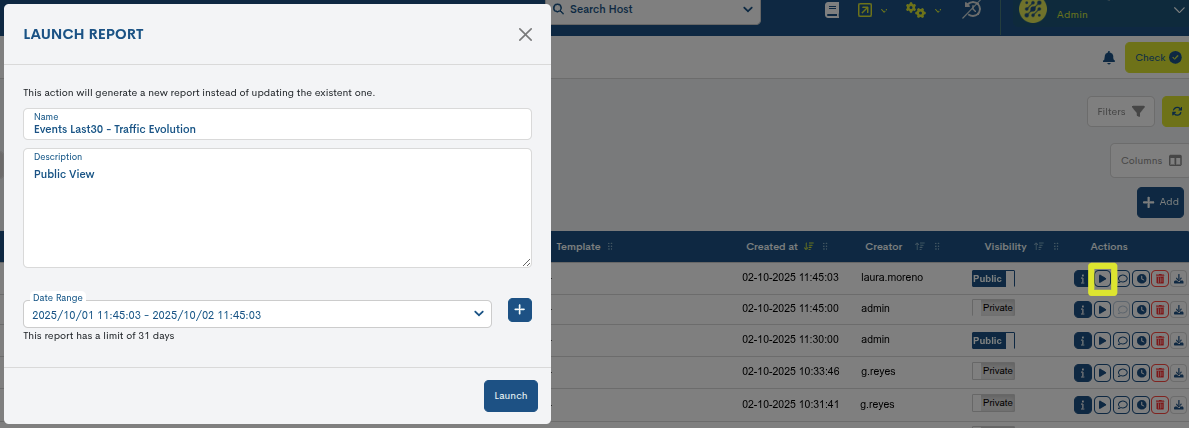
Launch
Allows you to relaunch the selected report by changing the fields: Name, Description and Date Interval.
Pressing the Launch button will automatically generate the new report.
Attention
To relaunch the report the user must have the appropriate permissions.
This action will not be available when the report is considered obsolete (report generated in a version older than the current one).
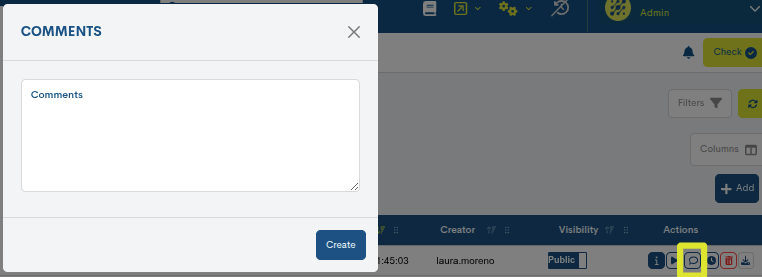
Comment
Allows the user to enter a note or comment associated with a report. This space will normally be used to note any relevant information about the report that the user considers important to share with the rest of the tool’s users.
By clicking the comment icon, a window will appear where the user can register the note they want to add to the report. By clicking the Save** button, the comment will be registered.
Comments are visible in the report configuration panel, and in the exported PDF report, if the corresponding checkbox is selected.
Attention
To add comments to the report, the user must have the appropriate permissions.
This action will not be available when the report is considered obsolete (report generated in a version older than the current one).
Schedule
WOCU-Monitoring enables the automation of reporting operations, thanks to the ability to schedule their generation and launch at the user’s discretion. This feature streamlines the report production and processing process, thanks to the extensive flexibility in scheduling dates and periodicity and the reduction in waiting times for results, caused by the large amount of information extracted from different databases, coupled with the intensive computing power required to process said data.
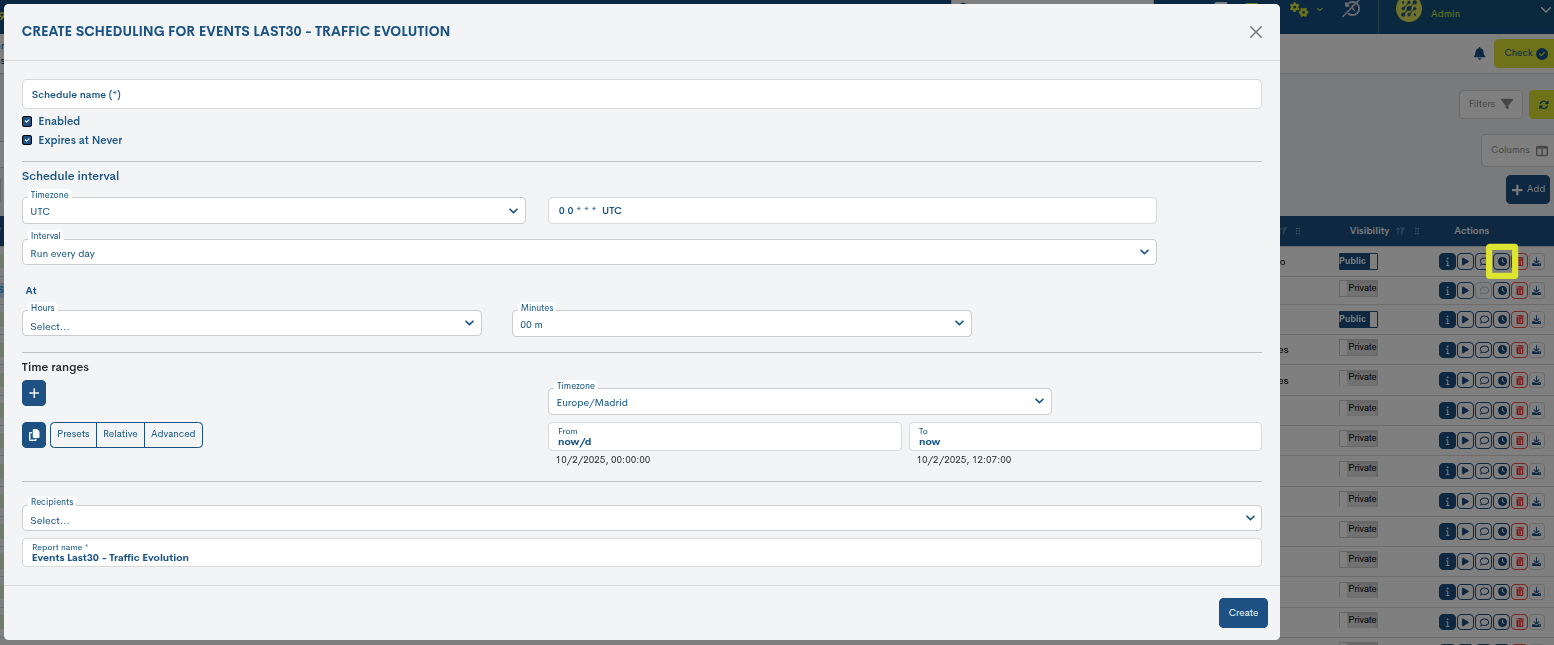
By clicking on the button (🕒), a new form will open to carry out the programming of the report in question.
Note
All report schedules are managed from the section: Scheduling.
Report Schedule Creation Form
The report scheduling form includes the following configuration fields:
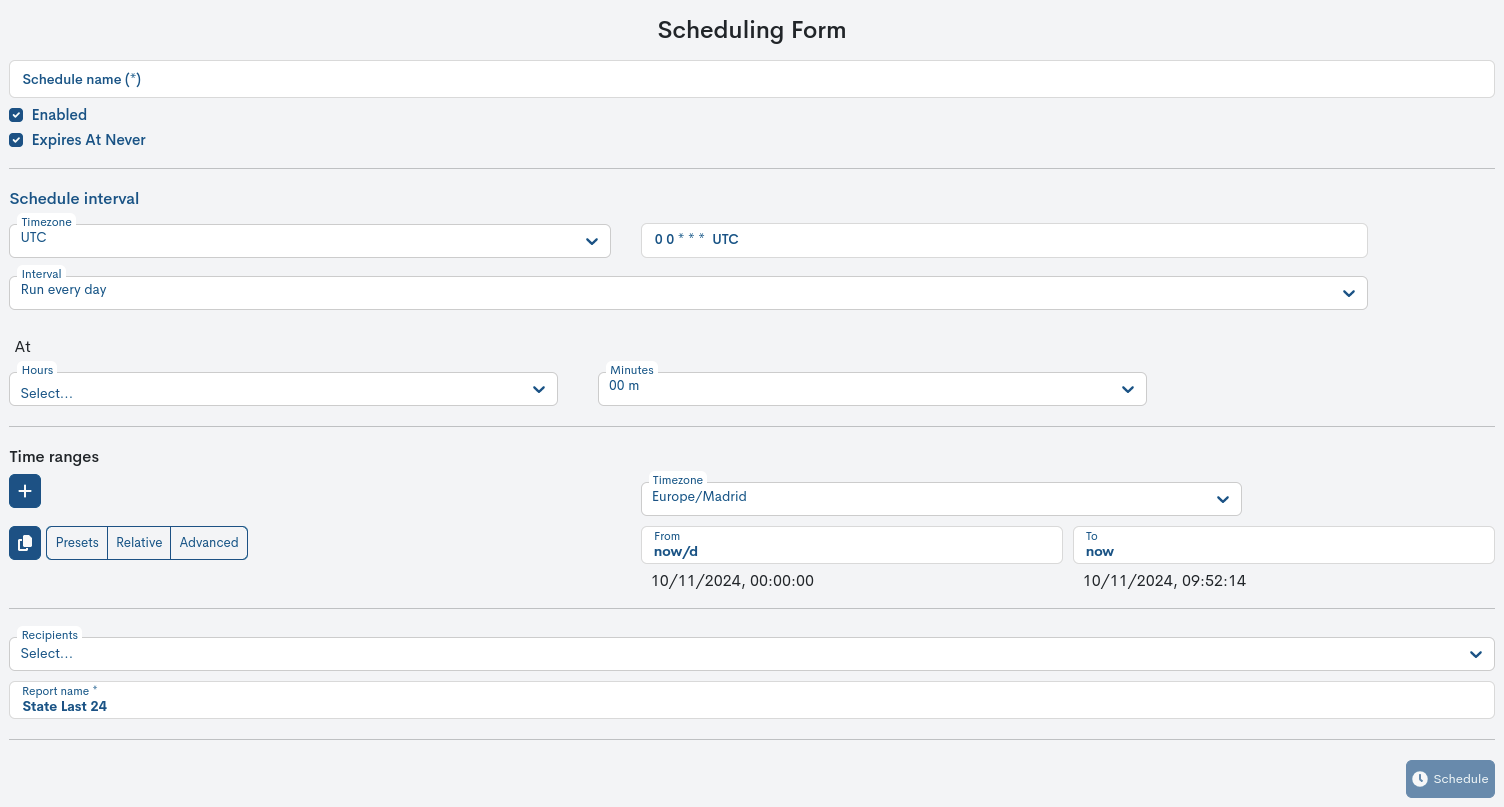
- Schedule Name
Mnemonic name assigned to the scheduling of a report.
- Enabled
This option indicates whether the report schedule is active (checked box) or not (unchecked box). It allows you to leave the schedule configured at a certain time, without generating reports until this option is enabled again.
- Expires At Never
This option indicates whether a report schedule has an expiration date.
If the box is checked, this schedule will not expire and will be launched cyclically until it is reconfigured or permanently deleted. Otherwise, a field will be displayed to define the exact date and time at which the report schedule will expire.
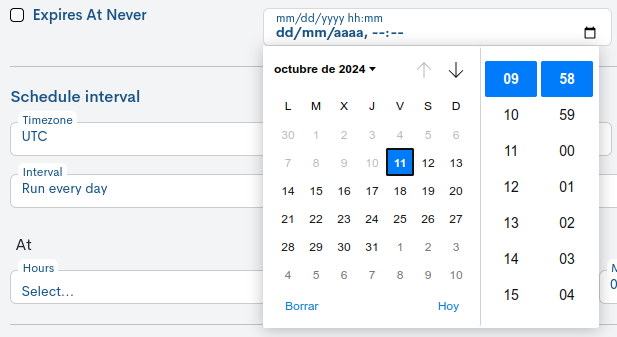
Important
Logically it is not possible to choose a date after the current date.
- Schedule Interval
In this section you set the frequency and time zone with which the report will be launched. To do this, there is a selector with multiple options that, depending on the one selected, will reveal settings according to the option chosen.

1. Timezone selector, for selecting the time zone that will be taken into consideration when collecting data for the new report. This option is useful for operators who want to schedule reports applying a time zone other than the one currently in use.

2. Selector Interval
2.1. Run every day: this option will re-launch the report daily. To configure it, you will need to indicate the hour and minute at which the report will be launched each day using the time selectors At.

2.2 Run every week: this option will re-launch the report weekly. In its configuration a series of selectors are displayed:

Run at days: to define the day or days of the week of release.
Days Week: predefined configuration selector for automatic report generation. Selecting one of the possible options will automatically set the appropriate configuration:
Default: this option sets the default launch of reports on Mondays (Mo) and at the time set by the user.
Working days: reports will be released only on working days(Mo, Tu, We, Th, Fr).
Weekend: reports will be released only on weekends(Sa, Su).
Time selector At: to define the hour and minute of the report launch.
2.3 Run every month: this option will re-launch the report monthly. The following selectors are displayed in its configuration:

On day: to indicate the day of the month on which the report will be released. The numbers 1 to 31 represent the days of the month.
Time selector At: to program the hour and minute at which the report will be launched on each set day of each month.
Attention
If you select days 29, 30 or 31, months with fewer days are excluded from the execution.
2.4 Run on cron schedule: finally, this option allows you to make a configuration just as you would do in Crontab format, providing all the flexibility of this tool for more specific and customized scenarios.

Important
To use this option you need to know the tool Crontab format.
Note
In each of the available programming intervals, a text field is included (not modifiable), where the crontab configuration to be applied is indicated.

- Time Ranges
This section indicates the period in which the samples will be collected to compute the report. It provides greater flexibility by allowing data to be obtained from days, weeks or months prior to the time of execution.
As time progresses, the date ranges from which information is extracted are also dynamically adjusted.

Important
To nest multiple date ranges relative to the release of reportsuse the + Button.
To duplicate or copy a specific date range, use the Copy button.
To delete a specific date range, use the X Button.

1. Timezone selector
Useful for setting the time zone that will be taken into consideration when collecting data for the new report. This option is useful for operators who want to schedule reports using a time zone other than the one currently in use.
2. Setting Time Ranges
To configure relative date ranges, you will need to use one of the three available options:
2.1 Presets: provides several pre-configured range criteria. Simply select one of the criteria to activate that setting.
For example, the Today option indicates that the report will be launched with the samples collected during the time period elapsed in today’s day, or This week will use the samples collected during the time period elapsed in the current week (from the start day of the week to the present day and time).
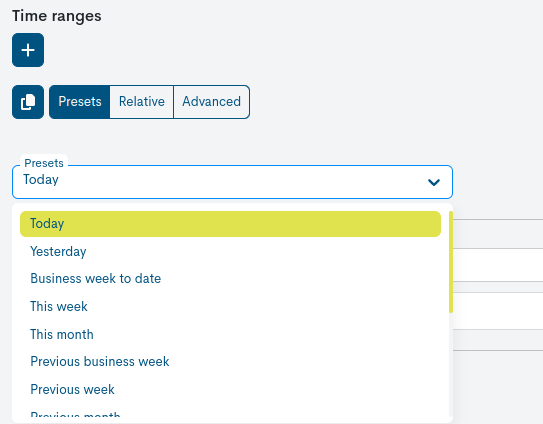
2.2 Relative: this criterion allows you to define a custom relative range for collecting report information. It is more flexible than the Presets option, where ranges are pre-set and cannot be modified. Time ranges can be set to minutes, hours, days, weeks, and months in the past using the From: and To: selectors.

Within the selection of ranges there are two other configurations complementary for the limitation of results:
No snap: by activating this option the date that will be set will be the current date minus the specified time.
Example
At 3:00 p.m. on 02/12/2024, if the report is configured from a day ago (From: Days ago) to 5 minutes ago (To: Hours ago) from the current time, samples recorded from 3:00 p.m. on 02/11/2024 to 2:00 p.m. on 02/12/2024 will be collected.
Start day/ End day: in this case the date that is established is the current date, minus the determined time truncated at the start of the selected magnitude.
That is, if the Start day box is checked, the selected date will be set to the start of the day (i.e. 00:00 hours). This means that the report will collect data from the first moment of the specified day.
On the other hand, if the End day box is checked, the date will be set to the end of the day (i.e. 23:59:59). The report will collect data up to the last second of the indicated day.
Both options are useful when you want to make sure the report covers an entire day, starting or ending at exact times without having to manually adjust the time.
2.3. Advanced: This criterion allows you to define a date range for the collection of samples, using the format datetokens.

Note
To represent date ranges, the format datetokens is used through the start (From) and end (To) parameters. This component is merely informative as it does not apply any changes.

For more information, please see the following links:
- Recipients
This option allows you to select zero, one, or more recipients to whom an email will be sent when the report is completed.
Attention
Only users who have viewing permissions for the realm in question will be available in the drop-down menu, except for the Administrator, who will have the full list of users registered in the system, regardless of the viewing permissions or realm restrictions they have associated. More information at: Realm display configuration.

Remember
By selecting more than one contact as a recipient, the report will become public for users in the Kingdom, regardless of whether the report was initially set to private.
- Report Name
Finally, this field allows you to set the identifying name of the next report to be generated. This is a required field.

Once setup is complete, the report will be generated according to the parameters set by clicking the blue Schedule button.

Crontab format
The format of this field is similar to the format of a UNIX crontab. It consists of five space-separated codes, where each of these codes specifies a specific time unit: minutes, hours, days of the week, days of the month, months of the year. In each of these codes we will specify separately:
At what minute do we want the report to run (using the first code).
At what time do we want the report to run (using the second code).
What days of the week do we want the report to run (using the third code).
What days of the month do we want the report to run (using the fourth code).
What months of the year do we want the report to run (using the fifth code).
Every minute, a check is made to see if a report should be run or not, based on whether we have allowed a report to run at the current minute, and at the current hour, and at the current day of the week, and at the current day of the month, and at the current month of the year.
To provide a simple approach to these codes, some values that can be entered into each field are:
Asterisk (*): means it can be run every minute, or every hour, or every day of the week, or every day of the month, or every month of the year.
A numeral: means that it can be executed when the minute hand, hour hand, day of the week number, day of the month number, or month of the year number match the one we have told it:
As a minute hand we can specify a number between 0 and 59.
As the hour of the day we can specify a number between 0 and 23.
As a day of the week we can specify 0 for Sunday, 1 for Monday, and so on up to 6 for Saturday. In the case of days of the week, it is legal to use the words mon, tue, wed, thu, fri, sat, sun, to refer to the days of the week in a more literal way.
As a day of the month we can specify a number between 1 and 31(taking into account the fact that not all months will have 31 days).
As a month of the year we can specify a number between 1 and 12.
Examples
30 12 * 1 * means that the report can be run “every 1st day of every month, at 12:30, regardless of the day of the week”.
0 0 mon * * means that the report can be run “every Monday at midnight (00:00), every day of every month of the year”.
However, for each unit, we can also specify more than one possible option, if we separate them with commas.
Examples
0 0 mon,tue,wed,thu,fri * * means that the report will run every Monday, Tuesday, Wednesday, Thursday, and Friday at midnight.
4,8,15,16,23,42 6 * * * means that the report will run every day at 6:04, 6:08, 6:15, 6:16, 6:23 and 6:42.
In addition, the following shortcuts are accepted to declare multiple values:
Two numbers separated by a dash: allow you to specify a range of dates. So we can use 10-15 as an alternative for 10,11,12,13,14,15.
Asterisk-slash-hash: allows you to specify all values that are divisible by the number you specify. For example, */2 is equivalent to all possible values divisible by 2; */5 is equivalent to all possible values divisible by 5.
For example, the schedule 20-25 */5 * * * causes the report to run at minutes 20, 21, 22, 23, 24, and 25 at hours 0, 5, 10, 15, and 20.
Important
After running at 20:25, the next execution will be at 0:20, because 0 is the next number divisible by 5 after the 20th hour. In other words, the numeral does not mean that it runs every N days, hours, or minutes, just that it runs in a unit of time that is divisible by the numeral provided.
Delete
This option permanently deletes the corresponding report. When you press the delete button, a message will be displayed confirming the action.

To continue with the deletion, you must press the red Delete button.To permanently delete the report, the user must have the appropriatepermissions.
Export
The system allows the export and download of reports in various formats, at the user’s discretion. The possible options are:
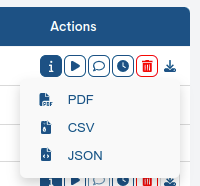
PDF (Portable Document Format): Fixed, non-modifiable format. Exporting to PDF makes it easier to share, store or print.
XLSX: Modern standard Excel format for creating, editing, and sharing spreadsheets. It allows you to store and manage data in cells organized by rows and columns, and also includes formulas, charts, pivot tables, filters, styles, and macros.
JSON (JavaScript Object Notation): lightweight data exchange format that can be read by any programming language, and that, by being modifiable, allows a new file to be generated and processed from the exported file, using other different tools. In short, a JSON file can be post-processed, unlike a PDF file, which is fixed and immutable.
These export options make it easy to send the information immediately.
Note
This action will not be available when the report status is Failed and when it is considered obsolete (report generated in a version previous to the current one).
Operational Options on Reports: Filters and Bulk Actions
Since the Reports inventory can be very extensive, the tool has filtering and search options for the items displayed. By default, these options are hidden; click on the Filters button to view them.

When WOCU-Monitoring filters are applied the Filters button will display a red dot over the funnel icon.

The fields are described below:
Filter by Status
Allows you to filter according to the different states in which the reports can be found. These are:
Pending: The report is pending execution.
Progress: Report execution is in progress.
Done: The report is now created and available to the user.
Failed: The report has suffered a failed execution, that is, it has not been executed correctly.
Unknown: This status is assigned when none of the above have been detected and indicates that the status of the report is unknown.

Filter by Type
Allows you to filter reports based on their typology.
The possible options are:

Filter by Template
Allows you to filter based on the template that has been applied to the report. More information about this element at: Templates.

Filter by Visibility
Allows you to filter based on public or private visibility of the report. By default, both public and private reports are displayed. If, on the other hand, you only want to retrieve private or public reports, you must select the Private or Public options accordingly.

Name
Allows you to perform a search based on the name assigned to the reports. The search works with the first characters of the name, even with several intermediate or final characters.

Description
Allows you to search by the additional description of the report. This filter will be effective when the reports include some type of information recorded in the Description field, otherwise, no elements will be retrieved.

ID
Allows you to perform a search based on the report ID. IDs are unique so it is an easy and efficient way to search for items.

Created at
Using this filter you can retrieve reports based on the date they were created.
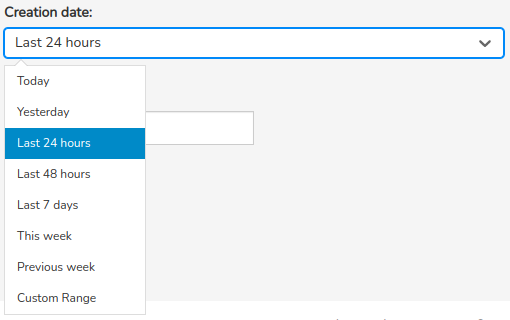
There are several time criteria already established:
Today: Filters and displays only events generated during the period of time elapsed during today’s session.
Yesterday: generados ayer.
Last 24 hours: generated in the last 24 hours.
Last 48 hours: generated in the last 48 hours.
Last 7 Days: Generated in the last seven days.
This Week: Generated during the time period elapsed in the current week (from the start day of the week to the current day).
Previous Week: Generated in the previous full week (Monday to Sunday).
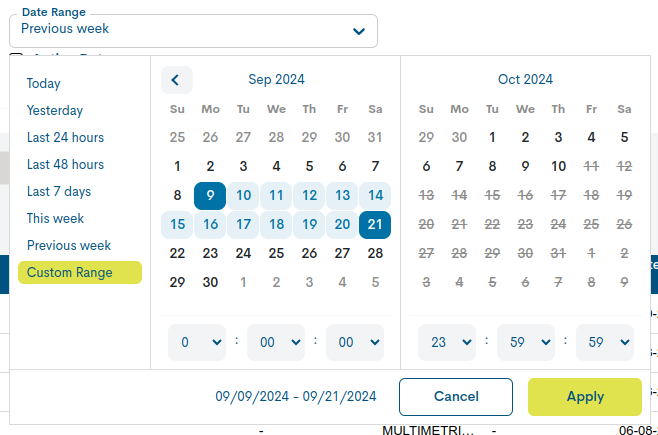
Custom Range: to set a specific time period. To configure the time frame, you need to set a start date and an end date. Clicking on one of the days will set this date as a selection, marked with a blue background. In addition to the day, you can set a specific time for that day. To do this, you need to use the drop-down menus in the hour, minute, and second boxes until you set the desired time. You can see the selected date and time in both the top and bottom boxes of the view.
Attention
Logically, it is not possible to choose start and end dates later than the current date, or to set an end date earlier than the start date.
Only display deprecated reports
Allows you to filter reports generated in previous versions of WOCU-Monitoring, that is, in a version older than the current one. By default, the filter is disabled, so that the panel displays both reports launched in this version and in previous versions. If, on the other hand, you only want to retrieve obsolete reports, simply apply this filter.
For ease of identification, when a report reaches this obsolescence state, it will be grayed out in the global listing. This state also implies that all actions on the report are disabled.
Finally, to execute the proposed search, it is necessary to click on the blue Filter button. If, on the other hand, the user wants to reset the query, the user must click the Clear filters option.

Mass Deletion of Reports
With both selectors it is possible to delete multiple reports at the same time. The action is executed as follows:

1. Selecting reports to remove from the list
Before deleting, you must select the reports you want to delete from the instance. The view allows several options:
Manual marking of reports in the list itself by clicking on each one of them.

Using the Select Current Page option of the first selector, to mark all the reports on the current page of the list, or the Select all option to mark all items. Applying the Select None option revokes the previous selection.

2. Selecting the delete action (Delete)
Once you have selected the set of reports you are interested in, you will have to use the adjacent drop-down menu to select the action Delete.

The system will ask the operator for confirmation before permanently deleting any item. Once the action is approved using the Delete button, the deletion process will begin. The list will then be updated with the remaining reports.

Attention
As long as there are no marked reports, the delete selector will appear disabled.
The user may only delete reports created by himself. Except for the Administrator, who has no limitations in this regard.
Creating New Reports (+ Add)
New reports will be created using the “+ Add” button.

A new form will then appear displaying specific settings for the report type selected. For more detailed information on creating new reports, see the following links.
