Import by network scanning
The import or inventorying through network scanning allows for both the discovery of new assets in a specific network and the enrichment of asset inventory data (already stored in the WOCU-Monitoring monitoring database)by scanning ports and operational services via nmap.
Note
By actively scanning IP addresses and active ports, it is possible to obtain a lot of information quickly and easily. It is an ideal approach when deploying WOCU-Monitoring in environments where there is no previous inventory, and you want to quickly initiate monitoring without the need forconfigurations on the various Hosts.
There are two possible tasks that involve network scanning for the incorporation of Assets: Task Scan_Import and Tarea Scan_Inventory.
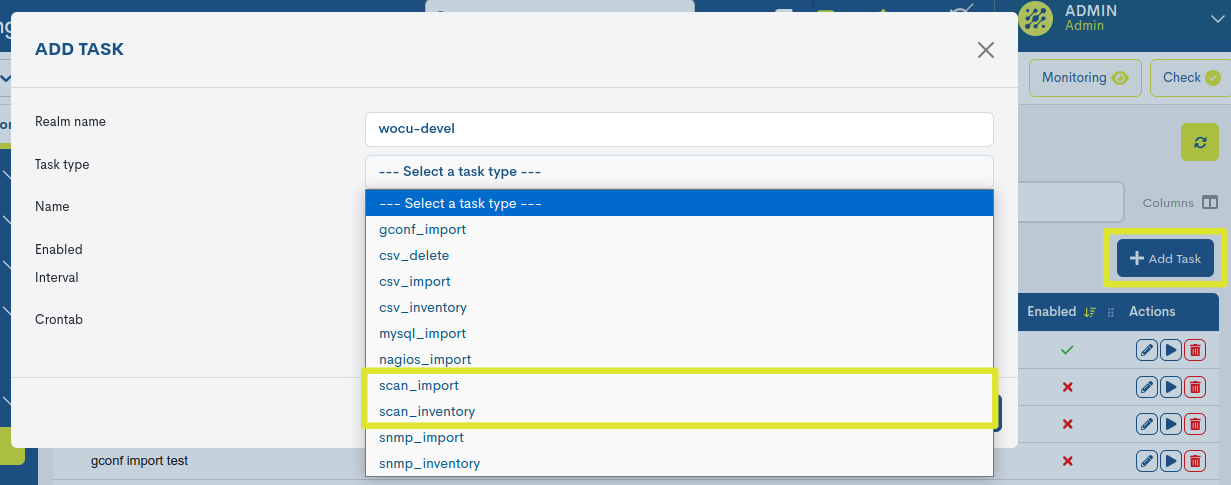
Task Scan_Import
The different fields that the user must fill in for their configuration are detailed one by one below:
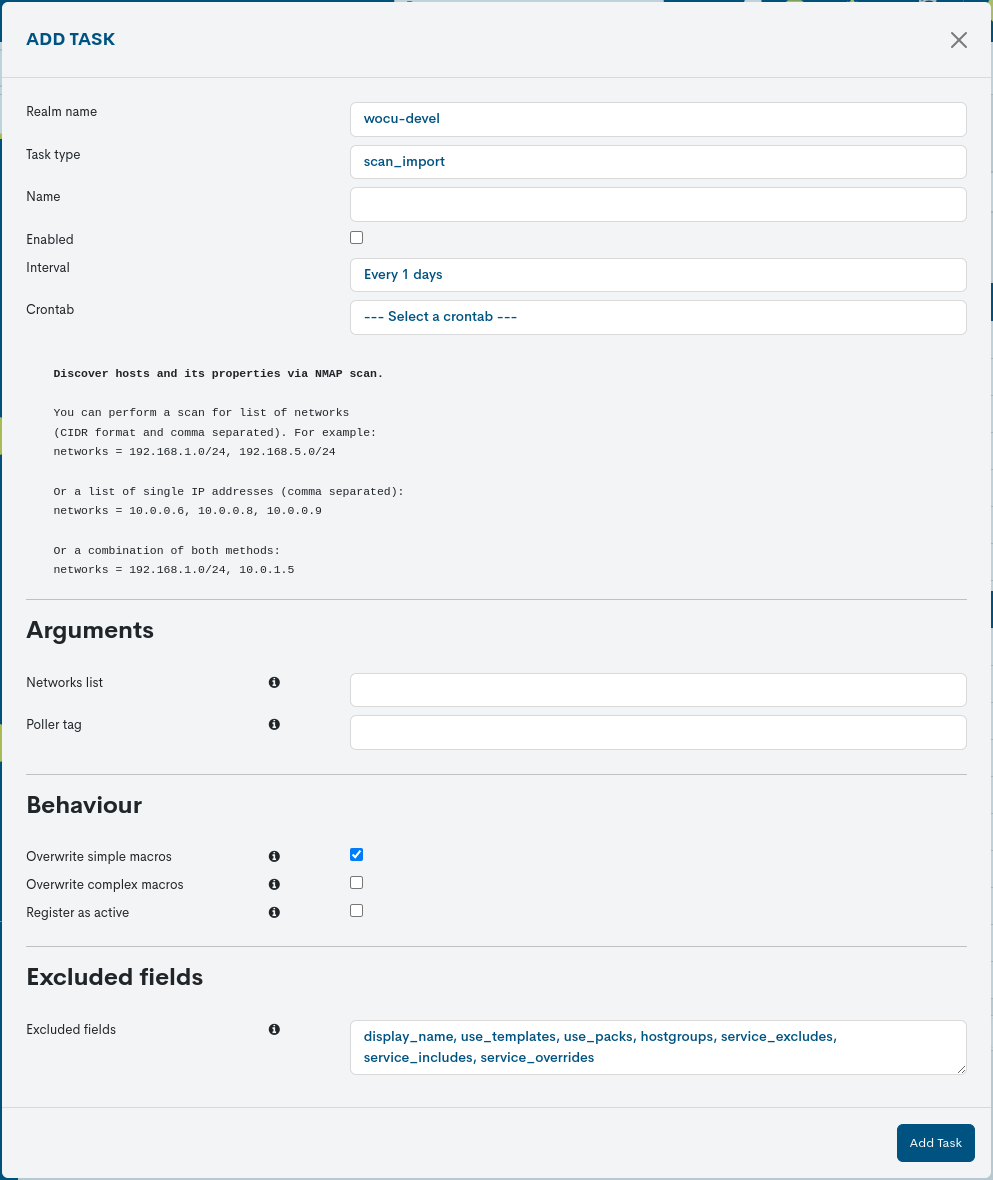
Name
This field is not editable and indicates the name of the Realm that is the subject of the Import Task.
Task Type
This field indicates the Task Type that will be generated. It is the first selectable field in the dropdown menu and influences the remaining fields.
If a different type of Task is selected before saving the changes, the previously entered data will be lost.
Name
The field contains the name chosen by the user to identify the New Task created.
Enabled
Checking this box enables and activates this New Import Task for its next execution.
By default this option is enabled.
Interval
By means of this drop-down menu it is possible to choose how often the Asset Import of this New Task will be executed. The possible options available are:
Task executed daily (Every 1 days).
Task executed every second (Every 1 second).
Contrab
An alternative option to set the frequency at which the Task will be executed. Its configuration is done using the Crontab format, providing greater flexibility for more specific use cases.
Expand information on defining execution periods here.
Help Information about NMAP Scanning
Next, the creation form provides instructions on how the discovery of devices and their properties works through NMAP scanning.
Discover hosts and its properties via NMAP scanYou can perform a scan for list of networks (CIDR format and comma separated). For example: networks = 192.168.1.0/24, 192.168.5.0/24Or a list of single ip addresses (comma separated): networks = 10.0.0.6, 10.0.0.8, 10.0.0.9Or a combination of both methods: networks = 192.168.1.0/24, 10.0.1.5
Networks list
In this field the user shall enter the network(s), IP address(es) where WOCU-Monitoring will perform the scan for Import Assets.
WOCU-Monitoring uses the Nmap tool to scan the configured network(s) or IP address(es) and perform a discovery of the network and its Devices. As explained in the Instructions section above, network addresses must be specified in CIDR (Classless Inter-Domain Routing) format, i.e., the network address must always be accompanied by a subnet mask. Examples: 192.168.0.0/16 (subnet mask 255.255.0.0), 192.168.11.0/24 (subnet mask 255.255.255.0), etc.
To enter multiple networks, the networks must be entered separated by commas. Continuing the example: 192.168.0.0/16, 192.168.11.0/24.
It is also possible to enter one or more unique IP addresses, separated by commas. Example: 192.168.3.11, 192.168.3.14.
Poller tag
In distributed environments there are machines (Pollers) that take care of discovery tasks and execution of checks for the evaluation of operational states, applied on a set of receiving Devices. By defining a tag in this field, it is configured which Poller will be responsible for the newly imported Devices, i.e. it will be in charge of sending checks and discoveries to each Device in question.
A Device to monitor with a
poller_tagdefined, will only use the Pollers tagged with the same tag, and never other Pollers with a different tag or none at all. In conclusion, it is necessary that both parties (Device-Poller) share the same tag.Note
The label construction will be carried out from the internal configuration of the machine/Poller itself.
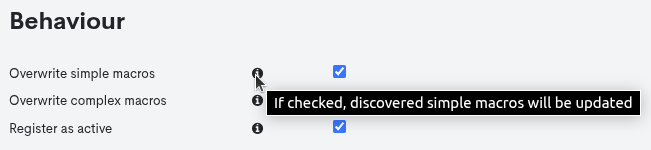
Overwrite simple macros
This option allows you to enable or disable the updating of the simple macros of the Assets. By default this option is enabled.
Overwrite complex macros
This option allows you to enable or disable the updating of the complex macros of the Assets. By default this option is disabled.
Attention
Macros are elements that WOCU uses internally to store properties and information of the monitored Assets.
A simple macro stores a single value. An example of a simple macro is “_DEVICEVENDOR”, a macro that stores as a value the name of the manufacturer of the Device. For example for a Cisco switch this example macro would have the value:
DEVICEVENDOR:Cisco.
A complex macro, on the other hand, can store a multitude of values within a table. An example of a complex macro is “_IFACES”, a macro that stores all the data of the ports and network interfaces of a Device. For example for a Cisco switch this example macro would have the value:
_IFACES:Fa0/0$(1)$$(1)$$(0)$$(0)$$(m)$,Fa1/1$$(4)$$(0)$$(0)$$(m)$, WAN_CPD_01$$(8)$$(0)$$(0)$$(0)$$(m)$…
Given the difficulty of configuring some complex macros, which may require additional manual configuration, it may be preferable to avoid overwriting them when running an Import Task. This is why this option to overwrite complex macros is disabled by default. It is advisable to use this option only with caution, when the user is sure that the execution of this option will not cause major misalignments in the configuration of the Assets.
Register as active
Enabling this option will send assets imported via CSV files directly to the :Monitored Assets list. In other words, the creation in the Pending Assets list will be skipped, and they will proceed directly to monitoring.
Exclude fields
The various import tasks in WOCU-Monitoring have a set of Host attributes that are ignored by default, during the import or update of the asset configuration profile.
In this field, the user can manually edit the fields excluded during the verification of assets through the scanning of ports and operational services via Nnmap. It is possible to modify the list by adding new fields or removing some of the predefined ones.
Note
Clicking on the button identified by the i (Information) icon will open a new window with help information for the different fields. This action does not make any changes to the configuration.
After entering the data in the respective fields, you need to click the blue Add Tasks button to save the new Task in the list.
Tarea Scan_Inventory
Each of the different fields that the user must fill in for the configuration of the new Task is detailed below:
Important
This task only performs enrichment activities on Asset inventory data that are already hosted in the WOCU monitoring database. In no case it will make a discovery of new Assets.
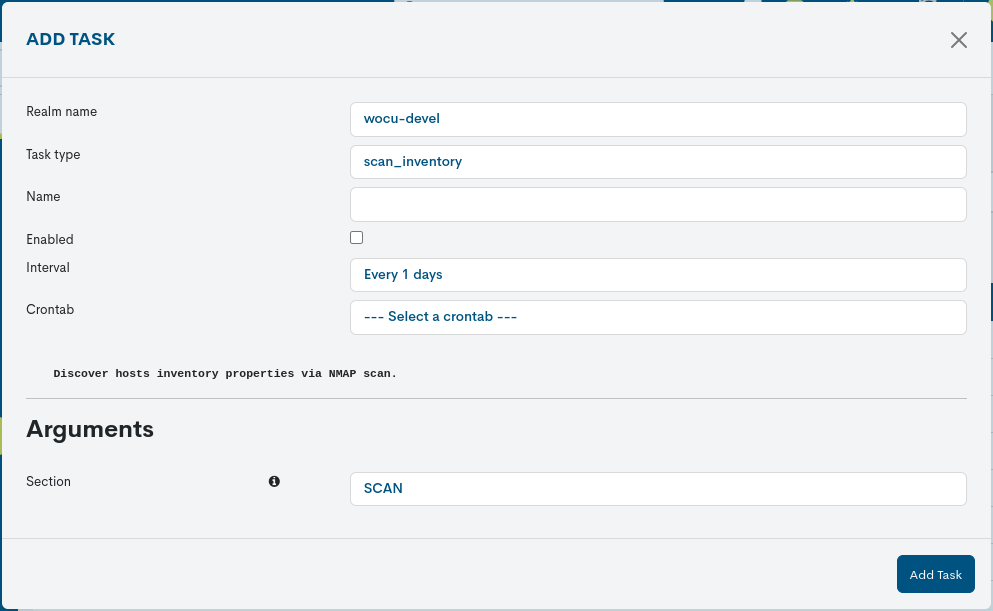
Name
This field is not editable and indicates the name of the Realm that is the subject of the Import Task.
Task Type
This field indicates the Task Type that will be generated. It is the first selectable field in the dropdown menu and influences the remaining fields.
If a different type of Task is selected before saving the changes, the previously entered data will be lost.
Name
The field contains the name chosen by the user to identify the New Task created.
Enabled
Checking this box enables and activates this new Import Task for its next execution.
By default this option is enabled.
Interval
By means of this drop-down menu it is possible to choose how often the Asset Import of this new Task will be executed. The possible options available are:
Task executed daily (Every 1 days).
Task executed every second (Every 1 second).
Contrab
An alternative option to set the frequency at which the Task will be executed. Its configuration is done using the Crontab format, providing greater flexibility for more specific use cases.
Expand information on defining execution periods here.
Section
This field groups the inventory data in the section specified by the user. By default, the SCAN section is pre-set, but this can be freely modified or deleted.
After entering the data in the respective fields, you need to click the blue Add Tasks button to save the new Task in the list.
Note
Clicking on the button identified by the i (Information) icon will open a new window with help information for the different fields. This action does not make any changes to the configuration.