Automatic interface discovery
the network interfaces associated with each device and preparing them for monitoring by WOCU-Monitoring. Furthermore, it is possible to refine this task by filtering the type of interface discovered, using regular expressions that will allow the addition of discovered interfaces that match the defined criteria and the exclusion of those
A case study for the configuration of automatic interface discovery in WOCU-Monitoring is described below:
1. Creating and configuring a new SNMP_Import task
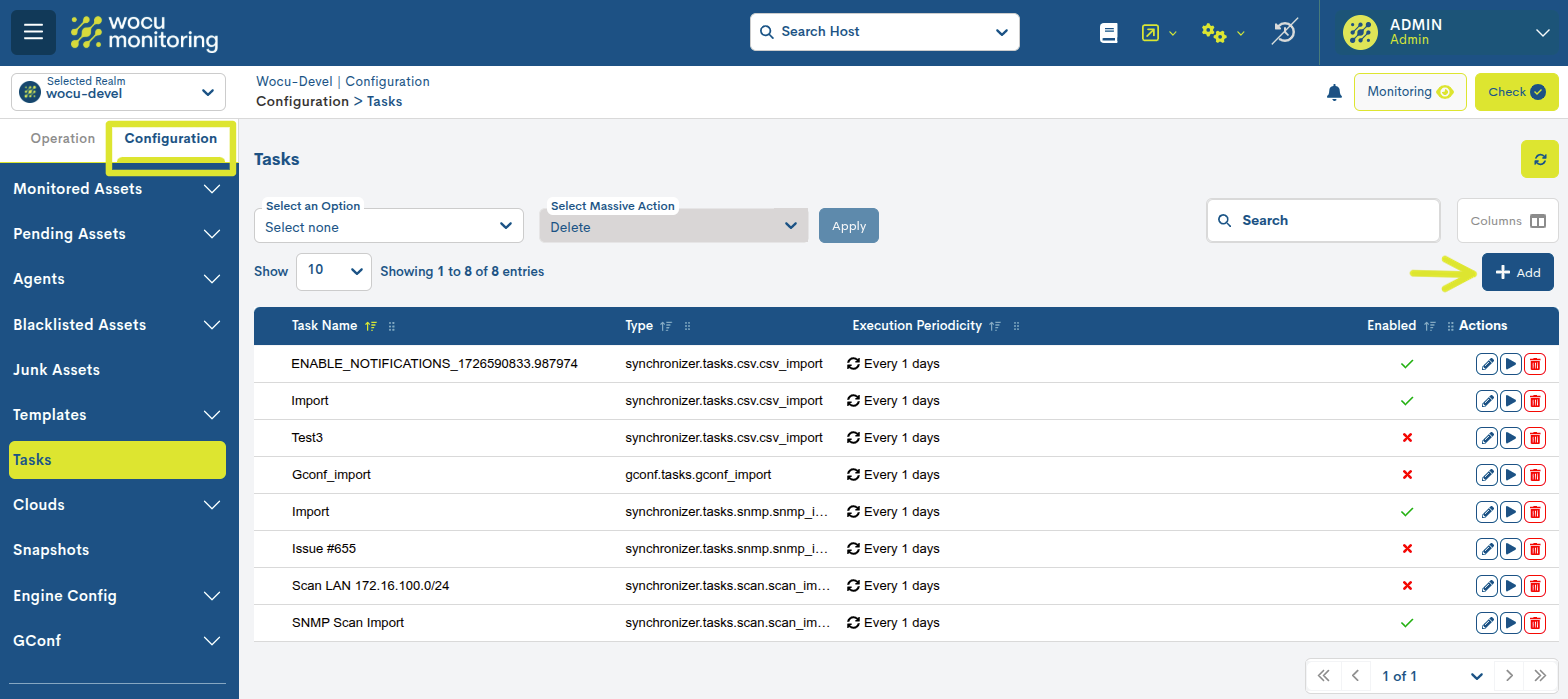
From the Import Tasks (Tasks) section within the Configuration module of a specific realm, the creation of an automatic import task is initiated through the + Add button, located in the upper right of the list.
In this case, an import task is created, named SNMP_Import task. Below are described the fields that must be completed to correctly configure this task. The remaining parameters can be found in SNMP_Import task.
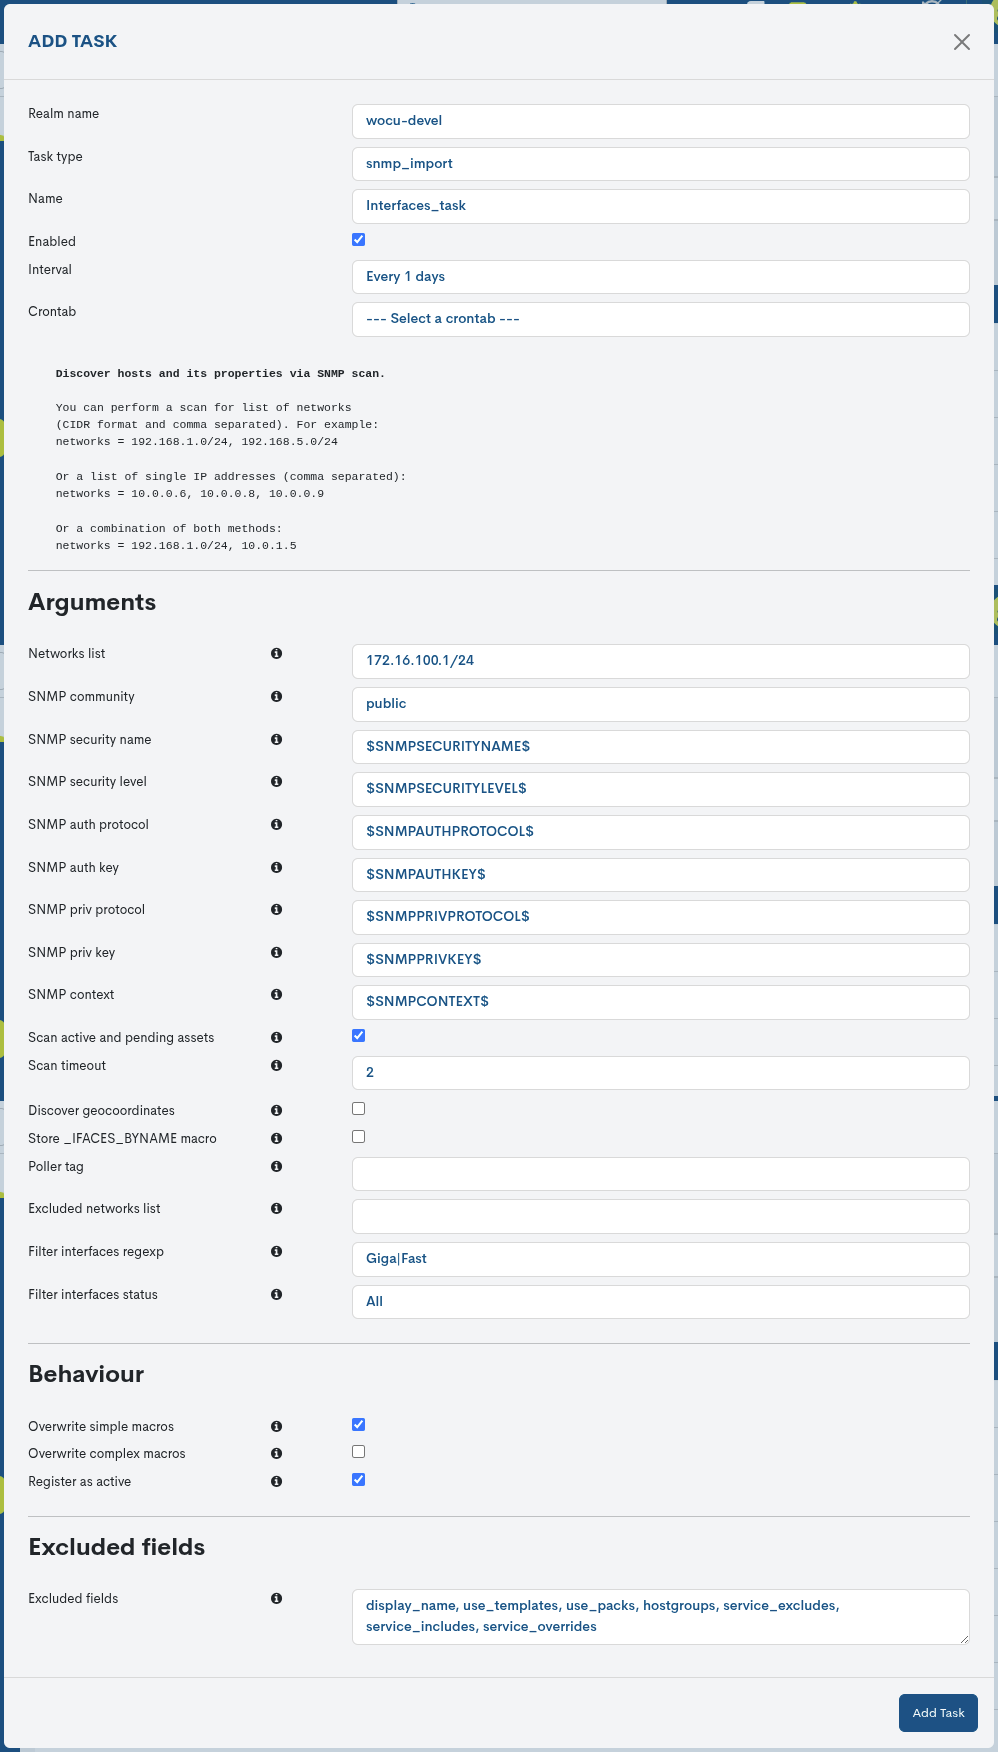
- Task Type:
Task type selector to be generated.
Selector of the type of task to be generated. Select the SNMP_Import option in the drop-down menu as shown in the following screenshot. The choice you make will condition the rest of the fields.

- Name:
Interfaces_taskis added as the identifying name of the newly created task.- Enabled:
This box is enabled to ensure that the task is executed in its next scheduled run.
- Interval:
The option ‘Every 1 day’ is selected so that the task is executed daily.
- Networks list:
In this field the user shall enter the network, networks, IP address(es) where WOCU-Monitoring will perform the scan to import Assets.
For this case the network range will be defined as
172.16.100.1/24.
- SNMP Community
The SNMP Community must be added to this field.
For this use case, the community will be added:
public
- Scan active and pending assets
For this case, this option shall be activated in order to keep the information of Hosts and Services already imported up to date.
- Scan Timeout:
2 seconds is defined as the time at which WOCU-Monitoring will stop querying a Device via SNMP if it does not find a response.

- Filter interfaces regexp:
Field for filtering by type of discovered interface. To do this, a regular expression (regexp) shall be added, and the discovered interfaces that match and comply with this expression shall be added.
For this case, the regular expression
Giga|Fastwill be defined. So only those interfaces containing the termsGigaorFastin their alias or description will be returned.
Things to keep in mind…
Such expressions shall be case insensitive to facilitate filtering.
The fields to check against are the interface description (ifDescr) and the alias (ifAlias).
The regular expression must be valid, otherwise the form itself will do the corresponding validation.
A simple string or complex regular expressions can be used (see the python documentation for reference).
This field is optional, i.e. it is possible to apply a regular expression, multiple or none at all. In this case, WOCU-Monitoring will return all active network interfaces detected on the set of defined Hosts.
For filtering to be successful, the equipment administrator must have assigned an appropriate description or alias to each interface.
- Overwrite simple macros:
This option remains enabled for updating the simple macros of the assets.assets.
- Overwrite complex macros:
This option remains disabled to prevent the system from updating the complex macros of the assets.
- Register as active
Enabling this option, the assets discovered via SNMP, will be imported directly to the list of Monitored Assets, i.e., the registration in Pending Assets will be omitted and they will go directly to monitoring.
Note
By placing the cursor on the information button (ℹ️), a new window will appear with help information on the different fields of the form. This action does not make any changes to the configuration.
Once the configuration is established, click on the blue button Add Tasks to make the new task effective. Immediately this new task will be available in the list with the rest of the created tasks.

3. Launching and executing the task.
Then, once the new task created in the global list has been located, it must be launched by means of the Run action (▶️).

Important
Remember that the frequency of automatic task execution is defined in the Interval field.
4. Make changes effective: WOCU-Check.
After the import task is finished, the changes will be consolidated through the execution of the Apply changes: Check action.

A dialogue box will immediately appear informing the user of the new asset configuration to be applied or of the abnormal operation in the system.
5. Automatic assignment of packs.
After the restart of WOCU-Monitoring, the new Hosts in Monitored Assets will start to be subject to the monitoring tasks of the tool.
In order to load network devices as automatically and completely as possible, WOCU-Monitoring assigns the corresponding Packs de Monitorización to each discovered device during the import process, based on properties such as the operating system and open ports.
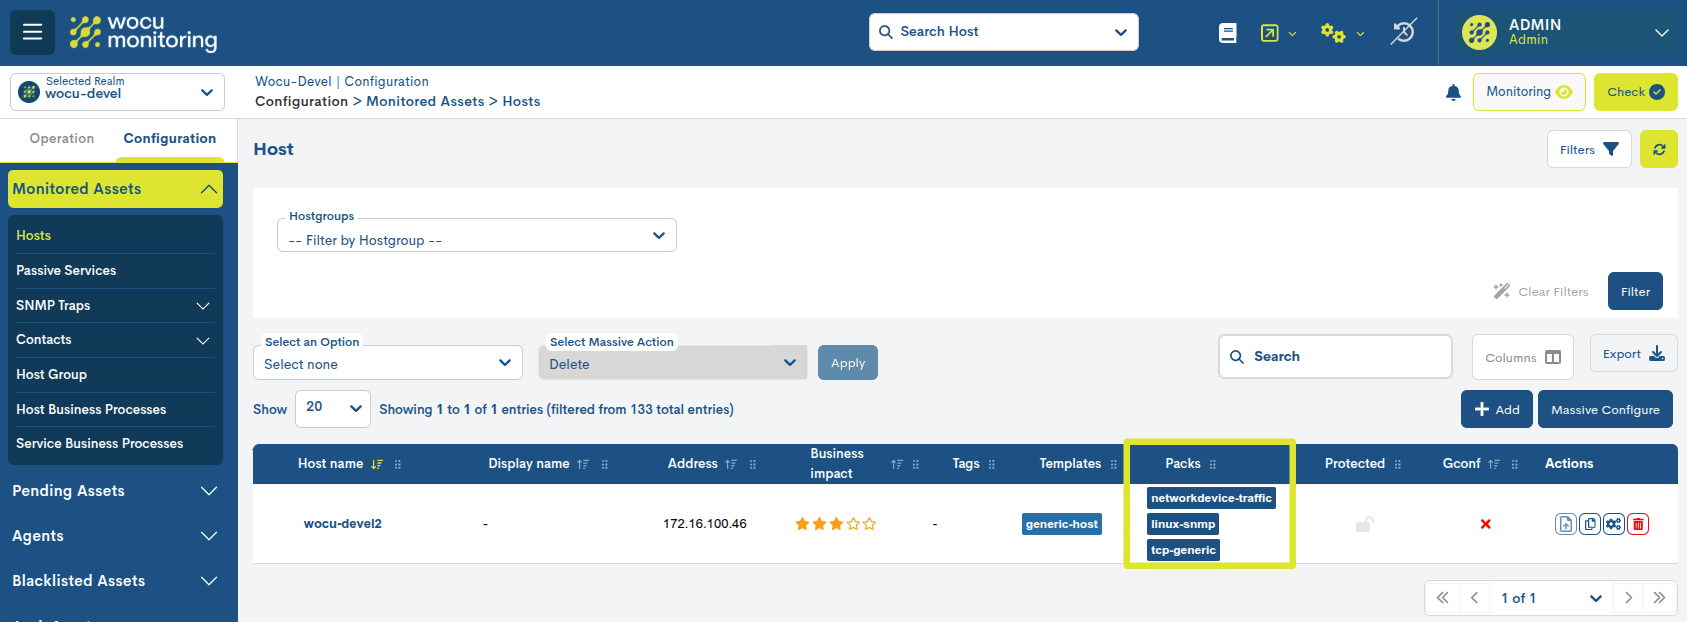
From the global panel Hosts, the packs assigned in the Packs column are observed, which correspond to monitoring packs.
Note
See our catalog of Monitoring Packages at the following link: <https://wocu-monitoring.com/integrations/>”_.
For example, in the previous image, you can see how the wocu-devel2 device has the following packs assigned to it:
networkhost-traffic: pack to check the traffic carried by a group of interfaces of the same host.linux-SNMP: this pack makes it possible to obtain values such as network connections, CPU consumption, RAM memory, etc., of a given Linux machine, via SNMP protocol.tcp-generic: generic pack that monitors the open ports of each machine.
Use the Packs action in the Hosts list and access the set of packs applied and custom configured for each of them.

6. Automatic interface discovery
Access the configuration specific to the networkdevice-traffic packusing the Configure action available in each listed pack.

Recall that in the configuration of the launched SNMP import task, it was filtered to discover only interfaces that match and comply with the defined regular expression: Giga|Fast. Therefore, only those interfaces containing Giga or Fast in their alias or description have been discovered by WOCU-Monitoring.
Continuing with the previous example, in the Complex macros section of the networkhost-traffic pack, the values returned are the configuration of the only interface that complies with the filtering rule, since the alias Intel_Corporation_82540EM_Gigabit_Ethernet_Controller, contains the term Giga.
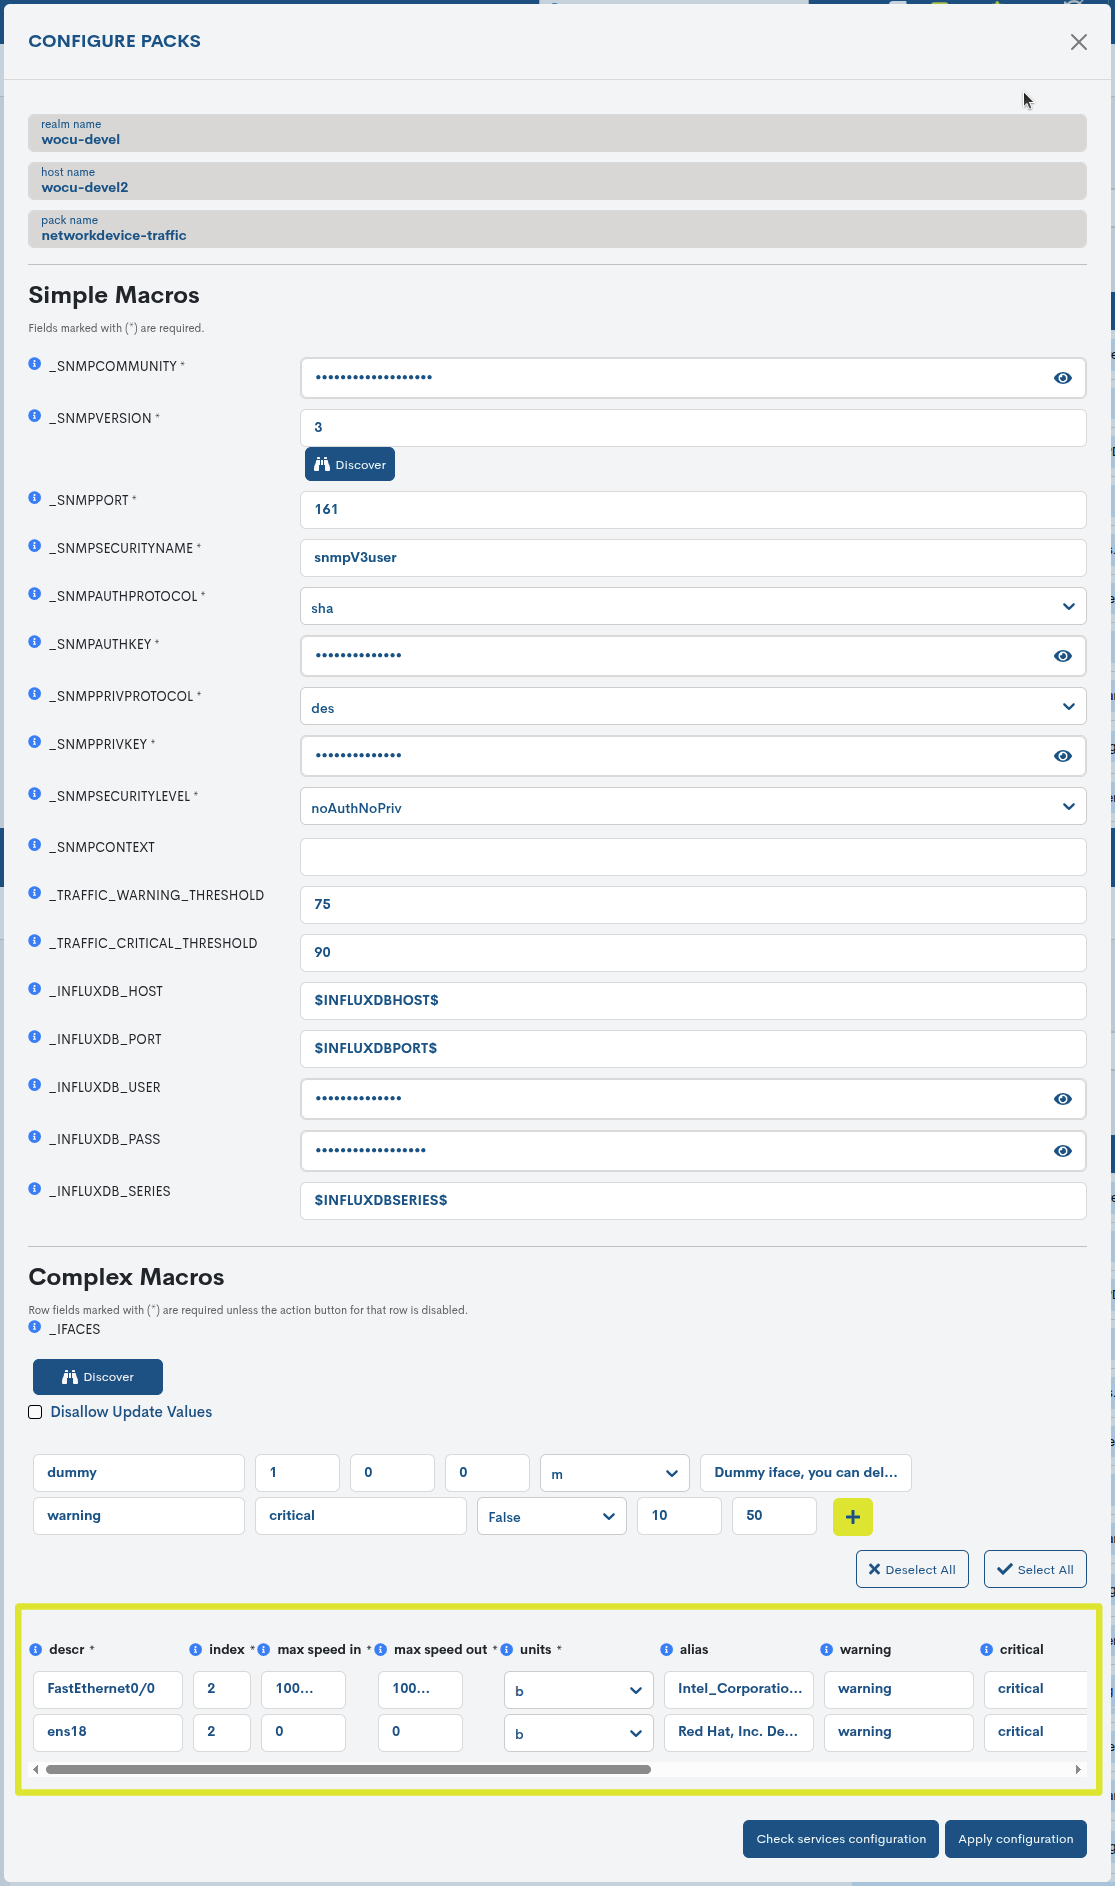
However, by means of the Discover functionality of the _IFACEs macro, the system shall rediscover all Host interfaces without any restriction, and independently of those discovered during the asset import.
As shown in the following image, the system will return a list of all identified interfaces:
Those previously known, discovered during importation, appearhighlighted in yellow.
The new interfaces, detected after executing the Discover action, are highlighted in green.
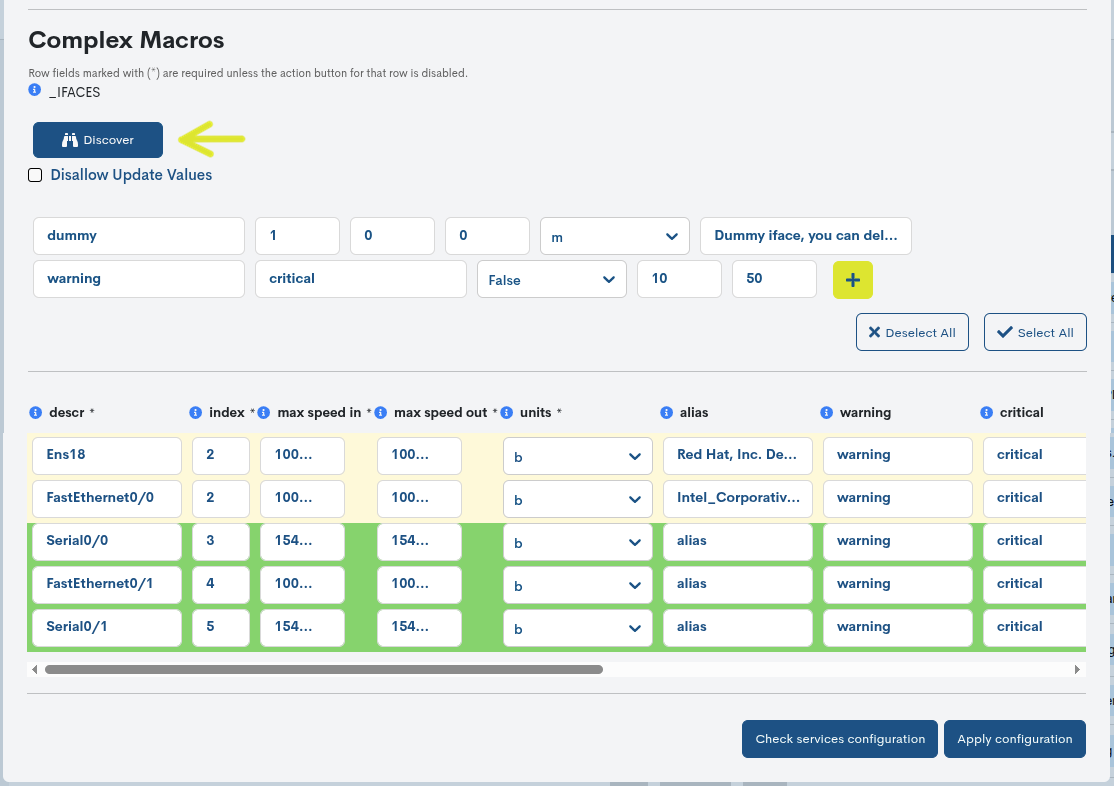
Each of the interfaces has the following options for management:
✔:️ to add the interface to the pack configuration.
✖️: to remove the interface from the pack configuration.

To save these new or updated configuration variables you will need to click the Apply configuration button.
Next, to consolidate these changes in the system, it is necessary toexecute the action of Apply changes: Check.

