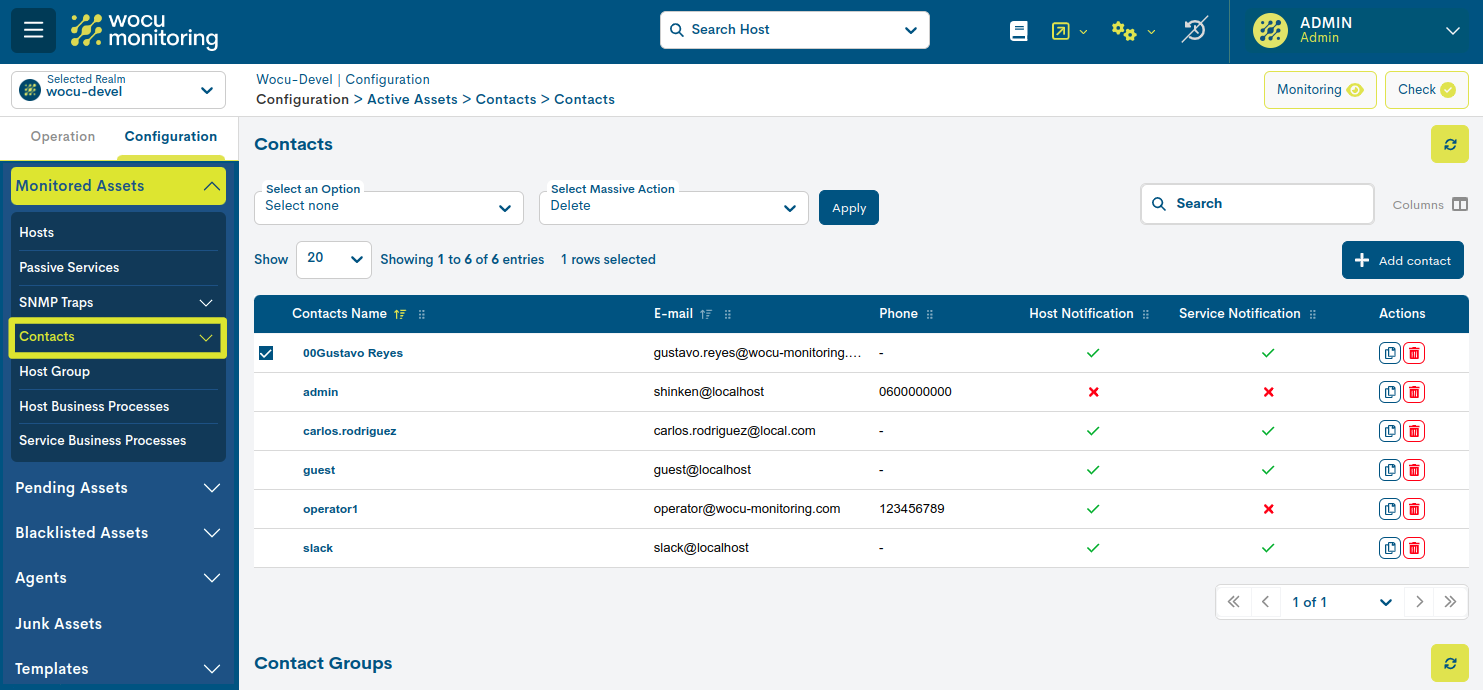
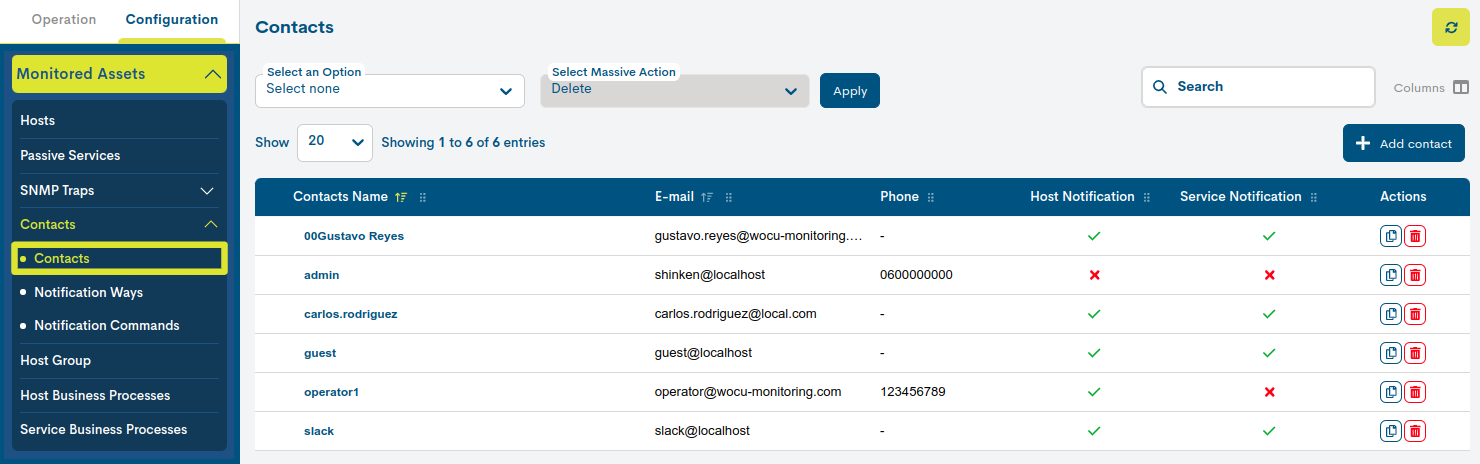
Contacts
The Contacts view of the Monitored Assets displays the list of users assigned as contacts, responsible for managing and controlling incidents occurring in Devices and Services monitored in WOCU-Monitoring.
For the notification of relevant communications to the operator, the tool distinguishes between two types of entities: Individual Contact and Group of Contacts. A table for each type is presented below.
Contacts
List of Contacts
The fields in the Contacts list are as follows:
Contact Name
Contains the Contact identifier (usually first name and surname(s)).
E-mail address
Contains the email address of the Contact who will receive relevant event notifications.
Phone
Register the Contact’s telephone number.
Host Notification
This field indicates whether the event notification option in Hosts is enabled for this Contact. The row will display a tick (✓) if the option is active and a check mark (X) if it is inactive.
Service Notification
This field indicates whether the event notification option in Services is enabled for this Contact. The row will display a tick (✓) if the option is active and a check mark (X) if it is inactive.
Attention
The activation/deactivation of Notification of a Host/Service would imply the sending or not of notifications to that Contact.
Add Contact
WOCU-Monitoring offers the possibility for the user to manually add new Contacts to the list, by means of the Add Contact button:

Once this action is triggered, the Add Contact form will be displayed, whose fields must be filled in manually:
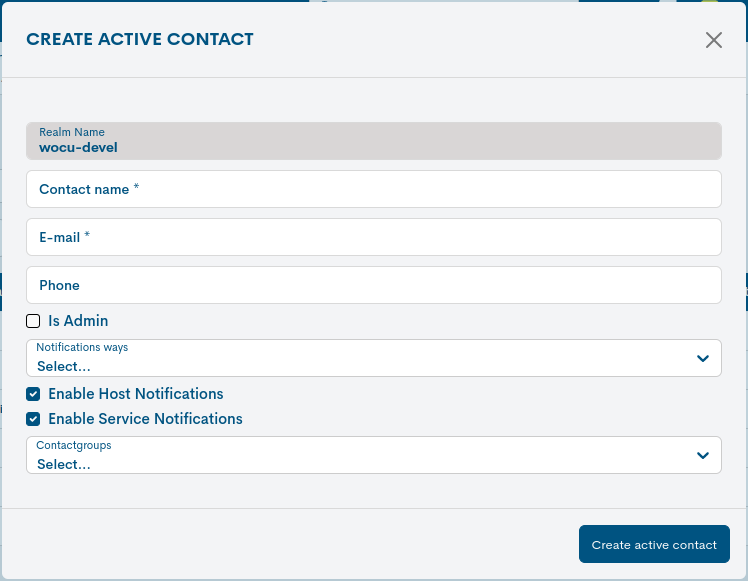
The fields that allow you to edit this menu are:
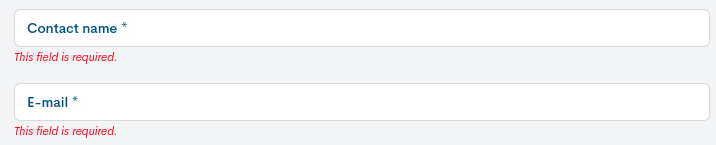
Contact name: mandatory field to record the identifying term of the Contact.
Email address (Email): mandatory field to register the email address of the Contact.
Phone: field to record the Contact’s phone number.
Notification Ways: field to link one or more notification ways. These are specific periods or time intervals, in which the system will send notifications when relevant events occur in Hosts and Services.
Assigning multiple notification paths never overwrites any configuration.
These options are set in: Notifications Ways.
Host notifications enabled: checkbox to enable/disable the Host Event Notification option for this Contact.
Service notifications enabled: checkbox to enable/disable the event notification option in Services for this Contact.
Once you have entered the data, confirm the registration of the new contact by clicking on the blue button Create.
List of Contact Groups
The fields in the list of Contact Groups are as follows:
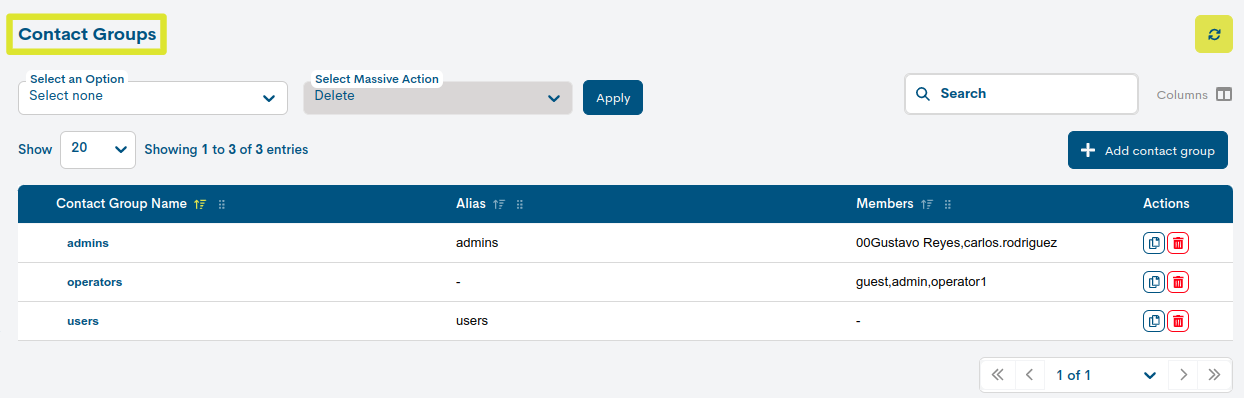
Contact Group Name
Contains the identifier of the Contact Group.
Alias
Register the alternative name under which the Contact Group is designated.
Members
Contacts in the group concerned.
Add Contact Group
WOCU-Monitoring offers the user the possibility to manually add new Contact Groups to the list, by means of the Add Contact Group button.
Once this action is activated, the Add Group Contact form will be displayed, whose fields must be filled in manually:
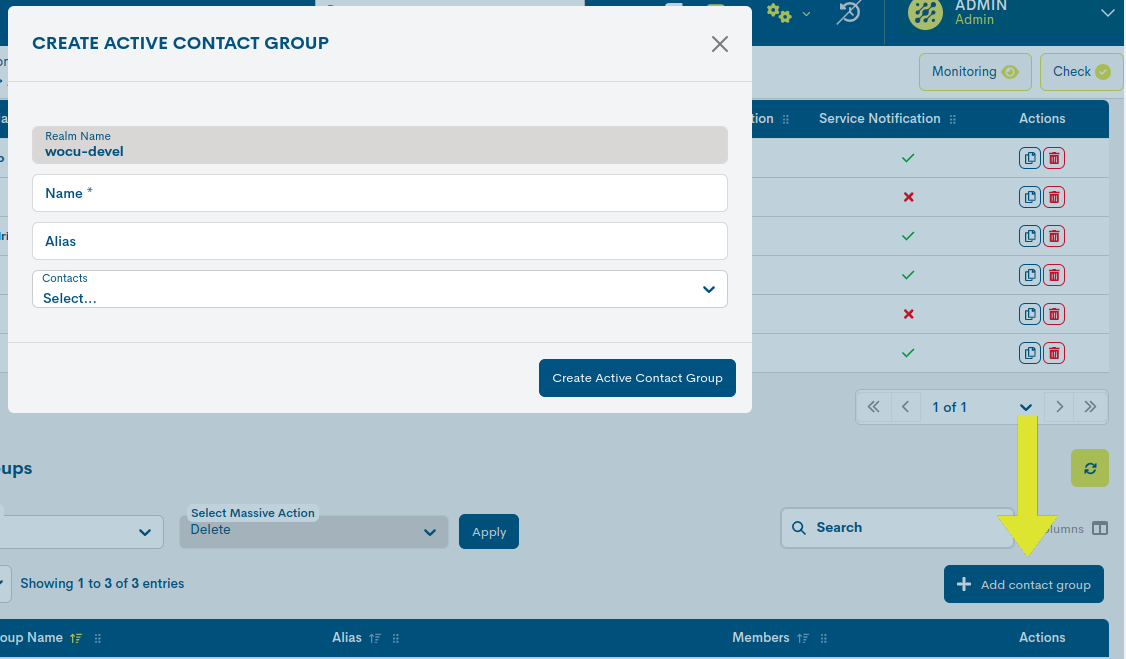
The fields that allow you to edit this menu are:
Contact Group name: mandatory field to record the identifying term of the group.
Aliases: field to register an alternative name to identify the Contact Group.
Members: field to register the contacts that will be part of the group in question.
Once you have entered the data, confirm the registration of the new contact by clicking on the blue button Create.
Common Contact List Actions
Because of their significance, the actions applicable to each Contact or Contact Group in both inventories are described below in a separate section.
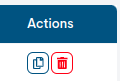
Duplicate
This action allows the duplication of a specific Contact, generating an exact copy of it.
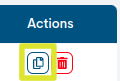
Before the duplicate becomes effective, the following form will appear with the configuration parameters of the original Contact, for possible modification and update.
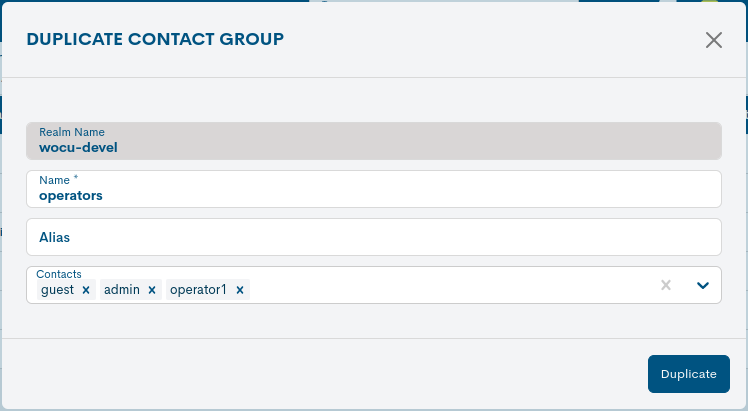
These fields to be edited match those described in Add Contact.
Once the relevant data has been modified, the action must be confirmed by pressing the Duplicate Contact button to save the new configuration.
Delete
This action removes the Contact permanently from the global inventory.
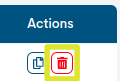
After selecting the deletion action, the following message will appear:
Delete Active Contact: Are you sure you want to delete the contact with “[Contact name]” as the contact name?
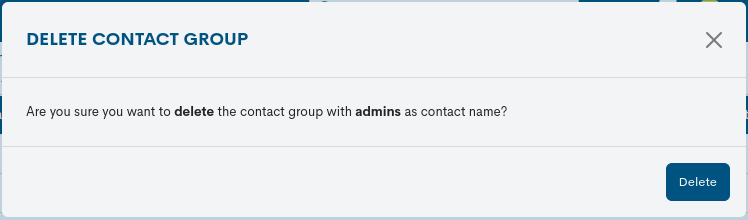
Selecting the red button Delete Contact will proceed with the deletion of the item.
Important
The different options for browsing, searching and ordering items in the inventory are explained in detail in the section: Common navigation, filtering and sorting options.
Detailed Contact or Host Contact Group Information
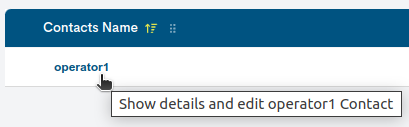
By clicking on the name of a specific item, the corresponding detail view will pop up with the configuration values of the different attributes of the Contact registered in the system.
The fields in the information window are described below:
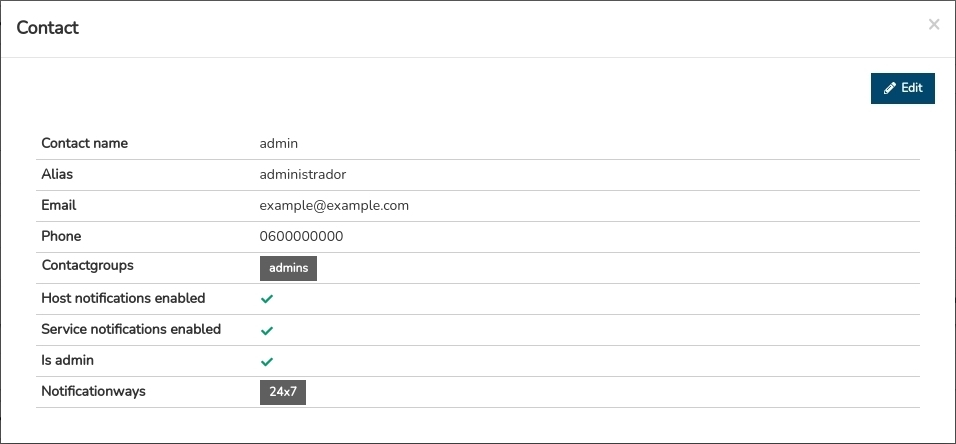
Contact name: Identifying term of the Contact.
Aliases: alternative name by which to identify the Contact.
Email: email address of the Contact.
Phone: telephone number associated with the Contact.
Contact Groups: Group or list of groups to which the Contact is integrated.
Host notifications enabled: indicates whether the Event Notification option in Hosts for Contact is enabled.
Service notifications enabled: indicates whether the Event Notification option in Contact Services is enabled.
Is admin: indicates whether the Contact has administrative privileges.
Notifications ways: method used to notify the Contact.
Editing configuration values
The system allows you to make changes to the configuration of the Contacts from the information modal itself. The Edit button accesses the editable form that allows changes to be made to the various parameters and attributes of the element.

The following configuration form will then be displayed:
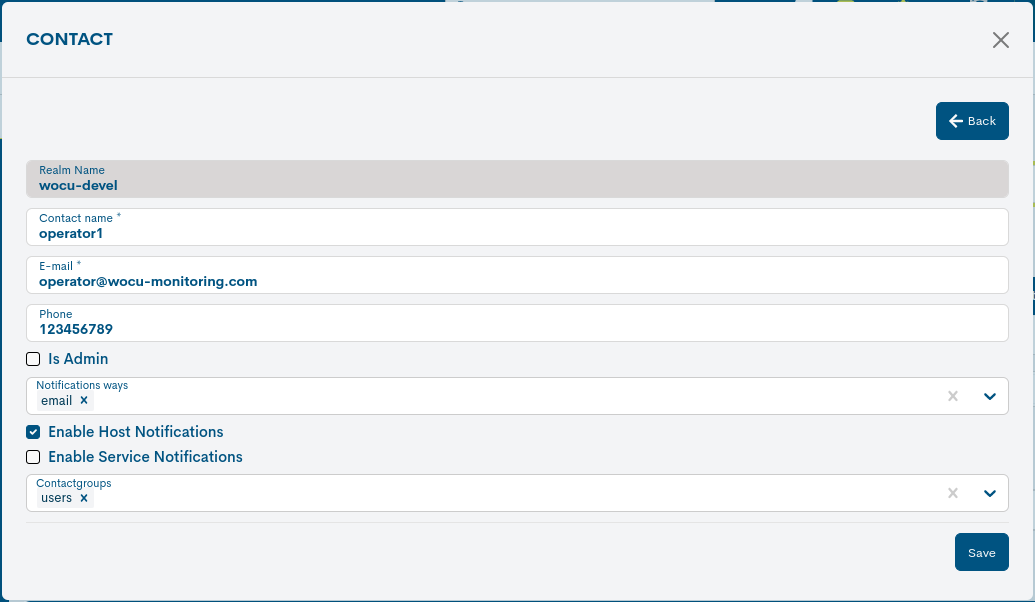
Note
The fields to be edited match the attributes described in Add Contact and Add Contact Group.
Once you have modified the data in the corresponding fields, click on the Save button to save the new configuration. If you prefer to discard the changes you have made, press the Go back button to return to the previous view without making any changes.
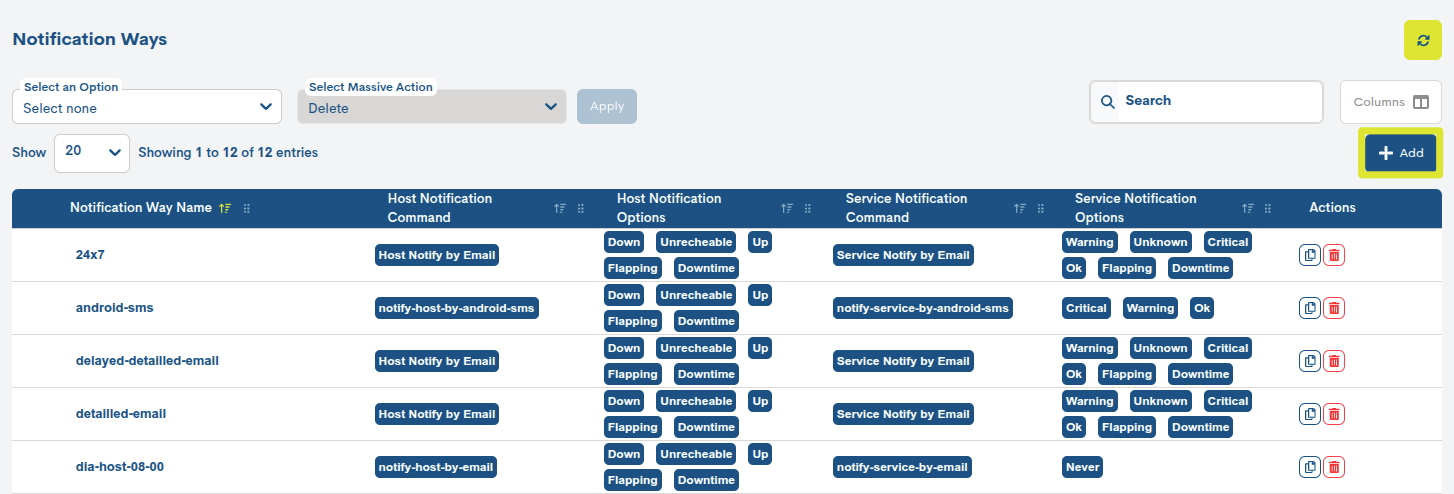
Notifications Ways
In this space, it is possible to define new Notification methods associated with Contacts, establishing specific periods or time intervals in which notifications are sent when relevant events occur in Devices and Services. These events can include availability issues, service outages or recovery, and ultimately, changes in state. Therefore, a notification method defines how, when, and for which events notifications are sent from devices and services within a specific realm.
The flexibility offered by this notification system allows it to adapt to the needs and preferences of the operator, guaranteeing effective communication about any important situation that requires their attention.
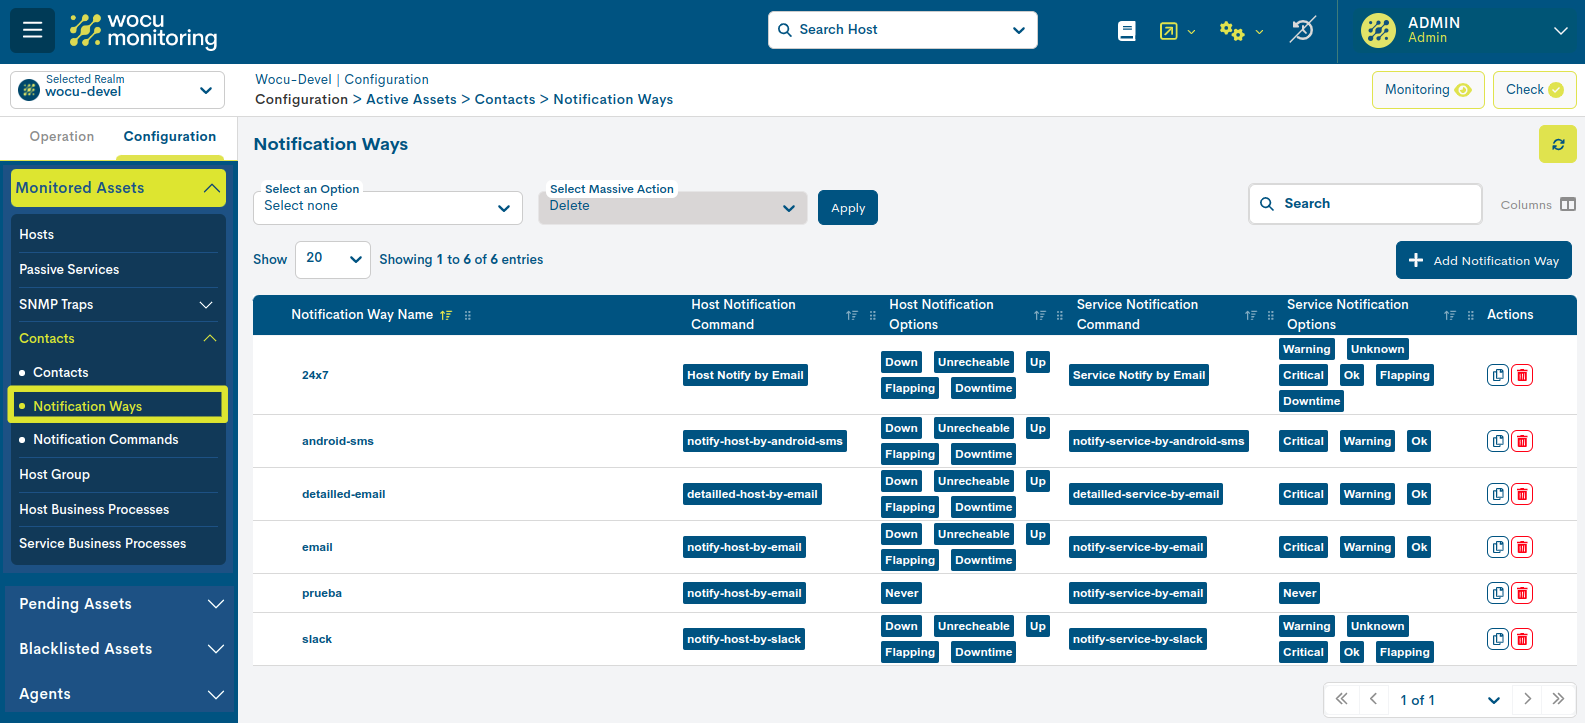
The fields in the Notification Way list are as follows:
Notification Way Name
Contains the identifying term of the notification.
Clicking on the name will display the Detailed information and editing of the Notification of the notification itself.
Host Notificaction Command
It contains one or several Notification Commands (separated by commas). A Command specifies the notification delivery mode through various communication tools or technologies integrated and supported by WOCU-Monitoring. It is possible to manually add new Commands from the Notificaction Command section.
Host Notification Options
Contains the availability statuses supported for sending Host notifications to a contact.
It can display a label for each monitoring state of the host.
Service Notificaction Command
It contains one or several Notification Commands (separated by commas). A Command specifies the notification delivery mode through various communication tools or technologies integrated and supported by WOCU-Monitoring. It is possible to manually add new Commands from the Notificaction Command section.
Service Notificaction Options
Contains the availability statuses supported for sending Service notifications to a contact.
You can display a label for each monitoring state of the Service.
Actions on notifications
Because of their importance, the applicable actions on Notifications are described below in a separate section.
Duplicate
This action allows the duplication of a specific Notification, generating an exact copy of it.
Before the duplicate takes effect, the following form will appear with the configuration parameters of the original notification, for possible modification and updating. These fields to be edited match those described in Add a new Notification Way (+ Add).
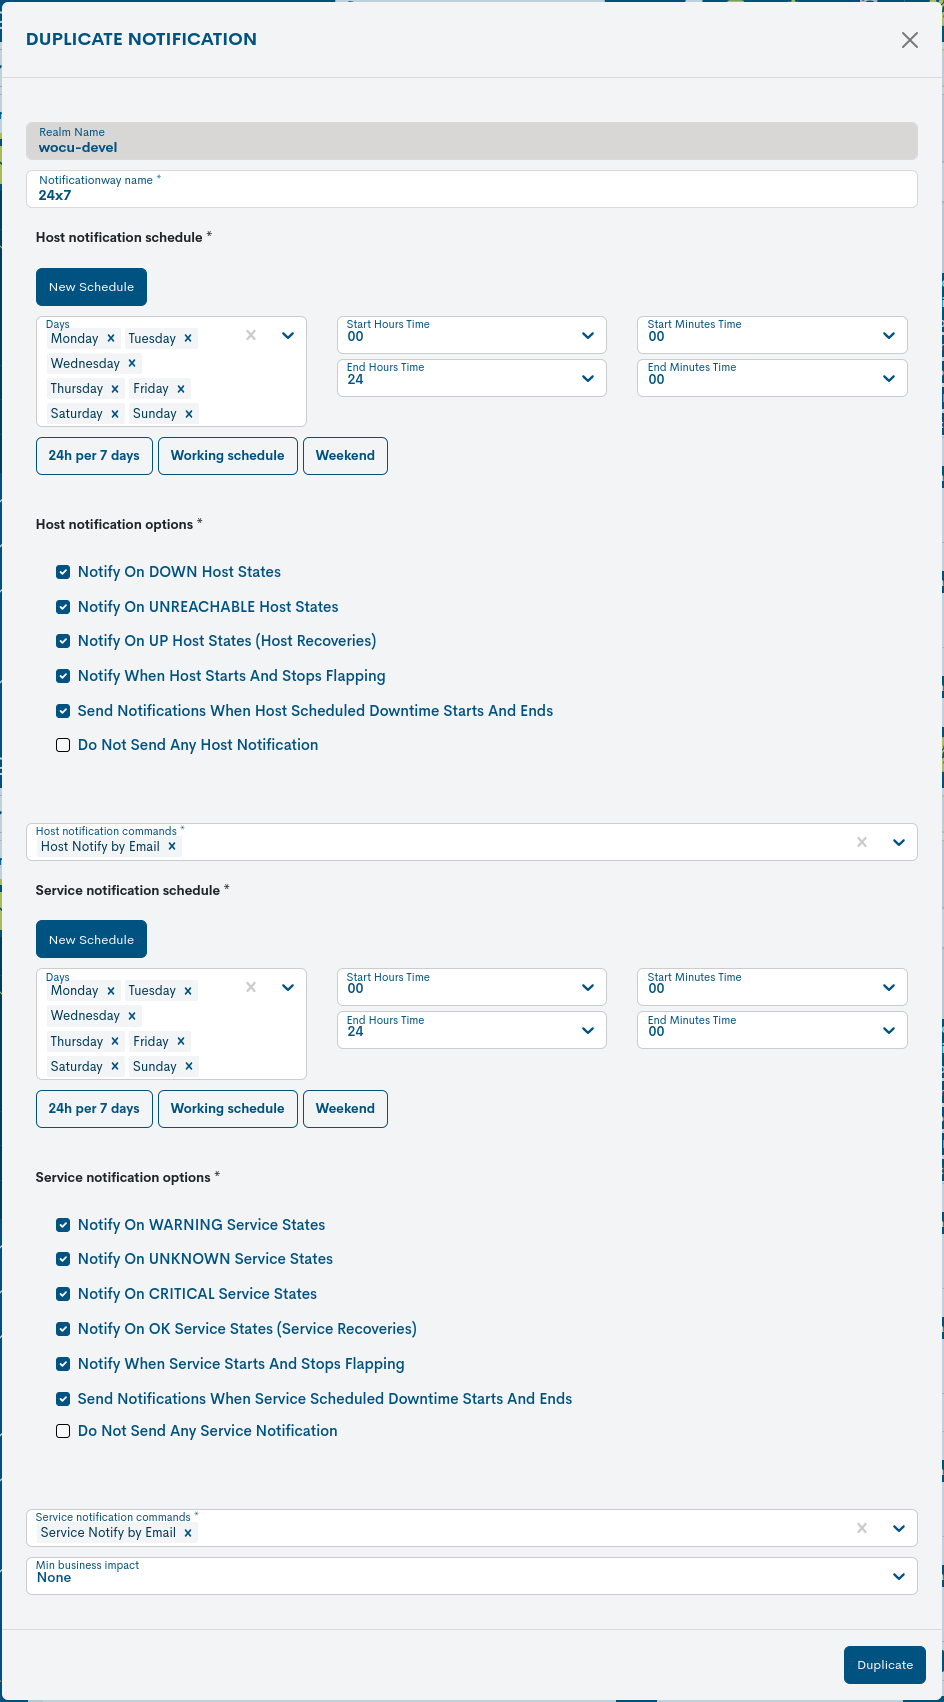
Once the relevant data is modified, the action should be confirmed by pressing the Duplicate button to save this new configuration.
Delete
This action removes the Notification permanently from the global inventory.
After selecting the deletion action, the following message will appear:

Selecting the Delete button proceeds with the deletion of the element.
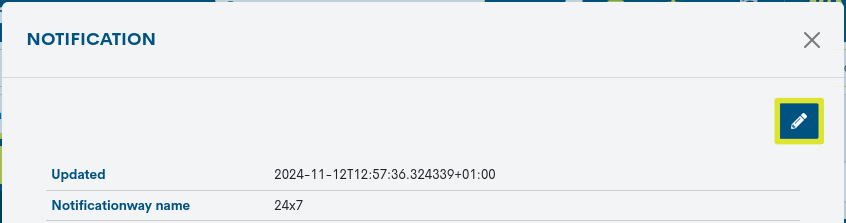
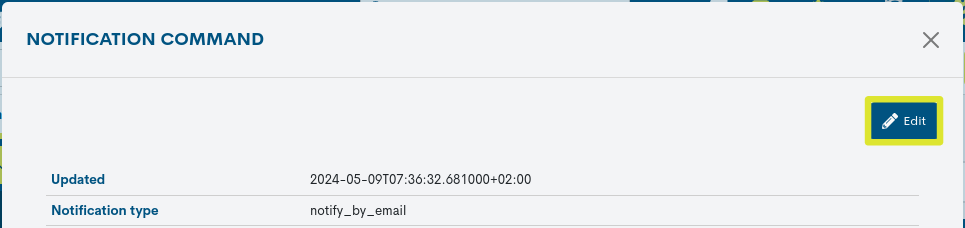
Detailed information and editing of the Notification
By clicking on the name of a specific item, the corresponding detail view will pop up with the configuration values of the different attributes of the Notification registered in the system.
The fields in the information window are described below:
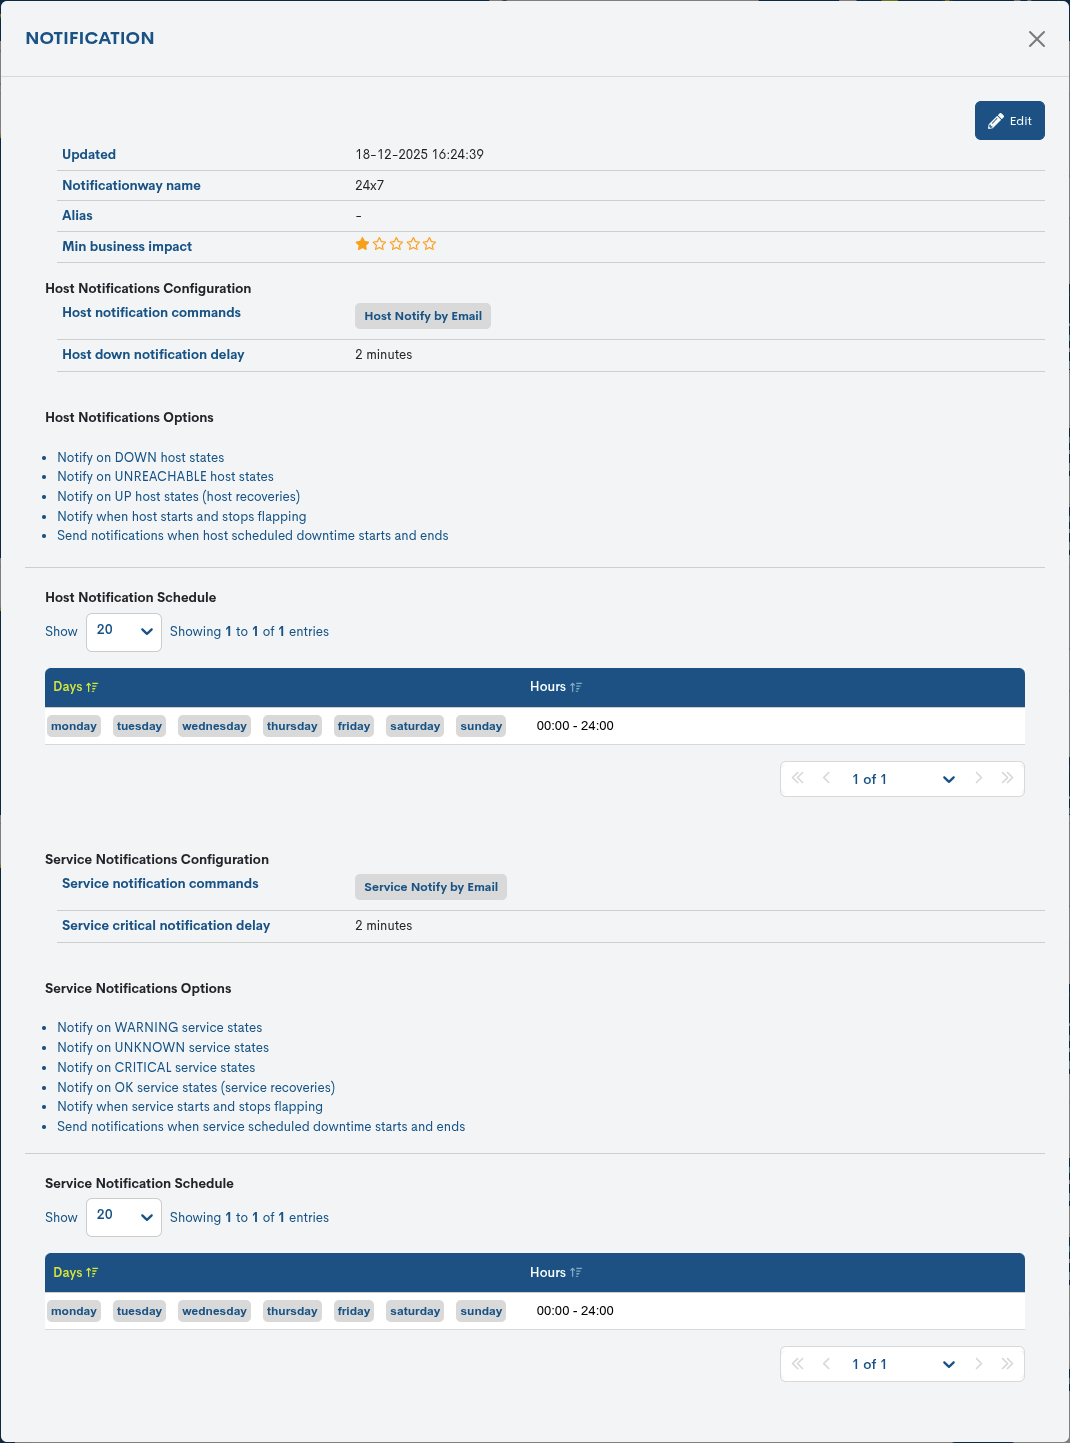
Updated: indica cuando fue la última actualización de la notificación.
Notificationway name: term identifying the notification.
Min business impact: minimum level of Business Impact that Hosts or Services must have in order to generate notifications.
Host notification commands: contains one or several notification commands (separated by commas). A command specifies the mode of sending notifications through various communication tools or technologies integrated and supported by WOCU-Monitoring. It is possible to manually add new commands from the Notificaction Command section.
Host down notification delay (minutes): indica el tiempo de espera (expresado en minutos) configurado antes de enviar una notificación cuando un host registra un estado de monitorización DOWN.
Host Notifications Options: details the availability statuses supported for sending Host notifications to a contact.
Host Notification Schedule: where the Days column records the days of the week enabled for notification purposes, and the Hours column records the exact notification timeframe for each of the days.
The period of time not covered by the current configuration shall be treated as periods of communications downtime.
Service Notification Commands: Contains one or several Notification Commands (separated by commas). A Command specifies the notification delivery mode through various communication tools or technologies integrated and supported by WOCU-Monitoring. It is possible to manually add new Commands from the Notificaction Command section.
Service critical notification delay (minutes): indica el tiempo de espera (expresado en minutos) configurado antes de enviar una notificación cuando un servicio registra un estado de monitorización Critical.
Service Notifications Options: details the availability statuses supported for sending Service notifications to a contact.
Service Notification Schedule: where the Days column records the days of the week enabled for notification purposes, and the Hours column records the exact notification timeframe for each of the days.
The period of time not covered by the current configuration shall be treated as periods of communications downtime.
Edition of the Notification
The system allows changes to be made to the Notification configuration from the information modal itself. The Edit button accesses the editable form that allows changes to be made to the different parameters and attributes of the element.
Note
The fields to be edited match the attributes described in Add a new Notification Way (+ Add).
Once the data has been modified in the corresponding fields, you will need to press the button Save to save this new configuration.
Add a new Notification Way (+ Add)
WOCU-Monitoring offers the user the possibility to manually enter new notification paths to link to contacts.
Remember
A Notification Way defines how, when, and in response to which events notifications are sent from devices and services within a specific realm.
Clicking the “+ Add” button will display a configuration form with the following attributes:
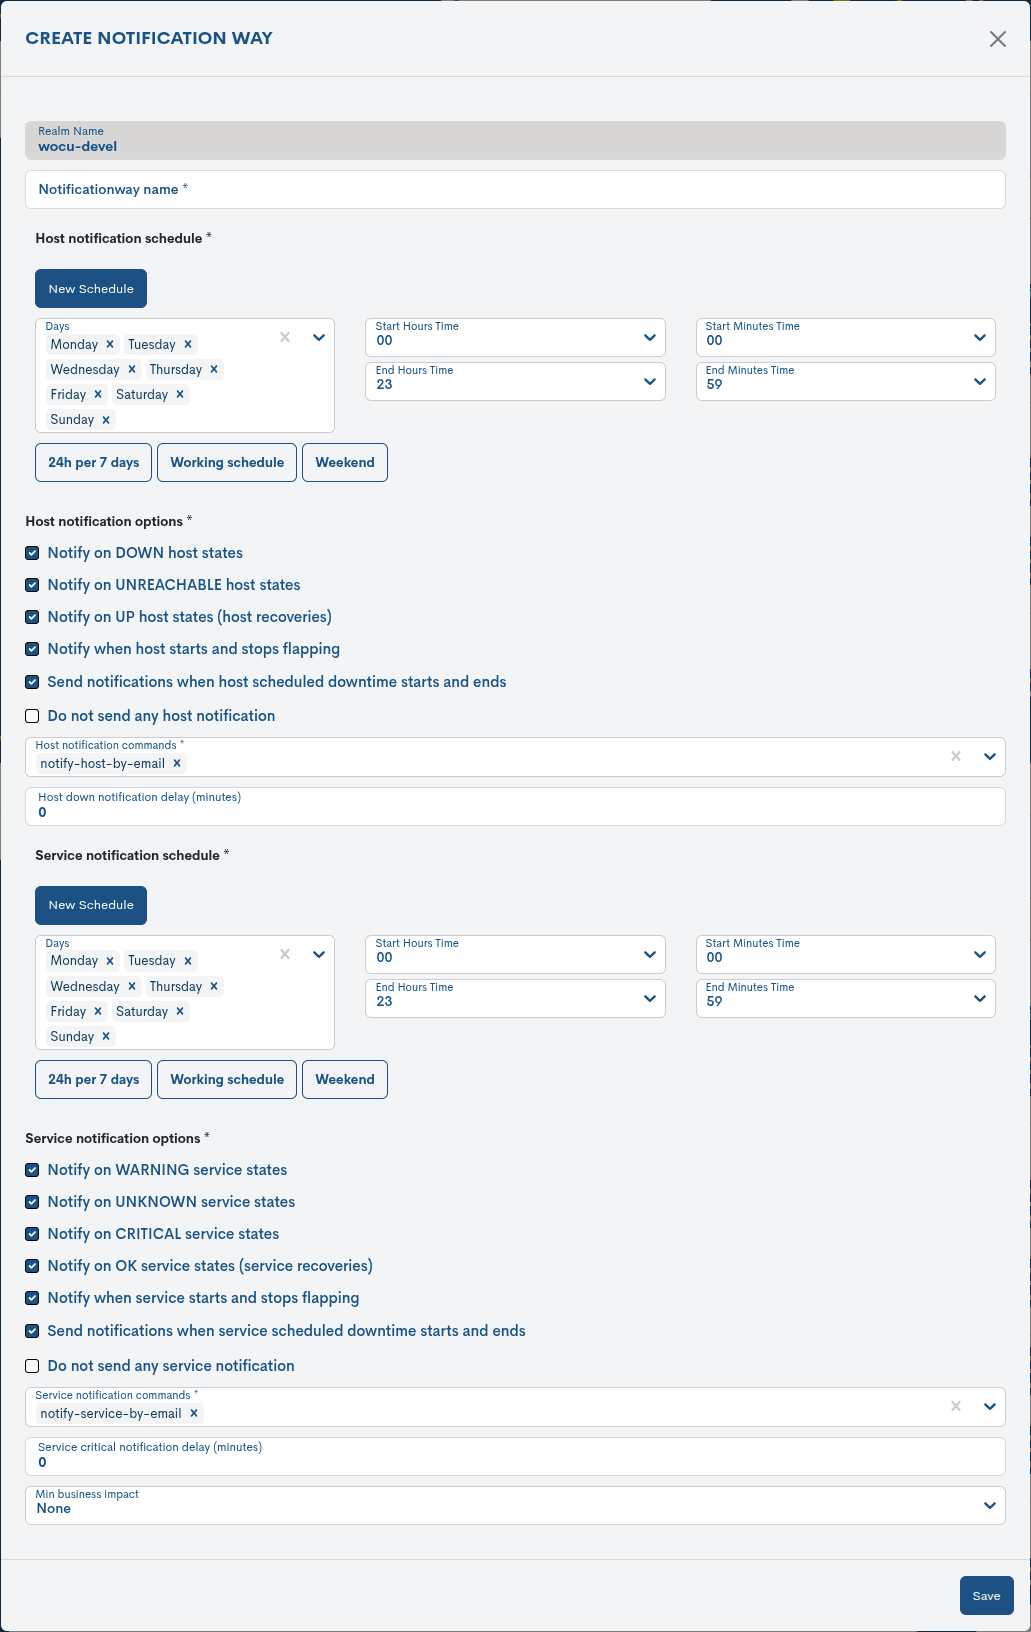
Realm Name: name of the Realm where the new notification channel will be registered. This field is for informational purposes only and is not editable.
Notificationway name: term identifying the notification.
Host Notification Schedule: field to define the time frame or periodicity of a notification to the relevant contact when certain events occur on a Host. The period of time not covered by the current configuration shall be treated as periods of inactivity for notification purposes.
There are predefined shortcuts, which, depending on the option chosen, will reveal appropriate configurations.
These options are:
24 h. per 7 days: this timetable covers the seven days of the week. It has a time interval that starts (Start Time) at
00:00 h.and ends (End time) at23:59 h.. Its operation is very simple, once the week is over it starts a new rotation.
Working schedule: this schedule is aligned with the working time (Monday to Friday). It has a time slot starting (Start Time) at
08:00 h.and ending (End time) at18:00 h..
Weekend: this timetable covers Saturday and Sunday only. It has a time slot starting (Start Time) at
00:00 h.and ending (End time) at23:59 h..
These patterns can be freely modified by the user, or if you prefer, you can also create and add unlimited time ranges using the New Schedule button.
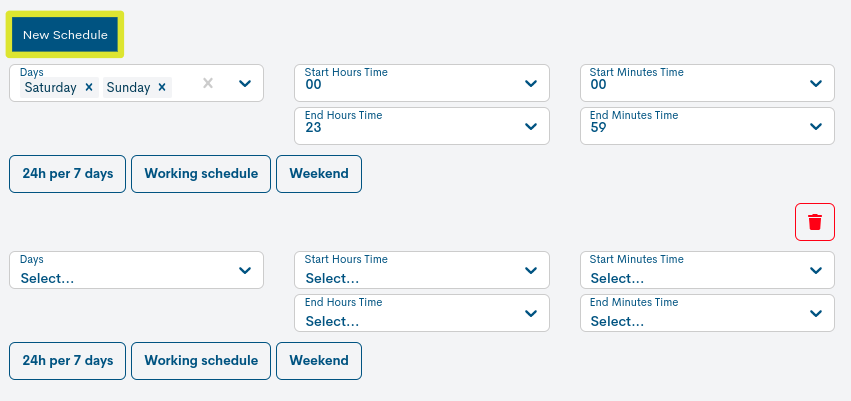
The flexibility of configuration allows it to be adapted to the needs and preferences of the operator.
Host Notification options: field to define the states of a Device supported for sending notifications to a contact. That is, it configures which events trigger a notification.
Valid configuration options are a combination of one or more of the following:
Notification for DOWN states.
Notification for UNREACHABLE states
Notification for UP states
Notification of state alternation (FLAPPING).
Send notifications when host scheduled downtime starts and ends.
Do not send any host notification
Host Notification commands: Notification Commands selector. A Command specifies the notification delivery mode through various communication tools or technologies integrated and supported by WOCU-Monitoring. It is possible to manually add new Commands from the Notificaction Command section.
Note
Hosts and Services do not necessarily have to share the same notification settings, so the above configuration fields exist for Services.
Host down notification delay (minutes): To define a waiting time (expressed in minutes) before sending a notification when a host registers a DOWN monitoring state. This prevents premature notifications of momentary outages or false alarms.
Service Notification schedule: field to define the time frame or frequency of a notification sent to the relevant contact when certain events occur on a Service; that is, defines when service-related notifications will be sent. The time frame not covered by the current configuration will be treated as periods of inactivity for notification purposes.
Its configuration is similar to the Host Notification Schedule field (see above).
Service Notification options: field to define the states of a Service supported for sending notifications to a contact. That is to say, it is configured in the event of which events to generate a notification.
Valid configuration options are a combination of one or more of the following:
Notification for WARNING states.
Notification for UNKNOWN states.
Notification for CRITICAL states.
Notification for OK states.
Notification of state alternation (FLAPPING).
Send notifications when service scheduled downtime starts and ends.Scheduled downtime.
Do not send any service notification
Service Notification commands: Notification Commands selector. A Command specifies the notification delivery mode through various communication tools or technologies integrated and supported by WOCU-Monitoring. It is possible to manually add new Commands from the Notificaction Command section.
Services critical notification delay: To define a waiting time (expressed in minutes) before sending a notification when a service registers a critical monitoring state. It is especially useful in environments where certain services may exhibit brief fluctuations that do not require immediate notification.
Min business impact: selector of the minimum level of business impact required for a device or service to generate a notification. There is a scale of six levels of criticality.
Once you have entered the data, confirm the creation of the new element by clicking on the Create button.
Notificaction Command
From this space, it is possible to configure new commands useful for the definition of Notifications Ways associated with Contacts.
These commands are used to automate the response to critical or relevant events occurring on Devices and Services in the infrastructure. They specify the notification delivery mode through communication tools or technologies integrated and supported by WOCU-Monitoring.
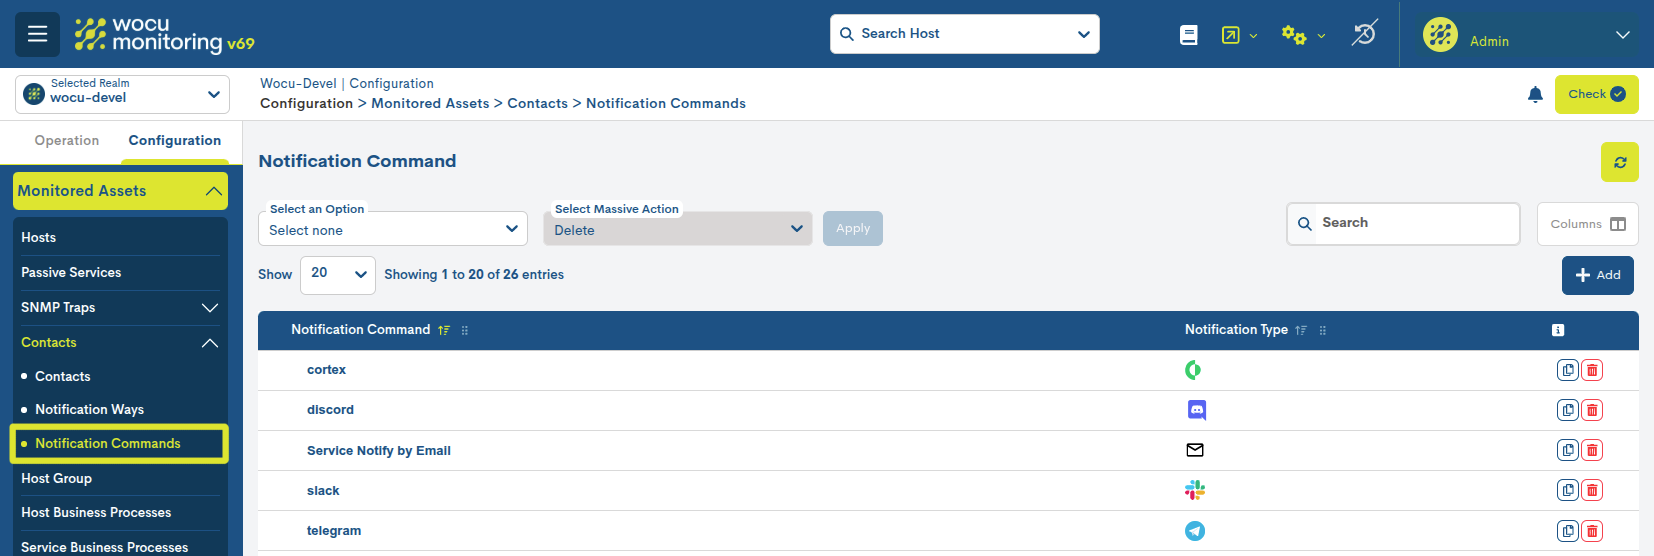
The fields in the Notification Command list are as follows:
Notification Command
Clicking on the name will display the Detailed information and editing of the Notification of the notification itself.
Notification Type
Tool or communication service widely used, used as a notification delivery method. WOCU-Monitoring integrates and supports Telegram, Discord, Slack XMPP, Cortex, and email.
Actions on notifications (ℹ)
Because of their importance, the applicable actions on Notifications are described below in a separate section.
Duplicate
This action allows duplicating a specific command model, generating an exact copy of it.
Before the duplication takes effect, the following form will appear with the configuration parameters of the original command, allowing for possible modification and updating.
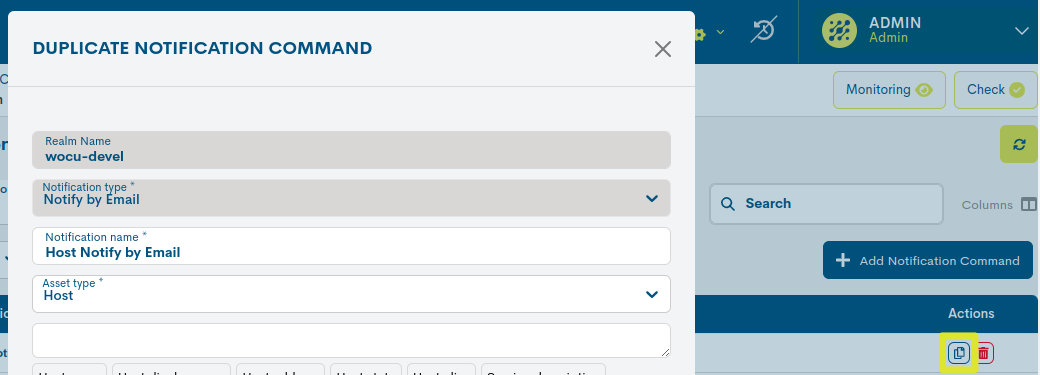
These fields to be edited coincide with those described in Add Command.
Once the relevant data is modified, the action should be confirmed by pressing the Duplicate button to save this new configuration.
Delete
This action removes the Contact permanently from the global inventory.
After selecting the deletion action, the following message will appear:
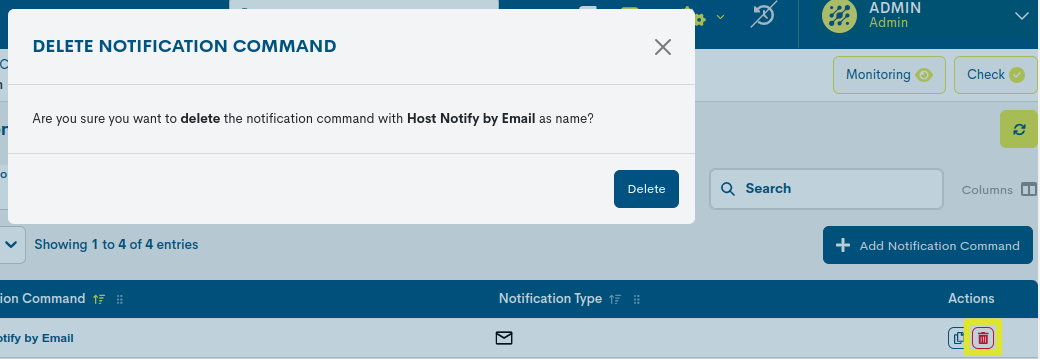
Selecting the Delete button proceeds with the deletion of the element.
Detailed information and editing of the Notification
By clicking on the name of a specific item, the corresponding detail view will pop up with the configuration values of the different attributes of the Contact registered in the system.

Important
This view will vary depending on the chosen communication tool or service, as each of them presents unique configuration attributes.
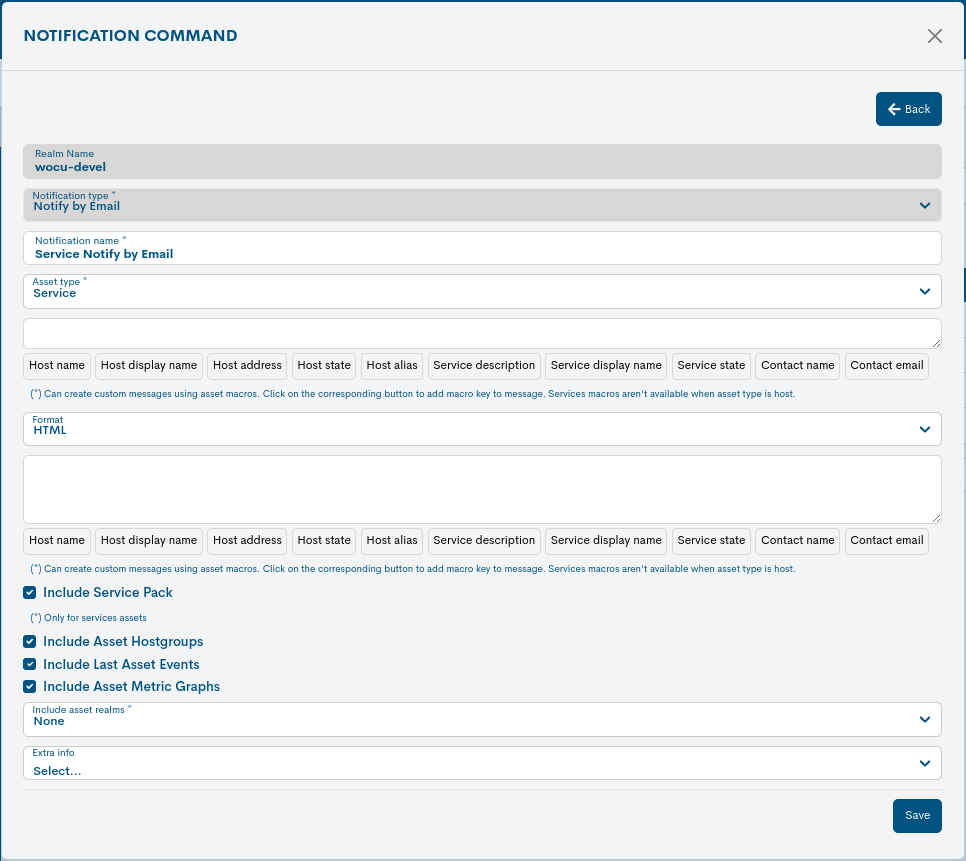
Edition of the Notification
The system allows you to make changes to the configuration of the Contacts from the information modal itself. The Edit button accesses the editable form that allows changes to be made to the various parameters and attributes of the element.
The following configuration form will then be displayed:
Important
These fields to be edited match those described in Add a new Notification Way (+ Add).
Keep in mind that this view will vary depending on the chosen communication tool or service, as each of them presents unique configuration attributes.
Once you have modified the data in the corresponding fields, click on the Save button to save the new configuration. If you prefer to discard the changes you have made, press the Go back button to return to the previous view without making any changes.
Add Command
WOCU-Monitoring offers the user the possibility to manually enter new notification paths to link to contacts.
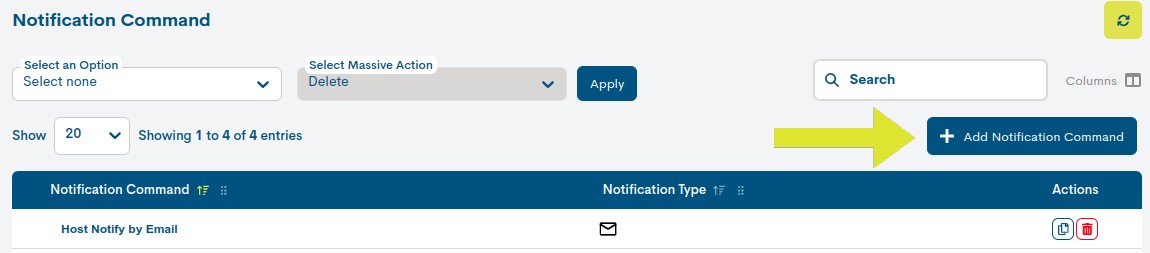
Clicking on the Add Command button will display a form for each communication tool or service supported by WOCU-Monitoring:
Email
For the option Notify_by_email, the configuration attributes are as follows:
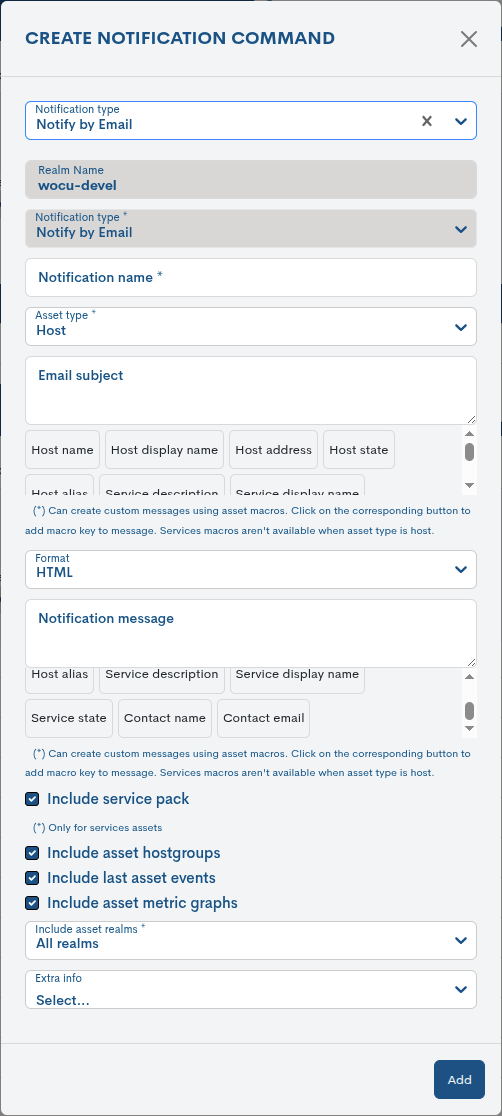
Realm Name: name of the Realm where the new notification channel will be registered.
Notification Type: Indicates the chosen command model. This field is not editable.
Contact name: mandatory field to record the identifying term of the Contact.
Assets type: mandatory field to select the type of asset that will be subject to notifications: Hosts or Services.
Email subject: field to enter the subject or reason of the notification email. You can use quick actions to build a customized subject with information about the asset being notified. For example, if the Host Name action is selected, the system assigns the pattern $hostname$, and the notification details the current Host Name of that asset.
Format: selector of the email format. You can choose between the standard HTML format or the basic text format TXT.
Notification message: field to compose the content of the notification email. You can use quick actions to build a customized message with information about the asset being notified.
Include service pack: By checking the box, the notification will include the Monitoring Pack to which the Service that generated the alert belongs.
Include asset hostgroups: By checking the box, the notification will include the Hostgroups to which the Device or Service that generated the alert belongs.
Include last asset events: by checking this box, the notification will include a list of events recorded in the last 24 hours for the asset that triggered the alert.
Include asset metric graphs: by checking this box, the notification will include graphs with metrics associated with the asset that triggered the alert.
Include asset realms: This selector allows you to define whether to include the Realms to which the asset that generated the alert belongs.
These options are:
None: No kingdom information will be included in the notification.
Only standard realms: Only standard realms will be included.available.
Only hostgroup realms: Only realms based on available hostgroups” will be included
All realms: All realms to which the asset belongs will be included.
Extra info: field that allows registering additional information to the notification of the asset that triggered the alert (for example, Alias, Business Impact, coordinates, etc.).
Slack
For the option Notify_by_slack, the configuration attributes are as follows:
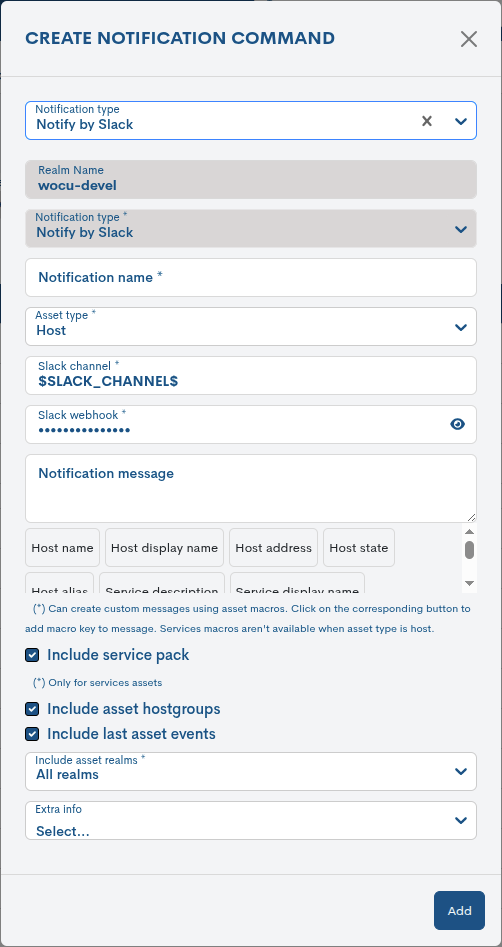
Realm Name: name of the Realm where the new notification channel will be registered.
Notification Type: Indicates the chosen command model. This field is not editable.
Contact name: mandatory field to record the identifying term of the Contact.
Assets type: Mandatory field to select the type of Asset that will be subject to notifications: Devices or Services.
Slack Channel: Mandatory field to register the name of the Slack channel that will receive the relevant notifications.
Slack Webhook: Mandatory field to register the URL of the Slack Webhook. More information at the following link.
Notification message: Custom message to include in the notification. You can use quick actions to build a custom message with information about the asset that is the subject of the notification.
Include service pack: By checking the box, the notification will include the Monitoring Pack to which the Service that generated the alert belongs.
Include asset hostgroups: By checking the box, the notification will include the Hostgroups to which the Device or Service that generated the alert belongs.
Include last asset events: by checking this box, the notification will include a list of events recorded in the last 24 hours for the asset that triggered the alert.
Include asset realms: This selector allows you to define whether to include the Realms to which the asset that generated the alert belongs.
These options are:
None: No kingdom information will be included in the notification.
Only standard realms: Only standard realms will be included.available.
Only hostgroup realms: Only realms based on available hostgroups” will be included
All realms: All realms to which the asset belongs will be included.
Extra info: field that allows registering additional information to the notification of the asset that triggered the alert (for example, Alias, Business Impact, coordinates, etc.).
Discord
For the option Notify_by_Discord, the configuration attributes are as follows:
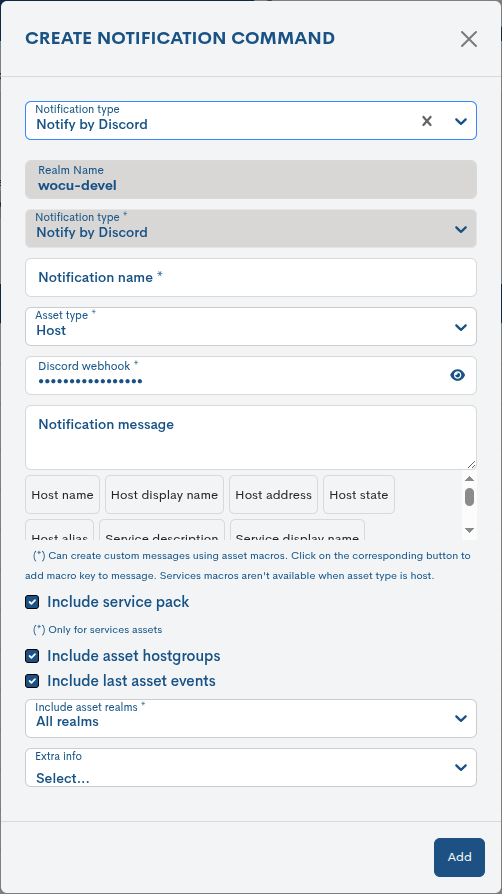
Notification Type: Indicates the chosen command model. This field is not editable.
Contact name: mandatory field to record the identifying term of the Contact.
Assets type: Mandatory field to select the type of Asset that will be subject to notifications: Devices or Services.
Discord Webhook: Mandatory field to register the URL of the Discord Webhook. More information at the following link.
Notification message: Custom message to include in the notification. You can use quick actions to build a custom message with information about the asset that is the subject of the notification.
Include service pack: By checking the box, the notification will include the Monitoring Pack to which the Service that generated the alert belongs.
Include asset hostgroups: By checking the box, the notification will include the Hostgroups to which the Device or Service that generated the alert belongs.
Include last asset events: by checking this box, the notification will include a list of events recorded in the last 24 hours for the asset that triggered the alert.
Include asset realms: This selector allows you to define whether to include the Realms to which the asset that generated the alert belongs.
These options are:
None: No kingdom information will be included in the notification.
Only standard realms: Only standard realms will be included.available.
Only hostgroup realms: Only realms based on available hostgroups” will be included
All realms: All realms to which the asset belongs will be included.
Extra info: field that allows registering additional information to the notification of the asset that triggered the alert (for example, Alias, Business Impact, coordinates, etc.).
Telegram
For the option Notify_by_Telegram, the configuration attributes are as follows:

Notification Type: Indicates the chosen command model. This field is not editable.
Contact name: mandatory field to record the identifying term of the Contact.
Assets type: Mandatory field to select the type of Asset that will be subject to notifications: Devices or Services.
Bot token: mandatory field to enter the unique token provided when creating a bot in Telegram. More information on the following link.
Chat id: mandatory field to enter the unique identifier of the chat to receive notifications. Each chat in Telegram has its its own chat_id which may vary according to its type.
Notification message: Custom message to include in the notification. You can use quick actions to build a custom message with information about the asset that is the subject of the notification.
Include service pack: By checking the box, the notification will include the Monitoring Pack to which the Service that generated the alert belongs.
Include asset hostgroups: By checking the box, the notification will include the Hostgroups to which the Device or Service that generated the alert belongs.
Include last asset events: by checking this box, the notification will include a list of events recorded in the last 24 hours for the asset that triggered the alert.
Include asset realms: This selector allows you to define whether to include the Realms to which the asset that generated the alert belongs.
These options are:
None: No kingdom information will be included in the notification.
Only standard realms: Only standard realms will be included.available.
Only hostgroup realms: Only realms based on available hostgroups” will be included
All realms: All realms to which the asset belongs will be included.
Extra info: field that allows registering additional information to the notification of the asset that triggered the alert (for example, Alias, Business Impact, coordinates, etc.).
Cortex
For the Notify_by_Cortex option, the configuration attributes are the following:
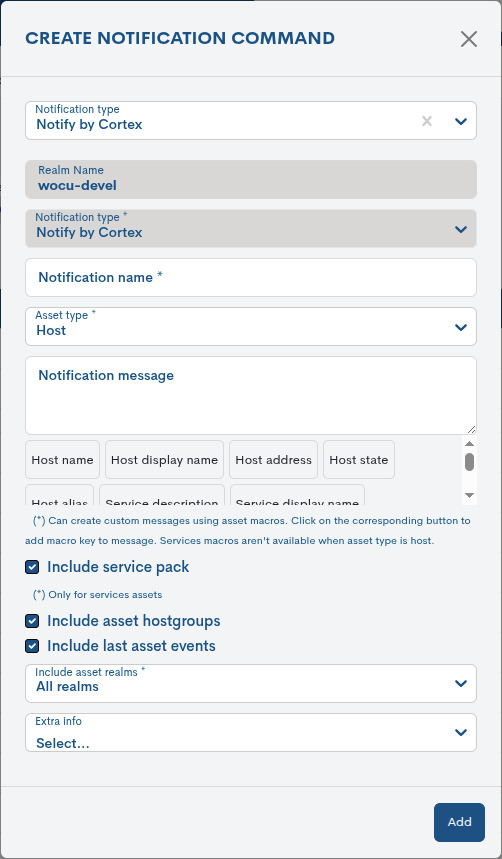
Notification Type: Indicates the chosen command model. This field is not editable.
Contact name: mandatory field to record the identifying term of the Contact.
Assets type: Mandatory field to select the type of Asset that will be subject to notifications: Devices or Services.
Notification message: Custom message to include in the notification. You can use quick actions to build a custom message with information about the asset that is the subject of the notification.
Include service pack: By checking the box, the notification will include the Monitoring Pack to which the Service that generated the alert belongs.
Include asset hostgroups: By checking the box, the notification will include the Hostgroups to which the Device or Service that generated the alert belongs.
Include last asset events: by checking this box, the notification will include a list of events recorded in the last 24 hours for the asset that triggered the alert.
Include asset realms: This selector allows you to define whether to include the Realms to which the asset that generated the alert belongs.
These options are:
None: No kingdom information will be included in the notification.
Only standard realms: Only standard realms will be included.available.
Only hostgroup realms: Only realms based on available hostgroups” will be included
All realms: All realms to which the asset belongs will be included.
Extra info: field that allows registering additional information to the notification of the asset that triggered the alert (for example, Alias, Business Impact, coordinates, etc.).
XMPP
For the Notify_by_XMPP option, the configuration attributes are the following:

Notification Type: Indicates the chosen command model. This field is not editable.
Contact name: mandatory field to record the identifying term of the Contact.
Assets type: Mandatory field to select the type of Asset that will be subject to notifications: Devices or Services.
Once you have entered the data, confirm the creation of the new element by clicking on the Create button.